Pages

Wednesday, September 25, 2013

Heartfelt Creations - Warmest Wishes


Happy Wednesday again!

Update:  Just wanted to let you all know that voting has begun at Heartfelt Creations today!  Please visit their blog to vote for your favorite top 5 designers...hopefully, I can continue on the team again!  Here's a little blurb from their Blog:

DT Semifinalists: Today we are pleased to announce the HC Design Team Semifinalists. Choosing from such great talent and diversified submissions is very difficult and we appreciate all the applicants that participated in the design team call. Without further ado, here are the semifinalists: Laurie Perry, Janelle Graham, Jenny Garlick, Lydia Tarry, Lori Williams, Doncella Sheline, Ujjwal Gupta, Caroleanne Wright, Linda Beeson, Enfys Cashmore, Joann Jamieson-Larkin, Liz Walker, Penny Weisman, Alicia Barry, Leslie Turner, Terre Fry, Sarah Miller, Lisa Fish, Penny O'Dell, Peggy Tieleman, Linda King, Karan Gerber, Stephanie Walker, Sandra Ten Wolde, Rose Lindquist
Vote for your favorite Semifinalists: We would love to have you particpate and vote your 5 favorite semi-finalists. Review each one of their blogs and then CLICK HERE to submit your vote. When you vote, you will also be entered into a drawing to be eligible to win a $50 HC Gift Certificate. You can only vote one time and you have to select 5 or more to be eligible to participate. Voting ends on October 18th, 2013
Vote for your favorite Designers: When we announce a new design team call that also means that we have a tough time deciding which of the current designers continue on the HC design team. We are giving you the opportunity to get involved and vote for 5 or more of your current favorite design team members. You can CLICK HERE and submit your vote. When you vote, you will also be entered into a drawing to be eligible to win a $50 HC Gift Certificate. You can only vote one time and you have to select 5 or more to be eligible to participate. Voting ends on April 18th, 2013.

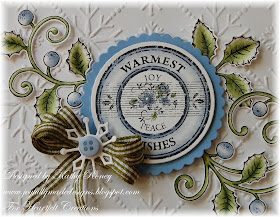
It's time for some Heartfelt Creations inspiration!  Today I have a card using the Christmas Sentiment Circles Set from the Season of Joy Collection and the Holly Berry Set and Ornamental Add On Die from the Christmas Card Collection.


I LOVE white with this beautiful blue and green color combination.  It's not your typical color sceme for Christmas, but I love the look!

Here's a little close up for you!


You can find complete instructions for my card at the end of my post. 

Be sure to visit the Heartfelt Creations Blog to all the gorgeous creations by the designers this week!

I'm submitting this to the following challenges:

Word Art Wednesday Challenge #99 - Anything Goes

Thank you for stopping by!

Blessings!

Kathy


Warmest Wishes

Heartfelt Creations Products & Products Carried by HC:
HCPC 3561 – Christmas Sentiment Circles PreCut Set
HCPC 3551 – Holly Berry PreCut Set
HCD 738 – Banner & Tree Die
HCD 738 – Ornamental Add On Die
Product ID: 159723 – Art Institute Glue –Dries Clear
Product ID: 452255 – Grand Calibur
Product ID: 368770 – Scor-Pal

Other Products Used:
Paper: Solar White (Neenah), Colonial Blue Linen (Recollections)
Ink: Onyx Black (VersaFine)
Accessories: Moss Micro Gingham (Really Reasonable Ribbon), Bow-Easy, button, Snowflake #8 Embossing Folder (Sizzix), Standard Circles Small, Large Petite Scallops (Spellbinders), adhesive pearls, mineral spirits, Prismacolor Pencils: Periwinkle, Kelp Green, Marine Green

Instructions:
Make an A-2 (4-1/4” x 5-1/2”) card base with blue.  Cut mat 4-1/16” x 5-5/16” with white and emboss with folder.  Add to base with pop dots.

Stamp branches and sentiment on Solar White with Onyx Black and color with pencils.  Die cut branches with matching die and shape leaves slightly with fingers.  Glue to card as shown.  Cut sentiment with circle die and color with pencils.  Cut blue cardstock with scallop circles die, add sentiment with pop dots, and add to card with pop dots.  Add adhesive pearl to sentiment.  Die cut small snowflake and add button to center.  Add to card with gingham bow.


Tuesday, September 24, 2013

Flourishes FTTC239 - "Build It With Dots"

Happy Tuesday everyone!

This is my last week as a guest designer for Flourishes Timeless Tuesday Challenges!  I've loved being a part of this talented group of ladies and appreciate the warm welcome they've given me!  Thank you so much ladies!

Now, on to the challenge this week which is hosted by Ally!

FTTC239 "Build it with Dots" - Create a card using dots to color your back ground &/or image.   EXAMPLE: here  Notice how the the ground is made of dots?    EXAMPLE: here  See how the leafy tree is coloured?

For my card I used the Cherry Blossoms Set.  This set has so many beautiful images that I had trouble deciding which one I wanted to use!  I finally picked this beauty which I stamped on Solar White Cardstock with Onyx Black Ink and colored with pencils.


For the challenge, I added shadows outside the image using dots!  Here's a close up so you can see it better.


The dot method doesn't work too well with pencils and I only have a handful of Copics, so why not Tombow Markers!  It worked pretty good I think.

After all my coloring was done, I trimed the image down to fit in a teal Timeless Rectangles die cut.  I then layered it with a peach (Tattered Rose) Decorative Labels 8 die cut backed with teal.  I finished this off with peach seam binding wraped around the mat, a bow with a button and floss and placed in all on a white embossed card base.  I really love the color combination of teal and peach, so pretty!

Be sure to visit all the talented designers to see their beautiful creations for the challenge this week!  Hope to see you join in the FTTC239 "Build It With Dots" Challenge this week!
 
 
Card recipe:
 
Paper: Solar White (Neenah), white, teal (Recollections), Tattered Rose Distress (Coredinations)
Ink: Onyx Black (VersaFine)
Accessories: Timeless Rectangles, Decorative Labels 8 Dies (Spellbinders), Bow-Easy, Dark Peach Seam Binding (Really Reasonable Ribbon), button, floss, Rosa Embossing Folder (Cuttlebug), Tombow Markers: Flesh #850, Coral #873, Pale Cherry #912, mineral spirits, Prismacolor Pencils: Kelp Green, Muted Turquoise, Cobalt Turquoise, Black
 
I'm submitting this to the following challenges:
 
 
Thanks for stopping by to visit!
 
Blessings!
 
Kathy

Sunday, September 22, 2013

Stocking Gift Card Holders - CottageCutz

Happy  Sunday everyone!

Today I have a couple of gift card holders for you that I made with CottageCutz's Large Confectionery Bag and the Build-A-Christmas Stocking Dies!

I have one in red and greens:


And another in red and brown:


I love this Build-A-Christmas Stocking Die, perfect to decorate the front of these...so adorable!!! 

I made these holders with trim so they can be hung on the Christmas tree for Christmas morning.  You could also put candy in them like chocolates or candy canes and hang them like an ornament.  I think they will make cute gifts!

The first holder is made with double-sided designer paper and the second is cardstock so I added a piece of red cardstock inside it before assembling.  These are super easy to make!

Here are the dies I used on these:


Project recipe:

CottageCutz Dies: Large Confectionery Bag, Build-A-Christmas Stocking
Paper: Whisper White, Real Red, Early Espresso (SU), Sugar Plums DP (Recollections)
Accessories: Red ric rack (Michaels), baker's twine (Martha Stewart), adhesive pearls, Perfect Polka Dots Embossing Folder (SU)

I'm submitting this to the following challenges:

Word Art Wednesday Challenge #98 - Anything Goes

Thanks for stopping by today!  I hope I have given you a little inspiration for Christmas this year!

Blessings!

Kathy

Wednesday, September 18, 2013

Heartfelt Creations - Striped Candy Cane

Happy Wednesday everyone!

It's time for some inspiration from Heartfelt Creations!

This week I have a card using the Striped Candy Cane Set!  I just love this set and had so much fun coloring it!


(Click on the photo for a closer view)


I stamped the candy cane image and flowers on white and colored them with my pencils.  I love this burgundy and green color combination for Christmas!  I used Labels 23 and Labels 23 Grand to die cut the image and a burgundy designer paper mat.  The flower was then shaped, assembled, and added over the flower on the candy cane image.  Then I just popped it all on an embossed card base placing it above the fold.  I love how extending it highlights the image!

Be sure to visit the HC Blog to see all the gorgeous creations by the designers this week!

I'm submitting this to the following challenges:

Word Art Wednesday Challenge #98 - Anything Goes

Thanks for stopping by to visit!

Blessings!

Kathy


Striped Candy Cane

Heartfelt Creations Products & Products Carried by HC:
HCPC 3561 – Christmas Sentiment Circles PreCut Set
HCPC 3557 – Chrismas Poinsettia PreCut Set
HCPC 3558 – Striped Candy Cane PreCut Set
HCPC1 225 – Frosty Blanket PaperCollection
HCD 734 – Sun Kissed Fleur Die
Product ID: 159223 - Paper Blossoms Molding Mat
Product ID: 459222 - Paper Blossoms Tool Kit
Product ID: 159723 – Art Institute Glue –Dries Clear
Product ID: 452255 – Grand Calibur
Product ID: 368770 – Scor-Pal

Other Products Used:
Paper: Solar White (Neenah)
Ink: Onyx Black (VersaFine), VersaMark Ink
Accessories: White Embossing Powder (SU), heat tool, Bow-Easy, Olive Wrinkled Ribbon (Really Reasonable Ribbon), Labels 23, Grand Labels 23 (Spellbinders), fibers, 1” circle punch, Snowflake #9 Embossing Folder (Sizzix), adhesive pearls (Recollections), mineral spirits, Prismacolor Pencils: Mahogany Red, Black Raspberry, Kelp Green, Marine Green

Instructions:
Make an A-2 (4-1/4” x 5-1/2”) card base with white card stock and emboss with embossing folder.  Stamp candy cane image on Solar White with Onyx Black Ink and color with pencils.  Cut with Labels 23 Die.  Cut burgundy designer paper with Grand Labels 23 and add image with pop dots.  Add to card base as shown with pop dots. 

Stamp flowers on Solar White with Onyx Black Ink.  Color 4 of the smaller flowers (refer to picture) and cut with matching die.  Shape flowers with tool kit and mat and glue together as shown.  Glue to flower on image and add pearl to center.  Stamp sentiment on light green designer paper with VersaMark and heat emboss with white embossing powder.  Cut sentiment with circle punch.  Make small hole on top and attach with fiber to make a tag.  Add bow and adhere to card placing tag underneath.  Place pop dot under tag to hold in place.  Add adhesive pearl.


Tuesday, September 17, 2013

Flourishes FTTC238 - Let It Shine

Happy Tuesday everyone!

It's time for a new Timeless Tuesday Challenge at Flourishes!  This week's challenge FTTC238 is:


 "Let It Shine" - Incorporate a light source in your card: a candle, lamp, lighthouse, the sun, or even a shiny element.---anything, as long as you "Let It Shine!".

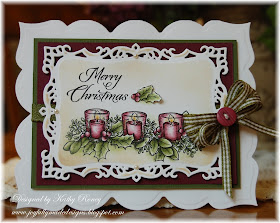
For my card, I used the Christmas Candles Set!


(Click on photo for a closer view)


I love this beautiful Christmas set!  The image and sentiment were stamped on Solar White Cardstock and colored with pencils and mineral spirits.    I also stamped, colored, and fussy cut an extra little piece of berries and holly to put next to the sentiment.  Here's a little close up of the image:


This was then die cut with Decorative Labels 8 and sponged with Wheat Chalk Ink while still in the die.  I popped this on a double mat of burgundy and green cardstock with Moss Twill wraped around it.  This was then popped on a white cardbased made the Labels 23 Grand Dies.  I finished this off with some pearls, bow made with Moss Micro Gingham Ribbon and a button with floss threaded in it.

Be sure to visit the Flourishes' Designers to see their gorgeous creations for the challenge this week!
 
 
I'm submitting this to the following challenges:

Word Art Wednesday Challenge #97 - Anything Goes

Thanks for stopping by to visit!

Blessings!

Kathy


Card Recipe:

Stamp: Christmas Candles (Flourishes)
Paper: Solar White (Neenah), white, green, burgundy (Recollections)
Ink: Onyx Black (VersaFine), Wheat (VersaMagic)
Accessories: Bow-Easy, Labels 23 Grand, Decorative Labels 8 (Spellbinders), Moss Twill, Moss Micro Gingham (Really Reasonable Ribbon), adhesive pearls (Recollections), sponge, button, white floss, mineral spirits, Prismacolor Pencils: Mahogany Red, Black Raspberry, Black, Sand, Jasmine, Kelp Green, Marine Green, and Sage Green

Thursday, September 12, 2013

CottageCutz Jolly Cardinal


Happy Thursday everyone!

Today I have a Christmas card using a new CottageCutz die called "Jolly Cardinal".  Is he cute or what?


I just LOVE birds, and cardinals are definitely one of my favorites!  As soon as I saw this little guy, I know I HAD to have it!  I love the scarf and little ear muffs, too cute!

Using the Jolly Cardinal Die, I die cut red for the body and green and white for the branch.  The remaining pieces were cut with white cardstock and colored with chalk inks. 

I used aqua for the card base and red and white for the mats.  The white mat was embossed on the upper portion only, stamped with a sentiment, distressed a little and glued to the red mat.  Then I added ribbon and popped the mat on the card base.  To finish the card I added a snowflake button and a bakers twine bow!

Here's a little close up of the Jolly Cardinal!  So cute!


Card recipe:

CottageCutz Die: Jolly Cardinal
Stamp: Merry (Recollections)
Paper: Solar White (Neenah), aqua (DCWV), Ruby Slipper (Bazzills), green (Recollections)
Ink: Onyx Black (VersaFine), Real Red (SU), Barely Banana (Powder Puffs), Vintage Photo Distress Ink (Ranger), Agean Blue (VersaMagic)
Accessories: White Gel Pen, black marker, Branches With Leaves Embossing Folder (Sizzix), bakers twine (Martha Stewart), ribbon, buttons (Michaels), distressing tool (Ranger), Bow-Easy

I'm submiting this to the following challenges:

Word Art Wednesday Challenge #97 - Anything Goes
Crafty Cardmakers #99 - Snow or Ice

Thanks for stopping by today!

Blessings!

Kathy


Wednesday, September 11, 2013

Heartfelt Creations - Season of Joy Collection

Happy Wednesday everyone!

It's time for the new release from Heartfelt Creations - The Season of Joy Collection!

The Season of Joy Collection has been put together so you can create your most elegant Christmas cards, layouts and 3D projects. Create gorgeous typography backgrounds in your favorite Christmas hues. The hand-drawn, detailed stamps provide new excitement to every Christmas project you'll create as the snow flies and the hot cocoa simmers on the stove. Feel your heart ignite with passion and excitement as you delight yourself with the Frosty Blanket Paper Collection. Match the ornate poinsetta stamp with the cutting-edge Sun Kissed Fleur die and you'll save time while creating your Christmas projects.

And for 4 weeks only, gift yourself with the whole collection and save $20 off the regular price!
With this set you can create the most elegant, delicate creations your friends and family have seen. Being a smile to your loved ones' faces. See the Season of Joy Collection here.

Win The Collection: Leave a comment on the Heartfelt Creations blog by September 17th to be eligible to win the entire collection. The winner will be announced on the blog on September 18th, so make sure you check back to see if you won.
Watch the latest video: Click Here to watch the latest videos and learn how to make a quick glittery background, dimensional Christmas Tree, and cut out 10 poinsettias at once.
 
Here is my first creation with the collection, a card using the Christmas Sentiment Circles and Christmas Poinsettia Sets and the Frosty Blanket Paper Collection..


(Click on photo for a closer view)


I love this blue and burgandy color combination for Christmas!  I used pencils to color the flower and sentiment circle to match the papers and added Night of Navy Ink for the edges and for the branch image (Elegant Joy Set) on the designer paper mat.  This would be a fairly easy card to duplicate, which I might do for some of my Christmas Cards this year!

My next project is an ornament using the Banner & Tree Die!


This little ornament was easy to put together and I really like how it came out!  I used the designer papers to cut 5 of the trees with the die and glued the sides together with a string and a bell in the middle.  Then I just decorated it with a bow, a white snowflake using the die in the set and a little poinsettia flower done the same as the flower on the card.  Another fairly easy project to make a few of for Christmas Gifts!

I hope I have given you a little inspiration for Christmas using this new collection, I had so much fun making these!  Be sure to visit the Heartfelt Creations Blog to see all the beautiful creations by the designers this week!  So many awesome projects to look at!

I'm submitting this to the following Challenges:

Word Art Wednesday #97 - Anything Goes

Thank you for stopping by!

Blessings!

Kathy


Merry Christmas Card

Heartfelt Creations Products & Products Carried by HC:
HCPC 3561 – Christmas Sentiment Circles PreCut Set
HCPC 3557 – Chrismas Poinsettia PreCut Set
HCPC 3560 – Elegant Joy PreCut Set
HCD 734 – Sun Kissed Fleur Die
HCPC1 225 – Frosty Blanket PaperCollection
Product ID: 159223 - Paper Blossoms Molding Mat
Product ID: 459222 - Paper Blossoms Tool Kit
Product ID: 159723 – Art Institute Glue –Dries Clear
Product ID: 452255 – Grand Calibur
Product ID: 368770 – Scor-Pal
Product ID: 352854 – Metal Glue Tip – Art Institute

Other Products Used:
Paper: Solar White (Neenah), white cardstock, June Berry (Coredinations)
Ink: Onyx Black (VersaFine), Night of Navy (SU)
Accessories: Standard Circles Small, Large Petite Scallops (Spellbinders), Wine Gingham 3/8” Ribbon (Really Reasonable Ribbon), Bow-Easy, button fiber, adhesive pearls, sponge, Fired Brick Distress Stickles (Ranger), mineral spirits, Prismacolor Pencils: Periwinkle, Black, Mahogany Red, Black Raspberry

Instructions:
Make an A-2 card base (4-1/4” x 5-1/2”) with white cardstock.  Cut mat with June Berry measuring 4-1/16” x 5-5/16”.   Using Frosty Blanket Paper Collection, cut mats as follows: multi colored 3-7/8” x 5-1/8” and blue designer paper 3-7/8” x 2-1/2”.  Glue blue paper to bottom of multi paper.  Stamp branch with Night of Navy Ink on lower left corner and slightly on the top right corner of the mat and ink edges.  Glue to June Berry mat, wrap piece of ribbon across and glue to card base.

Stamp sentiment on Solar White with Onyx Black Ink and color as desired.  Cut with circles die and ink edges.  Cut blue designer paper with scalloped circles die, ink edges and add sentiment with pop dots.  Add to card with pop dots.  Stamp 3 small flowers, color, shape and glue to sentiment.  Add stickles to flower centers.  Add bow, button with fiber bow and adhesive pearls.


Christmas Tree Ornament

Heartfelt Creations Products & Products Carried by HC:
HCPC 3557 – Chrismas Poinsettia PreCut Set
HCPC1 225 – Frosty Blanket PaperCollection
HCD 739 – Banner & Tree Die
HCD 734 – Sun Kissed Fleur Die
Product ID: 159223 - Paper Blossoms Molding Mat
Product ID: 459222 - Paper Blossoms Tool Kit
Product ID: 159723 – Art Institute Glue –Dries Clear
Product ID: 452255 – Grand Calibur
Product ID: 368770 – Scor-Pal
Product ID: 352854 – Metal Glue Tip – Art Institute

Other Products Used:
Paper: Solar White (Neenah)
Ink: Onyx Black (VersaFine), Night of Navy (SU)
Accessories: Silver wired string, bell, Bow-Easy, Wine 3/8” Gingham Ribbon (Really Reasonable Ribbon), Fired Brick Distress Stickles (Ranger), mineral spirits, Prismacolor Pencils: Periwinkle, Black

Instructions:
Cut 5 trees from blue designer paper with Banner & Tree Die.  Score each piece down center and crease.  Glue half a tree at a time with another half using glue and metal tip.  Before gluing last 2 sides together, add string wire for hanging and add bell to bottom.  Glue last sides together.  Add stickles as desired.  Add bow to top.

Cut snowflake from Solar White with die.  Stamp 2 smallest flowers on Solar White with Onyx Black, color, cut with Sun Kissed Fleur Die and shape.  Glue flower and snowflake together and add to bow.


Tuesday, September 10, 2013

Flourishes September Release & Timeless Tuesday Challenge


Happy Tuesday everyone!

This is my second week as a Guest Designer for Flourishes Timeless Tuesday Challenges AND today I'm lucky to also be part of their new release for September!!!

 
Holiday TopiariesWelcome to Day 2 of our fabulous September release week! Today both of our Friends of Flourishes Team and our Design Team will be showcasing a wonderful new stamp set created by our beloved artist Marcella Hawley. Marcella has packed this beautiful 4x6 stamp set called "Holiday Topiaries" with an array of beautiful holiday decorated greenery and 3 seasonal sentiments to match their holiday vibe. This sweet holiday stamp set will surely make an appearance on your homemade cards, handmade gifts, tags and more this
season! Don't forget... Mystery-Blogger-GraphicHidden among the Design Team’s blogs today is our Mystery Blogger of the day. Comment on her blog and you could be chosen to win today’s set! The more you comment, the better your chances, so comment away!

DO YOU WANT TO WIN OUR ENTIRE RELEASE?

If you would like a chance at winning all five of our soon-to-be released September sets…
  • You can play in our Get in Shape Challenge – we will have multiple winners there! Deadline for entries is FRIDAY September 13th at 5 PM EST. Check out the link for the official rules!
  • All five of our September sets can be pre-ordered now, even before you see them all! Take advantage our New Release Bundle and get 10% off when you purchase all five sets together in a bundle. This discount will be available for only 1 week following the release.
  • All sets will be live first thing Friday morning along with the coordinating cut files for this release.
  • Come back to the Flourishes Blog Saturday for the Winner’s Circle where we’ll announce all of our winners of this weeks’ challenges!

Our Timeless Tuesday Challenge this week is...

"Make a Good Impression" - Incorporate dry embossing somewhere on your card or project. It could be an embossing folder, stencils, or even a household item for your embossing....just make sure you "Make a Good Impression"! (FTTC237 
 
Here is my card for the challenge this week using this gorgeous new Christmas Set "Holiday Topiaries"!


http://flourishes.org/?cat=26


I stamped the tree image on Solar White Cardstock with Onyx Black Ink and colored it with pencils and mineral spirits.  I then fussy cut the image so I could pop it on the card base.  For my card base, I used the Lacy Squares Die and green cardstock placing the fold slightly under the top of the die.  I matted it with red cardstock and then white cardstock that is embossed with a snowflake embossing folder.
 
The sentiment I used is also from the set.  I stamped it in the same manner as the image and cut it with a circle punch.  I finished my card off with some narrow gingham ribbon, a bell and a button.
 
 
Blessings!
 
Kathy
 
 
Card recipe:
 
Paper: Solar White (Neenah), green, red (Recollections)
Ink: Onyx Black (VersaFine)
Accessories: Lacy Squares Die (Spellbinders), circle punch 1-1/2", corner rounder punch, Snowflakes #8 Embossing Folder (Sizzix), Bow-Easy, ribbon, twine, button, bell, mineral spirits, Prismacolor Pencils: French Greys, Kelp Green, Marine Green


Sunday, September 8, 2013

Homemade Christmas Gift Set Release!


Hello everyone, and Happy Sunday to you all!
It's Release DAY here at The Scrapping Cottage!
We are SUPER EXCITED about this DARLING
"Homemade Christmas Gift Set" 


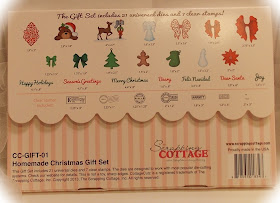
All the photo's on the front are all CottageCutz dies and the stamps mixed in. all the stamps are posted along the bottom of the back flap, so you can see them better there. We are super excited about this darling Gift Set that The Scrapping Cottage has come out with. You can find more about this super DARLING set HERE at The Scrapping Cottage!
 

CottageCutz Homemade Christmas Gift Set PRE-ORDER
www.scrappingcottage.com
Shipping End of September. Order today to reserve your Gift Set. Limited Quantities are being produced.


Here are the full views of my projects with this gorgeous set!  First, is the adorable bear die! 


I think he is just so cute and I love the way it's "sitting" on the ribbon! I cut his body, hat rim and pompom with white cardstock and colored them with inks. I used red, green and black cardstock for the remaining parts. The sentiment "Merry Christmas" is also one of the dies that I added using my Xyron Machine. The round sentiment is one of the 7 stamps in the set that I punched out with a circle punch and added a red punch out behind it.


My second project is a banner!  This is my first attempt at making a banner and boy did I have fun making it!  I may have to do these for Christmas Gifts this year!


Click on the photo for a closer view

I had trouble photoing the banner all together so I did closer ones of each side too.


All the little dies inbetween the banners would be super cute as individual ornaments or little decorations for Christmas gift packages!

To make my banner, I used O' Christmas Tree Designer Paper by Recollections, white, Robin and Basil Cardstock by Coredinations.  For the banners, I cut 5" x 4" pieces, marked with pencil 2" on the 4" side and cut corner to 2" mark on each side.  I scored the top of the banner at 1/2" and folded down which would then be the "pocket" for the jute to go through.  (Hope I'm making sense!)

So I could coordinate all the colors and patterns together nicely, I decided to make a second layer for the banners by cutting smaller ones 4" x 3", mark at 1-1/2" and cut corner to mark in the same manner as the larger one.  I glued the banners pieces together and had lots of fun with the different die shapes to decorate all the pieces and for the little pieces inbetween!  Before I assembled everything onto the jute string, I layed everything out to see what looked best where.  Once I had it the way I wanted it, I put the jute through the banner and glued the scored piece down with scor-tape making sure the banner could still be moved along the jute.  Then I just added the little pieces inbetween with twine tied in a bow.

Make sure to visit the Scrapping Cottage Blog to see all the designer's projects together and leave a comment for a chance to win a Gift Certificate at the Scrapping Cottage Store!

You can also visit the designer's Blogs and see more about their creations.

Carol - http://chocolatecraftsandbearsohmy.blogspot.com/
Vladka- http://ustvarjalnaskrinja.blogspot.com/
Olena- http://olenasplace.blogspot.com
Simona- http://papiart-simko.blogspot.com/
Cheryl- http://sweeetdesignsbycheryl.blogspot.com/
Frances- http://becreativebeyou.blogspot.com/

I'm submitting my Christmas Bear Card to the following challenges:

Word Art Wednesday Challenge #96 - Anything Goes
The Cutie Pie Challenge #52 - Cute Christmas in September
Crafty Cardmakers #99 - Snow or Ice

I'm submitting my Christmas Gift Banner to the following challenges:
Addicted to Stamps & More #61 - Anything Goes
Paper Playtime #18 - Use 3 Different Papers

Thanks for stopping by!

Blessings!

Kathy


Project recipes:

Christmas Bear

CottageCutz: Homemade Christmas Gift Set
Paper: Ruby Slipper, Rain Forest (Bazzills), Solar White (Neenah), black (Recollections)
Ink: Iced Blue (ColorBox), Vintage Photo, Antique Linen Distress (Ranger), Blue Moon (Powder Puffs)
Accessories: Tool Kit & Mat (McGill), ribbon, Bow-Easy, snowflake button, round punches 1-3/8", 1-1/2", Perfect Polka Dots (SU), Triad Leaves (Sizzix) Embossing Folders.

Christmas Gift Banner

CottageCutz: Homemade Christmas Gift Set
Paper: O' Christmas Tree (Recollections), white (DCWV), Robin, Basil (Coredinations)
Ink: Wheat (VersaMagic), Aqua Mist (Palette), Rhubarb Stalk (Momento)
Accessories: Bay Leaf Seam Binding, White Jute String (Really Reasonable Ribbon), White Twine (May Arts), Bow-Easy, 1/8" Scor-tape

Saturday, September 7, 2013

CottageCutz "Homemade Christmas Gift Set" Sneak Peek Day 2!

Happy Saturday everyone!

It's day 2 for the "Homemade Christmas Gift Set" sneak peek!  If you miss my post yesterday for Day 1, you can read all about it here!   The set has 21 universal dies and 7 clear stamps in in a cute box!!!

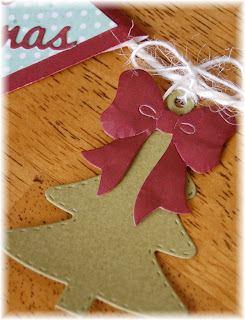
Here is my second sneak peek of the gorgeous set!


This is just one tiny little bit of my project with this set...it's actually a big project and was lots of fun to make.  I can't wait to show you!  It was one of those rare times that I had an idea in my head and it all worked out just as I visioned it!  I wish that happened more often, LOL!

For more Sneak Peeks be sure to visit the other CottageCutz DT members:

Carol - http://chocolatecraftsandbearsohmy.blogspot.com/
Vladka- http://ustvarjalnaskrinja.blogspot.com/
Olena- http://olenasplace.blogspot.com
Simona- http://papiart-simko.blogspot.com/
Cheryl- http://sweeetdesignsbycheryl.blogspot.com/
Kathy- http://www.joyfullymadedesigns.blogspot.com/
Frances- http://becreativebeyou.blogspot.com/

Also, be sure to visit the CottageCutz Blog here and leave a comment on each of the 3 days and one lucky winner will be picked to receive a Gift Certificate to spend at the Scrapping Cottage!

Thank you for joining us today for Sneak Peek Day 2 with the CottageCutz DT. Please be sure to join us tomorrow, Sunday, for the big reveal!!!

Blessings!

Kathy

Friday, September 6, 2013

CottageCutz "Homemade Christmas Gift Set" Sneak Peek Day 1!


Happy Friday everyone!

Welcome to CottageCutz by The Scrapping Cottage Sneak Peek Day 1 of the new "Homemade Christmas Gift Set"!  We will be showing you sneak peeks of this gorgeous set today and tomorrow and then the entire set will be released on Sunday, September 8th! 

We are super EXCITED to share these little peeks with you using some of the CottageCutz dies and stamps from "Homemade Christmas Gift Set".  The set has 21 universal dies and 7 clear stamps in in a cute box!!!  I just LOVE this set, so many dies and stamps to choose from!  It was hard to pick just one, but here is my sneak peek for you...isn't it adorable?


For more Sneak Peeks be sure to visit the other CottageCutz DT members:

Carol - http://chocolatecraftsandbearsohmy.blogspot.com/
Vladka- http://ustvarjalnaskrinja.blogspot.com/
Olena- http://olenasplace.blogspot.com
Simona- http://papiart-simko.blogspot.com/
Cheryl- http://sweeetdesignsbycheryl.blogspot.com/
Kathy- http://www.joyfullymadedesigns.blogspot.com/
Frances- http://becreativebeyou.blogspot.com/


Also, be sure to visit the CottageCutz Blog here and leave a comment on each of the 3 days and one lucky winner will be picked to receive a Gift Certificate to spend at the Scrapping Cottage!

Thank you for joining us today for Sneak Peek Day 1 with the CottageCutz DT. Please be sure to join us tomorrow Saturday the 7th of September for more Sneak Peeks!
 

Blessings!

Kathy


Wednesday, September 4, 2013

Heartfelt Creations - Christmas Song

Happy Wednesday everyone!

It's time for some inspiration from Heartfelt Creations!  This week I have another Christmas card for you this time using the Christmas Song Set.


I love this scroll and poinsettia image, so pretty!  I colored it with pencils and mineral spirits and matted it with green and burgandy cardstock to highlight it.  I love using lots of white sometimes to really let the image stand out.  For this one, I just using a white card base embossed with a snowflake folder and added some burgandy seam binding.  Super simple card, but I love how it came out!

Be sure to visit the Heartfelt Creations Blog to see everyone's beautiful creations this week!  Also, if you're interested in designer for HC, there is a Design Team Call going on right now!  Now is your chance!

I'm submitting this to the following challenges:

Word Art Wednesday Challenge #96

Blessings!

Kathy


Christmas Song

Heartfelt Creations Products & Products Carried by HC:
HCPC 3556 – Christmas Song PreCut Set

Other Products Used:
Paper: Solar White (Neenah), Whisper White (SU), green (Recollections), June Berry (Coredinations)
Ink: Onyx Black (VersaFine)
Accessories: Bordeaux Wine Seam Binding (Really Reasonable Ribbon), Bow-Easy, Adhesive Pearls, Snowflakes #8 Embossing Folder (Sizzix), mineral spirits, Prismacolor Pencils: Ginger Root, Sandbar Brown, Espresso, Dark Brown, Kelp Green, Marine Green, Mahogany Red, Black Raspberry, Black

Instructions:
Make 4-1/4” x 5-1/5” card base with Whisper White Cardstock and emboss front with folder.  Wrap ribbon around base.  Stamp image and sentiment on Solar White with Onyx Black Ink and color with pencils.  Trim image into a rectangle shape as shown and add green and June Berry mats measuring 3/16” larger than the image.  Glue together and add to card base with pop dots.  Add adhesive pearls and bow.