Pages

Wednesday, February 26, 2014

Heartfelt Creations - Vintage Closet Collage

Happy Wednesday everyone!

It's time for some Heartfelt Creations inspiration!  For my card today, I used the beautiful Vintage Closet Collage Set from the Raindrops on Roses Collection released this month.


The image is colored with Prismacolor Pencils and mineral spirits using the colors from the designer papers in the collection.  After trimming the image, distressing and inking the edges, I added 2 Burnished Keys, various fibers, pearls, microbeads and spacer beads for embellishments.

Be sure to visit the HC Blog to see all the beautiful creations by the designers this week!

I'm submitting this to the following challenges:

Word Art Wednesday Challenge #121 - Anything Goes

Thanks for stopping by to visit!

Blessings!

Kathy


Vintage Closet Collage

Heartfelt Creations Products and Products Carried by HC:

HCPC 3588 - Vintage Closet Collage PreCut Set
HCPC 3569 - Burnished Key PreCut Set
HCD 741 - Burnished Key Die
159723 - Art Institute Glue - Dries Clear
452255 - Grand Calibur
368770 - Scor-Pal

Other Products:

Paper: Solar White (Neenah), Perfect Plum (SU), Crushed Olive Distressed (Coredinations)
Inks: Onyx Black (VersaFine), Antique Linen, Vintage Photo Distress (Ranger)
Accessories: Aleene's Paper Glaze, Heather Microbeads (Recollections), fibers, adhesive pearls (Want-2-Scrap), bead spacer, Linen Thread (SU), distressing tool, Bow-Easy, mineral spirits, Prismacolor Pencils: Rose Beige, Clay Rose, Black Cherry, Kelp Green, Marine Green, Black, Sepia, Espresso, Ginger Root, Sandbar Brown.

Instructions: Make 5 1/2" x 4 1/4" top fold card base with Crushed Olive.  Cut mat with Perfect Plum measuring 4 1/16" x 5 5/16" and add to base with pop dots.  Stamp Vintage Close Collage image on Solar White with Onyx Black Ink and color with pencils as desired.  Distress edges and ink with Antique Linen, then with Vintage Photo Inks.  Add to mat with pop dots.  Stamp Burnished Key image on Solar White with Onyx Black Ink, color 2 of the keys and cut with matching die.  Tie keys together with Linen Thread and add to image with pop dots.  Add bead spacer with pearl to top of keys.  Add microbeads to blanket sparingly using Art Institute Glue.  Add Linen Thread bow with pearl to dress form as shown.  Add fiber bow to top of flower cluster adding bead spacer, pearl, and microbeads to the center.

Saturday, February 22, 2014

Love You Much - CottageCutz

Happy Saturday!

Today I have a card to show you using 3 CottageCutz Dies from The Scrapping Cottage.  The Garden Delight Butterflies (from the new Garden Delight release), Scallop Insert Card/Tag, and Pink Peony Flower.


All the die pieces were cut with white card stock.  I colored the flower using Pink Grapefruit, Aloe Vera Chalk Inks (VersaMagic) and Amaretto Chalk Ink (PowderPuffs).  The pieces were shaped using a tool kit and mat and then glued together.  I added the flower to a tag that I stamped with a sentiment using black ink.  I used a "Love You Much" sentiment, but I think this would be a pretty wedding card too.

I originally  started this as just a tag, but then decided to place it on an embossed card using pop dots.  I kind of like the way it looks!  The card base is white and then the embossed piece is 3/16" smaller and added with pop dots.  After glueing everything in place, I added some Diamond Stickles, White Opal Liquid Pearls, a button, and some pearl floss.

These are the dies I used:


Card recipe:

CottageCutz Dies: Garden Delight Butterflies, Scallop Insert Card/Tag, Pink Peony Flower
Stamps: Well Scripted (SU)
Paper: White (Recollections)
Ink: Onyx Black (VersaFine), Aloe Vera, Pink Grapefruit (VersaMagic), Amaretto (PowderPuffs)
Accessories: Scrolls Embossing Folder (Darice), white pearl floss, button, White Opal Liquid Pearls, Diamond Stickles (Ranger), Paper Blossoms Molding Mat & Tool Kit (McGill)

I'm submitting this to the following challenges:

Word Art Wednesday Challenge #120 - Anything Goes.

Thanks for stopping by to visit!

Blessings!

Kathy


Wednesday, February 19, 2014

Raindrops on Roses Scrapbook Page Holder

Happy Wednesday everyone!

I have a fun project today using the beautiful Raindrops on Roses Collection from Heartfelt Creations!  I bought this 6" x 6" Scrapbook Page Holder at Michaels and thought it would be perfect for the 6" x 6" designer paper blocks in the collection!

Here is the holder showing the cover decorated with lace, ribbon bows, and pearls.  I used the beautiful Raindrops on Rosettes image and Raindrops on Roses Die behind it for the front cover.


Here is a close up of the image that I stamped on Solar White Card stock and colored with pencils and mineral spirits.  It's been a very long time since I colored images with skin and I'm definitely out of practice!


 I just love the beautiful colors of these designer papers and tried to color the image to match.  You can see the two new dies behind the image, a green oval shaped lacy die and then two of the other die cut with white.  These dies are so beautiful and have so many possibilities to create with!

These are photos of the individual pages I made with the designer papers.  Each is different and made with the card fronts, tags, and journals blocks from the papers.  Very quick and easy to put together!  You can always add embellishments after adding your photos!


Be sure to visit the HC Blog today to see what the designers have for you!

I'm submitting this to the Word Art Wednesday Challenge #120 - Anything Goes

Thanks for stopping by today!

Blessings!

Kathy


Scrapbook Page Holder

Heartfelt Creations Products and Products Carried by HC:

HCPC 3585 - Raindrops on Rosettes PreCut Set
HCDP1 240 - Raindrops on Roses Paper Collection
HCD 743 - Raindrops on Roses Die
452255 - Grand Calibur
368770 - Scor-Pal

Other Products:
Paper: Solar White (Neenah), Crushed Olive Distressed (Coredinations), cream (Recollections)
Inks: Onyx Black (VersaFine), Wheat (VersaMagic)
Accessories: 6" x 6" Scrapbook Page Holder (Recollections), adhesive pearls (Want-2-Scrap), White Silk Ribbon (May Arts), button, trims (Jo-Ann's), Ivory Jute String (May Arts), brad, Bow-Easy, Standard Circles Large (Spellbinders), mineral spirits, Prismacolor Pencils: Cream, Light Peach, Pink Rose, Jasmine, Deco Pink, Blush Pink, Black Cherry, Rosy Beige, Clay Rose, Goldenrod, Yellow Ochre, Chocolate, Kelp Green, Marine Green, Sepia, Espresso

Instructions: For front cover, stamp face image on Solar White with Onyx Black Ink and color with pencils.  Die cut with circles die and ink with Wheat Ink.  With Crushed Olive card stock, die cut oval flourish from Raindrops on Roses Die.  Add image to die cut with pop dots and glue to journal block from designer paper.  Die cut 2 large flourishes from the Raindrops on Roses Die with white card stock.  Glue to 6" x 6" block as shown with image.  Trim 2 tags from designer paper and add as shown with pop dots and glue dots.  Add an adhesive pearl to top of tags.  Add trims and bows to top of the page protector.  Add large bow to base with glue dots.  Add large pearl button to center of bow.  Use 6" x 6" designer papers for the scrapbook pages and decorate with card fronts, journal blocks, and sentiments.


Friday, February 14, 2014

Craft Ideas Publication


Happy Friday everyone!

Just a quick post to show you a project I made for Heartfelt Creations that has been published in the Spring issue of Craft Ideas (formerly Crafts 'n Things)!  You can find it on pages 52 & 53 with and complete instructions on how I made it.  Here are some of my own photos I took of it.

The front and side.


The back and other side.


A closer look at the "nest".


Blessings!

Kathy


Wednesday, February 12, 2014

Raindrops on Rose Window


Happy Wednesday everyone!

We are pleased to introduce the Raindrops on Roses Collection.
The decorative and intricacy of this die will enable you to create frames, borders, and endless opportunities for layering with your favorite images. Pick up the classic image stamps to create a stunning masterpiece. These background, accents and sentiment stamps will add a delightful classic touch to every project you create.
The Raindrops on Roses paper pack is loaded with saturated greens and purples and sprinkled with colorful clusters of roses. Card panels, 6x6 sheets, colored tags and journaling blocks will add the finishing touches to your projects.
Leave a comment on the Heartfelt Creations blog by February 18th to be entered to win the entire collection valued at $175.93.

I just LOVE this new collection!  I love the beautiful images and the designer papers are just stunning!  The colors are so soft and feminine...I had a really hard time cutting these papers for sure!

For this week's project, I made a card with the Raindrops on Roses Window PreCut Set.  I colored the image with pencils trying to match the designer papers and then fussy cut it.  The background mat is some of the designer paper.  The white lacy piece behind the image is one of the gorgeous new dies with the collection, The Raindrops on Rose Die.  There are two beautiful dies, this one is a circle medallion.  There are lots of possibilities with these dies as you can see on the HC Blog.  I have a feeling I'll be using these dies a LOT!


(Click on photo for a close up)

I added some lace and trim across the mat for the window to "sit" on.  The 2 tags are trimmed from the designer paper and added with pop dots and glue dots.  I added a white silk bow and some adhesive pearls to complete this.

Be sure to visit the HC Blog to see all the gorgeous creations by the designers this week!  What a talented bunch of ladies they are!  Make sure to leave a comment there too for a chance to win the release!

I'm submitting this to the following challenges:

Word Art Wednesday Challenge #119 - Anything Goes
Craft Hoarders Anonymous #1 - What's Your Style - lots of coloring and pinks/greens...

Thank you for visiting with me today!

Blessings!

Kathy


Raindrops on Roses Window

Heartfelt Creations Products and Products Carried by HC:

HCPC 3587 - Raindrops on Roses Window PreCut Set
HCDP1 240 - Raindrops on Roses Paper Collection
HCD 743 - Raindrops on Roses Die
452255 - Grand Calibur
368770 - Scor-Pal
159723 - Art Institute Glue - Dries Clear

Other Products:

Paper: Solar White (Neenah), Pale Plum (SU), white Cardstock
Inks: Onyx Black (VersaFine), Spring Pansy (VersaMagic)
Accessories: Trim, lace (Jo-Ann's), White Silk ribbon (May Arts), Bow-Easy, adhesive pearls (Want-2-Scrap), mineral spirits, Prismacolor Pencils: Cream, Jasmine, Goldenrod, Chocolate, Sepia, Espresso, Black, Kelp Green, Marine Green, Pale Sage, Black Cherry, Rosy Beige, Clay Rose.

Instructions: Make 5 1/2" x 5 1/2" card base with white card stock.  Cut designer paper for background measuring 5 1/8" x 5 1/8" and ink edges with Spring Pansy.  Cut mat 5 5/16" x 5 5/16" using Pale Plum and add to card using pop dots.  Adhere lace and trim across card as shown using Scor-Tape.  Stamp window image on Solar White with Onyx Black Ink and color with pencils.  Fussy cut image and ink edges with black.  Die cut oval from Raindrops on Roses Die with white card stock.  Trim off lower right portion of oval die cut and add remainder as shown to card base.  Add image over it with pop dots.  Add bow and adhesive pearl.  Trim tags from designer paper, ink edges with Spring Pansy and add to card as shown.  Add adhesive pearl to tag.

Baby Congratulations

Hi everyone!

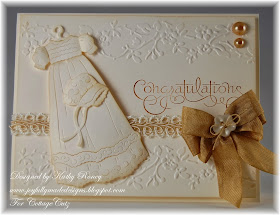
I'm back again today with another card using CottageCutz Dies from the Scrapping Cottage.  This time I have a congratulations card for a new baby using the Christening Gown and Clothes Hanger Mini Dies.


I decide to make a cream on cream card using Natural White card stock from Neenah for all the card pieces.  The die cut pieces and mat were inked with Wheat (VersaMagic) and Vintage Photo Distress Inks.  The mat was embossed with the Rosa border embossing folder and the sentiment (Well Scripted - Stampin' Up) was stamped with Vintage Photo Ink.  I wrapped some pretty trim (Jo-Ann's) around the card and added a bow using Havana Brown Seam Binding from Really Reasonable Ribbon and my Bow-Easy Tool.

The mini hanger was glued to the back of the dress and the dress was added to the card using pop dots.   I also add the bonnet to the dress using pop dots.  Here's a little close up of the pretty dress and bonnet.


To finish my, card I added some adhesive pearls and a flower button with a fiber bow in it.  Very simple card to make and I love the vintage feel to it!

These are the dies I used:


Card recipe:

Stamps: Well Scripted (SU)
Paper: Natural White (Neenah)
Ink: Wheat (VersaMagic), Vintage Photo Distress Ink (Ranger)
Accessories: Rosa Embossing Folder (Cuttlebug), Havana Brown Seam Binding (Really Reasonble Ribbon), Bow-Easy, lace trim (Jo-Ann's), fiber, button, adhesive pearls (Recollections), McGill Tool Kit & Mat

I'm submitting this to the following challenges:

Word Art Wednesday Challenge #119 - Anything Goes
Craft Hoarders Anonymous #1 - What's Your Style? - I love cream on cream with lace & bows...

Thanks for stopping by today to visit!

Blessings!

Kathy

Tuesday, February 11, 2014

Sweet Filigree Cupcake

Hi everyone!

Today I have a "sweet" birthday card using CottageCutz Dies from The Scrapping Cottage.  I used the Sweet Filigree Cupcake Die from the Sweet Love Release and paired it with the Cupcake Pocket with Note Card Die!


For my card, I used the Sweet Mat Stack papers from DCWV and a white card base.  Notice my cupcakes are chocolate...my favorite kind!  I added a little Diamond Stickles to the "frosting" on the cupcakes to make them look even yummier.  The sentiment is stamped with brown ink using Teeny Tiny Wishes from Stampin' Up.  I added a little brown twine bow and some buttons to finish it off.

Here's a picture of the cupcake card outside it's pocket.  You can write a little note on it or stamp it.  You can also glue it in the pocket to keep it in place.


Here are the dies I used:

http://www.scrappingcottage.com/cottagecutzsweetfiligreecupcakeelites.aspx


Card recipe:

Stamps: Teeny Tiny Wishes (SU)
Paper: White (Recollections), Sweet Mat Stack (DCWV)
Ink: Dark Chocolate (Palette), Mocha Mama (Powder Puffs)
Accessories: Twine, Bow-Easy, buttons, Diamond Stickles (Ranger)

I'm submitting this to the following challenges:


Thanks for stopping by today to visit!

Blessings!

Kathy

Wednesday, February 5, 2014

Sheltering Tree - Heartfelt Creations & The Robin's Nest

Happy Wednesday everyone!

It's time for some Heartfelt Creations inspiration!  HC is also doing a blog hop with The Robin's Nest which gave us a chance to use some of their wonderful products on our designs this week!


For my card, I used the Majestic Morning Paper Collection (yellow) with black card stock.  The mat is stamped with the Majestic Collage PreCut Set in black ink.  The image on top is one of the journal blocks from the designer paper.  The tree and quote are rubons from The Robin's Nest called Family Tree Rubons.   I just love that tree!

To complete the card I just added some trim, bow, and button.  Very simple card to put together!  I really like the yellow and black with the pop of pink too!

Be sure to visit the HC Blog to see all the beautiful creations by the designers this week and also make sure to check out the blog hop for The Robin's Nest!

I'm submitting this to the following challenges:

Word Art Wednesday Challenge #118 - Anything Goes

Thanks for stopping by!

Blessings!

Kathy


Sheltering Tree

Heartfelt Creations Products and Products Carried by HC:

HCPC 3579 - Majestic Collage PreCut Set
HCDP1 239 - Majestic Morning Paper Collection
452255 - Grand Calibur
368770 - Scor-Pal
159723 - Art Institute Glue - Dries Clear
DDOTS - Double Dots

Other Products: Black card stock, Family Tree Rubons (The Robin's Nest), Pink Aster Seam Binding (Really Reasonable Ribbon), Bow-Easy, button, Ivory Jute String (May Arts), black trim (Jo-Ann's)

Instructions: Make black card base measuring 4 1/4" x 5 1/2".  Cut yellow designer paper 4 1/16" x 5 5/16", stamp Majestic Collage image with black ink twice to cover it, and ink edges.  Wrap trim across center of yellow mat and secure to back.  Add to card base with Double Dots.  Cut yellow journal block from designer paper and apply the Family Tree Rubons as shown.  Ink edges with black.  Cut black card stock 3 1/4" x 3 7/8" and glue journal block to it.  Add to card base with Double Dots.  Add bow and button with jute string as shown.

Sunday, February 2, 2014

Sweetheart Lovebirds

Happy Sunday everyone!

Today I have a darling Valentine's Day card for you using the Sweetheart Lovebirds CottageCutz Die from The Scrapping Cottage!


Aren't these little guys adorable?  I think they are the cutest thing!

To make my card, I cut all the die pieces with white card stock and colored them with chalk inks and make up applicators.  The colors I used are Perfect Plumeria, Thatched Straw, Aloe Vera (VersaMagic), and Mocha Mama (Powder Puffs).  I also shaped some of the pieces a little with my McGill Tool Kit & Mat.  Here's a close up for you.


I used a white card base and added a white mat embossed with the Framed Tulips Embossing Folder (SU).  The sentiment (Teeny Tiny Wishes - SU) is stamped with black ink.  I made the bow with Cotton Candy Baker's Twine (Really Reasonable Ribbon) and my Bow-Easy.  I glued one of the little flowers from the die on the bow center.  Then I added some adhesive pearls to finish!

Here is the die I used:


I'm submitting this to the Word Art Wednesday Challenge #117 - Anything Goes.

Thank you for stopping by today!

Blessings!

Kathy