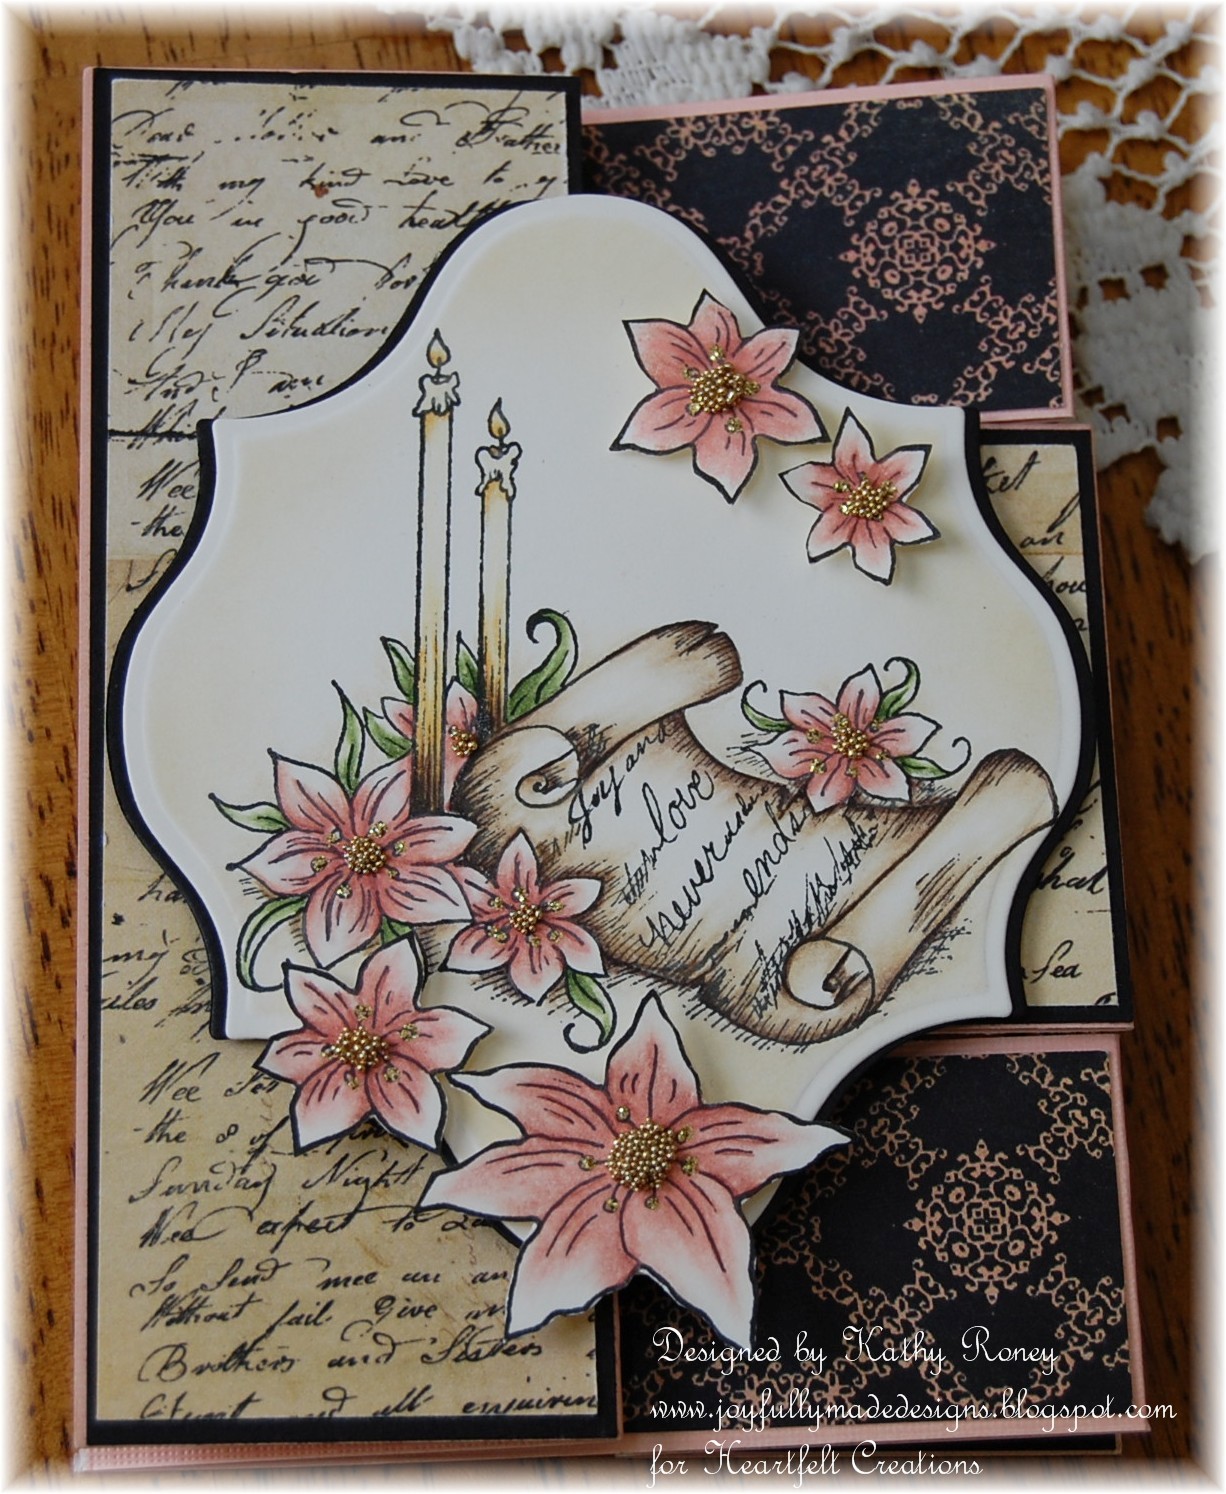
Be Joyful

Rejoice in the Lord always. Again I will say, rejoice! Let your gentleness be known to all men. The Lord is at hand. Be anxious for nothing, but in EVERYTHING by prayer and supplication, with thanksgiving, let your requests be made known to God; and the PEACE OF GOD, which surpasses all understanding, will guard your hearts and minds through Christ Jesus. Philippians 4:4-7

These are verses I memorized years ago and they are written on my heart. There are times when I still need to remember not to be anxious, but I eventually listen to my heart saying these verses. I didn't really understand what the "peace of God" was until I experienced it. It's having peace inside you, even when you're going through heartbreaking situations and trials. It does "surpass ALL understanding" and you know it comes from GOD alone. Praise the Lord for His wonderful promises!


I love, love, love what I do. I am passionate about the things I create and the talents God has placed in me. I SO appreciate the time you take to look at my things and the comments you all leave me!

Blessings to you!

Kathy

Wednesday, May 23, 2012

Inspiration Wednesday with Heartfelt Creations

Happy Wednesday!

It's time to show you more inspiration using Heartfelt Creations' Stamps and dies!


I'm using another set from the gorgeous English Garden Collection released this month.  (I knew from the name alone that I would love this collection!)  For this card, I used the Broken Cinder Blocks Set for the main image and the background.  I colored the image with Prismacolor Pencils and mineral spirits.  The background is designer paper with a "wethered" look, then stamped with the background stamp from the set.  The flower on the top right is made with the Tattered Blossom Set and the matching dies and was also colored with my pencils.  The leaves are from the Distressed Leaves Set from a previous release.

Here is the complete list of ingredients used and instructions:

Heartfelt Creations Products & Products Carried by HC:
HCPC 3468 –Tattered Blossoms PreCut Set
HCPD –Broken Cinder Blocks PreCut Set
HCPC 3474 –Heartfelt Expressions PreCut Set
HCPC – 3376Distressed Leaves PreCut Set
HCD 722 –Tattered Blossoms Die
Product ID:159723 – Art Institute Glue – Dries Clear
Product ID:159223 - Paper Blossoms Molding Mat
Product ID:459222 - Paper Blossoms Tool Kit
Product ID:9brn – Brown Gala Glitz

Other Products:
Paper: Olive cardstock ( ANW Crestwood), Roam Designer Paper (K & Co.),  Serendipity Wish (The Paper Loft), Solar White (Neenah)
Ink: Onyx Black, Vintage Sepia (VersaFine)
Accessories: Et Cetera Brads (Bo Bunny), Antique Gold Velvet Ribbon (Really Reasonable Ribbon), Sookwang or Scoretape 1/8” double sided adhesive tape, glue dots, sponge, pop dots (Recollections), scissors, mineral spirits, black Copic liner pen, Prismacolor Pencils: (Chestnut, Tuscan Red, Ginger Root, Sandbar Brown, Burnt Ochre, Terra Cotta, Jasmine, Goldenrod, Kelp Green, Marine Green, Prussian Green, Steel, Metallic Silver, Light Umber, Chocolate, Dark Brown)

Instructions:  Cut green cardstock 5 ½” x 8 ½”, score and fold at 4 ¼” for card base.  Cut piece Wish paper (it’s double sided with red/oyster) 5 3/8” x 4 1/8”.  Cut at 1 ¾” across, turn one piece over and tape on back with both colors showing for your mat as shown.  Stamp mat with Vintage Sepia Ink using  Broken Cinder Block background stamp all over, leaving area for sentiment with a lighter application (see note).  Ink edges with Vintage Sepia, adhere ribbon down cut line using Sookwang/Scortape.  Stamp sentiment from Heartfelt Expressions Set on the bottom right of mat.  Note: I traced liner pen over the words “have a” and “day” to darken the print a little.  Ink edges of card base with Vintage Sepia, add 2 brads on top left, and adhere mat to base. 

Stamp image from Broken Cinder Blocks Set with Onyx Black Ink on Solar White Paper and color with pencils.  Trim image as shown, Ink edges with Vintage Sepia, and add Gala Glitz to flower centers using Art Institute Glue.  Stamp flowers from Tattered Blossoms Set with Onyx Black Ink on Solar White paper, doing 1 each on the 3 smallest flowers.  Color with pencils, mold their shape with Tool Kit and Mat till pleasing, and add Gala Glitz to centers with Art Institute Glue.  Glue the 3 flowers together with glue dots and adhere to top right of card with pop dots.  Stamp 6 of the smallest flowers from the Distressed Leaves Stamp Set with Onyx Black Ink onto the green designer paper from the Roam Collection.  Cut with scissors (or the match die Nested Leaves Nestabilities Product ID: 472117).  Shape with Tool Kit and glue with pop dots as shown.
Please visit the Heartfelt Creations Blog to see all the creations the designers have for you this week! They're all so gorgeous!!!

I'm also submitting this to the latest Stampin' Sister's in Christ Challenge #140 to:

Build up your card: by adding layers, paper tole, paper piecing, stacking flowers...you name it!!

This is a wonderful theme for the Scripture this week reminding us to "build" eachother up:

Ephesians 4:29 "Do not let any unwholesome talk come out of your mouths, but only what is helpful for building others up according to their needs, that it may benefit those who listen."

Blessings!
Kathy

Saturday, May 19, 2012

ODBDSLC109 - Sketch Challenge

Happy Saturday everyone!

It's time for a new Shining the Light Challenge at Our Daily Bread Designs!

This week's challenge:
is a sketch!!!


To make the challenge even more fun, we will be giving out a prize, a $15 gift certificate to be used toward stamps at the Our Daily Bread Designs store!! Entries for the prize must be submitted by Friday, May 25th at 8 a.m. EST. One random winner will be chosen and announced next Saturday.

While it is not required to use Our Daily Bread Designs images and sentiments on your creations, we would love to see them if you have them. As a way of recognizing those who do use Our Daily Bread Designs stamps, we will again be choosing three or more of our participants for the Shining the Light Award . In order to qualify for this award or join the challenge, however, you must use Our Daily Bread stamps and have your submission added to Mr. Linky by Friday, May 25th at 8 a.m. EST. If you upload your creations to Splitcoast Stampers or any other online gallery, please use the keyword is ODBDSLC109. When creating your posts on blogs please include a link to the challenge.
Here is my take on the challenge this week!  I really love this sketch!  I think I'll be using this one again!


I used the Dreams Stamp Set for the quote and the bird, which was just released this month  The flourish below the quote is from  Flourished Verses Stamp Set recently released.  The Dreams Set is perfect for Gratuation cards and projects.
For ingredients used:
Stamps: Dreams, Flourished Verses (ODBD)
Paper: Little Black Dress (Basic Grey), Basic Grey (SU)
Ink: Onyx Black (VersaFine)
Accessories: Piercer, lace (RAK), Paper Lace II Embossing Folder (Cuttlebug), flower (Recollections), adhesive pearls (Want-2-Scrap), Medium Branch Punch (Martha Stewart), Elegant Ovals Die (ODBD/Spellbinders), Labels 18 Die (Spellbinders)
For more inspiration on the ODBD Challenge this week,  please visit the other ladies and see their gorgeous creations!  You can also see them all together here on the ODBD Blog!
Hope you are able to join in on the challenge this week!

I'm also submitting this to the latest Stampin' Sisters in Christ Challenge to use any type of animal, bird, or bug.   Also, Word Art Wednesday Challenge #28 using Scripture or an uplifting quote or sentiment.  Lastly, Basic Grey Challenge #68 - Anything Goes.
Blessings!  Kathy

Wednesday, May 16, 2012

Wednesday Inspiration With Heartfelt Creations

Hi there!

It's time for some inspiration with Heartfelt Creations!   Each Wednesday I will be showing you my creations I've made using HC's stamps!  For this week, I've created a card using more of the English Garden Collection released last week.  The main image on the front is from the Tattered Collage Set.  This is the front...


Here's the inside of the card...


This stamp is so beautiful, and it allowed me to die cut some of the flowers to add dimension to it.  The verse within the image is Romans 8:28, a beautiful verse!  I'm submitting this to the Little Birdie Blessings Scripture Thursday Challenge #28, a wonderful site to show your creations that use Scripture on them.  Also, Word Art Wednesday Challenge # 28 using Scripture and an uplifting message on your creation.

Here are the details for the products I used, along with the intructions.

Tattered Blossom Collage
HCPC 3468 –Tattered Blossoms PreCut Set
HCPC 3471 –Tattered Collage PreCut Set
HCPC 3474 –Heartfelt Expressions PreCut Set
HCD 722 –Tattered Blossoms Die
Product ID:159723 – Art Institute Glue – Dries Clear
Product ID:415217 – Spellbinders Fancy Tags Die
Product ID:159223 - Paper Blossoms Molding Mat
Product ID:459222 - Paper Blossoms Tool Kit

Other Products:
Paper: Solar White (Neenah), White card base (Georgia Pacific), melon (Cardstock Stacks – Brights DCWV)
Ink: Onyx Black (VersaFine), Pink Martini Powder Puffs (Shop Quick Quotes)
Accessories: Peridot Micro Beads (Martha Stewart), Adhesive Pearls (Want-2-Scrap), Bow-Easy, Melon Seam Binding (Really Reasonable Ribbon), Prismacolor Pencils – Carmine Red, Crimson Red, Olive Green.

Instructions: Cut a piece of white cardstock 9¼” x 5⅜” and score at 4 ⅝”.  Cut 2 melon cardstock mats: 5¼” x 4½”.  Stamp Tattered Collage image onto Solar White paper and cut down to 5⅛” x 4⅜”.  Color with pencils and ink edges with Pink Martini Chalk Ink.  Stamp Tattered Blossoms onto Solar White; 3 smallest flowers, 2 second smallest, and 2 third smallest images.  Color with pencils and shape petals using mat and tool kit.  Glue beads to centers of flowers.   Add 3 smallest and 1 third smallest to collage image as shown with pop dots.  Make bow and, glue to Collage image, and glue 1 second smallest flower to bow.  Add 2 adhesive pearls on top right of card.  For inside of card, glue the second melon mat.  Stamp sentiment on Solar White paper and cut out with Fancy Tag Die.  Glue sentiment to mat and then glue the remaining 2 flowers.
I hope this inspires you!  Please visit the other DT Members for their beautiful creations!

Blessings!

Kathy

Tuesday, May 15, 2012

Alter It - Elphine House Australia

Hi there!

It's time for a new challenge at Elphine House Australia!  This week's challenge is: 

  “Alter It”Alter ANY item, and incorporate your favorite Elisabeth Bell design in it.


Use ANY Elisabeth Bell Design in order to qualify for
any 2 stamps of your choice from
Elphine House Australia.

For my project, I altered a spiral journal notebook I bought at Michaels for a couple of dollars.  The stamp I used is another brand new one from EHA called "Carrie On the Swing".  I LOVE this one!  She's so adorable with that cute little face!  I thought this would be a great gift for a young girl and you could add a matching pen to go with it!


I colored Carrie with Prismacolor Pencils and mineral spirits and sponged around the bottom part of the image while inside the die.

For ingredients used:

Stamp: Carrie On the Swing (EHA)
Paper: The Garden Party Stack (DCWV), Solar White (Neenah), Lavender Lace (SU)
Ink: Onyx Black (VersaFine), Certainly Celery (SU)
Accessories: Paid ribbon (Jo-Anns), Moss Seam Binding (Really Reasonable Ribbon), lace trim (RAK), flowers (Recollections & Offray), adhesive pearls (Want2Scrap), rhinestone flower (Michaels), Floral Ovals Nesties, Classic Petals & Classic Decorative Inserts Four Edgeabilities (Spellbinders), Spiral Punch (SU), Fanciful Flourish (Cheery Lynn), stamens (Michaels), Prismacolor Pencils, mineral spirits, Bow-Easy, black marker (SU), sponge, Mod Podge, foam brush, sand paper, journal (Michaels)

How you can join in on the challenge this next 2 weeks!

Blessings!

Kathy

Saturday, May 12, 2012

ODBDSLC108 - Inspiration Photo

Happy Saturday everyone!

It's time for a new Shining the Light Challenge at Our Daily Bread Designs!

This week's challenge:
Tomorrow is Mother's Day- since most have already made cards for their moms, we want you to use one of the photos to inspire your creation. Please let us know what number you used.


To make the challenge even more fun, we will be giving out a prize, a $15 gift certificate to be used toward stamps at the Our Daily Bread Designs store!! Entries for the prize must be submitted by Friday, May 18th at 8 a.m. EST. One random winner will be chosen and announced next Saturday.

While it is not required to use Our Daily Bread Designs images and sentiments on your creations, we would love to see them if you have them. As a way of recognizing those who do use Our Daily Bread Designs stamps, we will again be choosing three or more of our participants for the Shining the Light Award . In order to qualify for this award or join the challenge, however, you must use Our Daily Bread stamps and have your submission added to Mr. Linky by Friday, May 18th at 8 a.m. EST. If you upload your creations to Splitcoast Stampers or any other online gallery, please use the keyword is ODBDSLC108. When creating your posts on blogs please include a link to the challenge.
Here's my take on the Challenge this week:
Here's what the inside looks like:

The images on the front of the card is from the new Dreams Stamp Set.  The thing I love about this set is you can combine the stamps together or use them each separately.  The image on the front is actually 3 separate stamps put together on my acrylic block!  I love it when I can use things in different ways, I feel like I'm getting more for my money!

For the ingredients used:

Stamps: Dreams (ODBD)
Paper: Botanical Collection (Prima), Bravo Burgundy (SU), Palo Verde (Bazzills), Ivory Cardstock (TPC)
Ink: Rich Razzleberry (SU)
Accessories: Elegant Ovals (ODBD's Spellbinders Die), Labels 18 Die (Spellbinders),5 Petal Flower Punch (SU), Medium Branch Punch (Martha Stewart), Snowflake Punch (Marvy), piercer, mat, stylus, Florentine Gold Microbeads (Martha Stewart), trim (Jo-Ann'), flowers (RAK from Sabrina), Prismacolor Pencils (Kelp Green, Sage Green, Light Umber, Eggshell, Pomegranate.

For more inspiration this week, check out the other Design Team ladies and see their beautiful creations:


That's is for today!  Hope to see you join in the Challenge this week!  Blessings!

Kathy

Thursday, May 10, 2012

Heartfelt Creations - Weekend Market

Hi there!

I'm back with another card I made for Heartfelt Creations.  This is my second project I created for my submission to their Design Team, a center-step card.  I love the rich vibrant colors of these Weekend Market Papers.  It was fun coordinating the project around them!

I've got lots of pictures.  Here's the front straight on...


The side...


Another side view...


A close-up...


Here's the inside...


These are the ingredients and instructions I gave to Heartfelt Creations. You can also find these and lots of other gorgeous creations from the design team members here on the HC Blog. 

Products Used on This Project
HCPC 3452 Pristine Lilies PreCut Set
HCPC 3455 Butterflies and Lilies PreCut Set
HCD 718 Decorative Chateau Gate Die
McGill Paper Blossoms Tool Kit
McGill Paper Blossoms Molding Mat

Other Products Used. Paper: Not Quite Navy, Black, and Old Olive (Stampin’ Up), Natural White (Neenah) cardstock, Weekend Market Collection designer paper (Bo Bunny) Inks: Onyx Black (VersaFine), Amaretto, Banana Bliss (Powder Puffs). Accessories: Scissors, exacto knife, cutting pad, stylus, scoreboard and tool, sponge, pop dots, Gold Stickles (Ranger), Copper mini beads (Martha Stewart), Aleene’s Paper Glaze, mineral spirits, tortillons, Prismacolor Pencils (Cream, Sand, Goldenrod, Yellow Ochre, Chocolate, Light Umber, Dark Umber, Dark Brown, Ginger Root, Indigo Blue, Kelp Green, Black), and black adhesive pearls (Recollections).

Instructions: Card measures 6” x 5 1/2”. Used “Center Step Card” instructions from Split Coast Stampers adjusting center measurement to increase by 1”. Cut Not Quite Navy Cardstock 6” x 11”, line up edge of 11” side on cutter at 1” mark and cut at 1” to 6 1/2” marks, flip cardstock over and repeat on other side. Using a scoreboard and score tool, score along the long side of the cardstock from the edge to the cut line at 1”, 2”, 6 1/2”. Repeat on opposite edge of cardstock. Score between cut lines at 5 1/2”. Fold at the score lines and make crisp folds. Fold the first, third, and center fold lines mountain folds, and the second fold valley fold. This is the card base. For center section of card, cut dark gold designer pattern paper 4” x 6” format, cut light gold pattern paper 3 7/8” x 4 3/8” and ink all edges with Banana Bliss and Amaretto using sponge, and glue to card. Die cut 2 large gates and 1 small gate with Black cardstock. Cut and remove doors from large gates dies. Layer 2 large gates together with pop dots. Cut small gate in half down the middle between the windows. Overlap windows on top of each other and glue to form the flower box. Trim the little curl that extends on the sides. Use pop dots to adhere the window box to the bottom of the large gate. Stamp candle/scroll image on Natural White cardstock and color with pencils and mineral spirits, add micro beads with Aleene’s Paper Glaze to flower centers. Trim image to fit in gate window and adhere. Stamp flower box image on Natural White cardstock, color with pencils, and fussy cut. Stamp another flower image, color and cut 2 of the flowers. Add micro beads to flower centers, use pop dots to add the 2 flowers. Use pop dots to adhere the flowers to the flower box. Stamp butterfly on Natural White cardstock, color with pencils, fussy cut, and add copper micro beads as shown. For bottom front of card, cut mat with light gold designer paper 1” x 6”. For top layer, using striped pattern paper, cut 7/8” x 5 7/8” piece. Ink all edges with Banana Bliss and Amaretto. Glue to bottom of card. Add 3 black adhesive pearls on bottom right. Adhere gate and window box to center front of card with pop dots. Add butterfly to top right with pop dots. Stamp 1 second smallest and 1 third smallest flower from Pristine Lilies Precut Set onto Natural White cardstock. Color with pencils and puff up the petals using the McGill Paper Tool Kit and molding mat. Glue micro beads to centers and use gold stickles to dot stamens. Adhere to bottom left of card with pop dots. For front sides of card, cut 2 – 1” x 4 3/8” from light gold designer paper and 2 – 7/8” x 4 3/16” from blue designer paper. Ink edges of gold paper with Banana Bliss and Amaretto, and ink blue paper with Amaretto. Glue to sides of card. For inside of card, cut 1 – 4 3/8” x 5 7/8” from blue designer paper, ink edges with Amaretto, and adhere to inside of card. Cut 1 – 1” x 5 7/8” from striped designer paper and glue to bottom of card. Die cut one each of the leave branch from the Decorative Chateau Gate Die Set from Old Olive cardstock, and glue to center bottom of card inside using a glue dot. Stamp 1 large flower on light gold designer paper and 1 second smallest flower onto Natural White cardstock from the Pristine Lilies PreCut Set. Color with pencils, and cut out with scissors (or the matching die set if you have it). Cut between petals of large flower and ink edges with Banana Bliss ink. Puff up the petals using the McGill Paper Tool Kit and molding mat. Glue micro beads to both flower centers and use gold stickles to dot stamens. Add flowers with pop dots as shown.  

I think I'm a little too detailed, lol!  Well, I hope this gives you a little inspiration today!

Blessings!

Kathy

Wednesday, May 9, 2012

Heartfelt Creations Wednesday

Happy Wednesday everyone!  It's the second Wednesday of the month which means Heartfelt Creations has a new release! 

We are delighted to present the Old English Garden Collection. Come have a cup of tea with us in our Old English Garden. With flower blooms as fresh as the morning dew and cracked walls as old as the dirt beneath it, this set offers a rustic flavor. The typography flows as smoothly as a calm spring breeze. Be sure to grab the custom die for maximum creative versatility and fun 3D depth! There are 6 new PreCut Stamp Sets and one beautiful new exclusive Spellbinders die designed for Heartfelt Creations.

Leave a comment on the HC Blog by May 15th and you will be eligible to win the entire release valued at $141.99.  The winner will be announced on May 16th on the HC Blog.

For my card today, I used images from 3 of the new sets in the Old English Garden Collection.


These new sets are SO GORGEOUS!!!  I am so thrilled to be able to work with these beautiful images as one of Heartfelt Creations' Designers!  I love the way the sets all coordinate with eachother or can be used separately and also having dies to match!

For my card, I did the center-step technique.  I love making these, and they are pretty easy to make.  I colored the center image using Prismacolor Pencils and mineral spirits on Natural White Neenah paper.  The small flower swirls are colored with pencils (no mineral spirits) on patterned paper.  I'm in love with this little flower swirl!  I know I'll be using this little one a lot!

You'll definitely want to visit HC's Blog and leave a comment for the contest.  Also, check out all the other DT's beautiful creations!

Blessings!

Kathy


Heartfelt Creations Products & Products Carried by HC:
HCPC 3468 –Tattered Blossoms PreCut Set
HCPC 3469 –Tattered Blossoms Swirls PreCut Set
HCPC 3474 –Heartfelt Expressions PreCut Set
HCD 722 –Tattered Blossoms Die
Product ID159723 – Art Institute Glue – Dries Clear

Other Products:
Paper: Serenity Love (Bo Bunny), Natural White (Neenah), Black (SU)
Ink: Onyx Black (VersaFine), Wheat Chalk Ink (VersaMagic), Midnight Confession Powder Puff
Accessories: Regal M-Bossabilities Embossing Folder & Labels 20 Nestibilities Dies (Spellbinders), Brad (Bo Bunny Et Cetera), Olive Wrinkled Ribbon (Really Reasonable Ribbon), Adhesive Pearls (Want 2 Scrap), Prismacolor Pencils – Olive Green, Marine Green, Sepia, Bronze, Ginger Root, mineral spirits, Copper Micro Beads (Martha Stewart)

Instructions: Make center step card base with cream colored cardstock: cut piece 6” x 9”, score at 1”, 2”, 5 ½”, at 1” mark on each side cut at 1” to 5 ½”, score at 4 ½” between cut lines.  (Basic instructions for center step cards can be found on Split Coast Stampers, these measurements here are a variation.)  Mat each section with black cardstock and adhere to base.  Cut the narrow strips of designer paper and stamp using the small flower spray from the Tattered Blossom Swirls Set as shown.  Color flowers with Bronze pencil.  Ink edges with black chalk ink.  Add micro beads using glue and adhere to card.  For middle section, emboss designer paper with Regal EF and run black chalk ink over raised pattern and edges.  Adhere to card.  Stamp large flower image from Tattered Blossom Swirls Set on Natural White Cardstock and color with pencils and mineral spirits.  Die cut image with labels 20 die and sponge with wheat ink while in die.  Die cut black cardstock and cut down center lengthwise and adhere to back of image to create mat.  Stamp sentiment from Heartfelt Expressions Set and cut with Labels 20 die and sponge with wheat ink.  Add image, sentiment, bow, and brad to card as shown.

Saturday, May 5, 2012

ODBDSLC107 - Scrapbook Page

Happy Saturday!
It's time for a new Shining the Light Challenge at Our Daily Bread Designs!

This week's challenge:
Since today is National Scrapbooking Day, we want to see you make a scrapbook layout (any size).

To make the challenge even more fun, we will be giving out a prize, a $15 gift certificate to be used toward stamps at the Our Daily Bread Designs store!! Entries for the prize must be submitted by Friday, May 11th at 8 a.m. EST. One random winner will be chosen and announced next Saturday.

 
While it is not required to use Our Daily Bread Designs images and sentiments on your creations, we would love to see them if you have them. As a way of recognizing those who do use Our Daily Bread Designs stamps, we will again be choosing three or more of our participants for the Shining the Light Award . In order to qualify for this award or join the challenge, however, you must use Our Daily Bread stamps and have your submission added to Mr. Linky by Friday, May 11th at 8 a.m. EST. If you upload your creations to Splitcoast Stampers or any other online gallery, please use the keyword is ODBDSLC107. When creating your posts on blogs please include a link to the challenge.

Here is my scrapbook page for the challenge this week.


This is a picture of me when I was probaby about 4 years old.  Probably seems silly to scrapbook one of my own photos, but this one has special meaning to me.  It just totally reminds me of my Mom who passed away a few years ago.  I don't remember if she kept it framed on the wall or not, but I think she may have.

The photo was "colorized" so I tried to match the papers and embellishments with it.  I found these beautiful papers at a scrapbook store that I use to go to a long time ago when I did a little scrapbooking.  Things have changed a lot since I made scrapbooks for my boys, so I did the best I could with what I've seen.

I used a new stamp set from Our Daily Bread Designs called "Flourished Verses".  It's a pretty set with some basic sentiments that are good to have on hand.

For ingredients used:

Stamps: Flourished Verses (Our Daily Bread Designs)
Paper: Be Happy Be Joyful Paper, Follow Your Heart (My Mind's Eye), darl green, med. green, peach, pink, old pink (no names - from scrapbook store)
Ink: Creamy Caramel (SU), Sweet Blush (Palette), Onyx Black (VersaFine)
Accessories: Adhesive pearls (Recollections), Flowers (RAK, Prima Sugar Blooms Collection), lace, ribbon & trim (scrapbook store), seam binding (Really Reasonable Ribbon), decorative brads & layered stickers (Follow Your Heart - MME), Grand Adhesion Stickers (K&Co), Fanciful Flourish (Cheery Lynn), Classic Petals Edgeabilities, Paisley Impressionablilies, Holly Motifs Shapeabilities, Foliage Shapeabilities, Classic Scalloped Ovals Large, Floral Ovals (Spellbinders)

For some more inspiration this week, check out the other DT ladies and their beautiful creations!


Hope you can join in on the ODBD Challenge this week and try doing some scrapbooking!

I'm also entering this in the Really Reasonable Ribbon Challenge #47 for Mother's Day or Feminine theme creations with ribbon that you can find here.

Also, Stampin' Sisters in Christ Challenge #137, Jeremiah 17:8, something green or planted...lots of pretty flowers on this one.  You can find this challenge here.

Also, Word Art Wednesday #26, Nahaum 1:7, which you can find here.


Blessings!

Kathy

Thursday, May 3, 2012

Heartfelt Creations - Almanac Tri-Shutter Card

Hi there!

I thought I would show you the projects I made for Heartfelt Creations' Design Team submissions.  This is the first project, a tri-shutter card.  These card are so easy to make even though they look a little complicated.  They have so many places to embellish too...if you want to.

This is the card opened up.  I love these gorgeous Almanac papers and the Pristine Lilies Stamp Sets.


A closeup of the front image.


The back...


The card closed...


These are the ingredients and instructions I gave to Heartfelt Creations.  You can also find these and lots of other gorgeous creations from the design team members here on the HC Blog.  There is also a sneak peek of HC's new release for May that will be released next Wednesday, 5/9th, what a GORGEOUS collection I have been playing with for this release!

Products Used on This Project
HCPC 3452 Pristine Lilies PreCut Set
HCPC 3455 Butterflies and Lilies PreCut Set
HCD 718 Decorative Chateau Gate Die
McGill Paper Blossoms Tool Kit
McGill Paper Blossoms Molding Mat

Other products used. Paper: Natural White (Neenah), Almanac Collection (Prima), “Pink” (DCWV Cardstock Stack), Black (Stampin’ Up). Inks: Wheat (VersaMagic) and Onyx Black (VersaFine). Accessories: Copper Micro Beads (Martha Stewart), Aleene’s Paper Glaze, scissors, exacto knife, Labels 13 Nestibilities (Spellbinders), adhesive pearls (Recollections), pop dots, mineral spirits, tortillons, Prismacolor Pencils (Cream, Goldenrod, Yellow Ochre, Chocolate, Light Umber, Dark Umber, Dark Brown, Ginger Root, Kelp Green, Black, Pink Rose, Nectar, Chestnut), white pencil.

Instructions: Card measures 4” x 5 1/2”. (Used the Tri-Shutter Card instructions from Split Coast Stampers.) Cut 5 1/2” x 12” piece of pink cardstock. Score long side at 2”, 4”, 8”, and 10”. Place cardstock on cutter on short side and cut between the 2” and 10” score lines at 1 1/2” from the side. Repeat on opposite side. For sides, fold first and third mountain fold, second and forth valley folds. For center section, fold second mountain fold and third valley fold and leave first and forth flat. Using the card base as a template, trace the section with the T-shape fold onto black cardstock with white pencil. Cut 2 of these shapes and trim 1/32” from all sides of paper. Do the same with the script writing designer paper and trim 1/16” from all sides of paper. Glue these to the front and back T shape of the card. Cut 4 pieces of black and pink designer paper 1 3/8” x 1 7/8” and 2 pieces 1 3/8” x 3 7/8”. Glue these as shown. Cut 1 piece of black cardstock 2 3/8” x 3 7/8” and glue to center panel. Cut 1 - 2 1/4” x 3 3/4” piece of a lighter shade of script designer paper and glue over the black mat in the center panel. Stamp candle and scroll image from the Butterflies and Lilies PreCut Set and color with pencils. Die cut candle scroll image using Labels 13 die. Sponge edges of image while inside die using Wheat Ink. Glue Copper micro beads to flower centers. Add dots to stamen tops with Gold Stickles. Cut 1 die cut with same die out of black cardstock. Cut in half on tall side and glue to back of image creating a mat on each side of image, trimming slightly on top and bottom to hide cut. Stamp 1 second largest flower, 1 third largest flower, 3 fourth largest flower, and 1 smallest flower. Cut each out with scissors (or appropriate die for stamp set) and glue copper micro beads to flower centers. Add 4 of the flowers to image as shown using pop dots and add image to front T of card with pop dots as shown. Add the other 2 flowers to the small panels in the back of the card using pop dots. Cut the image piece in the center of the card from the designer paper and glue with pop dots. Add pink pearls at each corner. For back of card, cut 1 small gate die from pink cardstock and 1 from black cardstock. Slightly offset and glue together. Adhere to card as shown. Cut piece of Natural White cardstock measuring 1 3/8” x 2 1/2”, ink edges with wheat ink and glue to small gate center. Stamp the butterfly image from the Butterflies and Lilies PreCut Set onto Natural White cardstock and color with pencils. Fussy cut image and adhere with pop dots as shown.

I hope this gives you a little inspiration today!  I am so blessed to be on Heartfelt Creations' Design Team!  Blessings to you!

Kathy

Tuesday, May 1, 2012

Everything is Coming Up Daisies!

Hi there!

It's time for a new challenge at Elphine House Australia!  The new Challenge is to incorporate daisies on your creation!  That shouldn't be too hard to do, where a lot of Elisabeth Bell's stamps have daisies on them and you can use ANY of her stamps not just EHA's!

For the challenge this week, I'm using a new stamp from Elphine House Australia called "Carrie: Three Wheeling"...so adorable! 


She has such a sweet face! Her tricycle reminds me of when my boys were little!    I colored her with my Prismacolor Pencils and mineral spirits to match these beautiful Eva papers from Basic Grey.

For all ingredients used:

Stamp: Carrie: Three Wheeling (Elphine House Australia)
Paper: Solar White (Neenah), Brocade (Bazzills), White card base (Georgia Pacific), Eva Designer Papers (Basic Grey), Certainly Celery (SU)
Ink: Onyx Black (VersaFine), Certainly Celery (SU)
Accessories: White and Black gel pens, White Opal Liquid Pearls, Prismacolor Pencils, Mineral Spirits, ribbon & lace (Michaels), Moss Seam Binding & White Netting (Really Reasonable Ribbon), Fanciful Flourish (Cheery Lynn Designs), Labels 18 (Spellbinders), adhesive pearls (Want-2-Scrap), sponge, Petite Petals Punch (McGill)

You can use any Elisabeth Bell stamp or image to enter the Challenge!  The winner will be picked randomly and will receive 2 stamps of their choice!


Hope you can join us this week!

I'm also entering this in the Cheery Lynn Designs Challenge #26 - Flowers - using dies or punches which you can find here. 
Blessings!

Kathy