Be Joyful

Rejoice in the Lord always. Again I will say, rejoice! Let your gentleness be known to all men. The Lord is at hand. Be anxious for nothing, but in EVERYTHING by prayer and supplication, with thanksgiving, let your requests be made known to God; and the PEACE OF GOD, which surpasses all understanding, will guard your hearts and minds through Christ Jesus. Philippians 4:4-7

These are verses I memorized years ago and they are written on my heart. There are times when I still need to remember not to be anxious, but I eventually listen to my heart saying these verses. I didn't really understand what the "peace of God" was until I experienced it. It's having peace inside you, even when you're going through heartbreaking situations and trials. It does "surpass ALL understanding" and you know it comes from GOD alone. Praise the Lord for His wonderful promises!


I love, love, love what I do. I am passionate about the things I create and the talents God has placed in me. I SO appreciate the time you take to look at my things and the comments you all leave me!

Blessings to you!

Kathy

Friday, October 10, 2014

You Inspire Me - Heartfelt Creations


Happy Friday!

I'm back again with another card for Heartfelt Creations using the new All Geared Up Collection that was released on Wednesday!


This card is a little more soft and feminine than my first one.  The collection is perfect for masculine projects, but can be used for feminine ones too!

I'm submitting this to the Word Art Wednesday Challenge #153 - Anything Goes.

Thanks for stopping by!

Blessings!

Kathy


You Inspire Me

Heartfelt Creations Products and Products Carried by HC:

HCPC 3632 - Plates and Gears PreCut Set
HCPC 3635 - Shifting Gears PreCut Set
HCD 754 - All Geared Up Die
HCPC1 248 - All Geared Up Paper Collection
452255 - Grand Calibur
368770 - Scor-Pal
459222 - McGill Paper Blossoms Tool Kit
159223 - McGill Paper Blossoms Molding Mat
Other Products:

Paper: White (Recollections), tan, (DCWV - Neutrals), Ocean Tides (Papertrey Ink)
Ink: Ocean Tides (Palette), Sahara Sand (VersaMagic)
Accessories: Ivory Burlap String (May Arts), Bow-Easy Tool, button (stash), glue dots, pop dots, Fast Grab Tacky Glue (Aleenes).

Instructions: Make 4 1/4" x 5 1/2" card base with Ocean Tides. Cut tan mat measuring 4 1/16" x 5 5/16". Cut light aqua designer paper 3 7/8" x 5 1/8", ink edges with Ocean Tides, then using Sahara Sand Ink, stamp floral image (Plates and Gears) on lower left and stamp spray image (Shifting Gears) on top right corner. Glue the 2 mats together and add to card base with pop dots. Using the All Geared Up Die, cut 1 small flower and 1 circle from tan card stock and 3 leaves from Ocean Tides card stock.  Ink leaves and small flower with Ocean Tides and shape as desired. Stamp sentiment (Plates and Gears) on white with Ocean Tides and cut with matching die. Ink edges with Sahara Sand and Ocean Tides. Glue circle die cut to mat as shown, then add sentiment with pop dots. Make multi-loop string bow with bow tool. Add all elements together as pictured. (The tan flower is cut into 2 pieces and added on top of each other.) Thread string in buttons and adhere to card with glue dots.

Wednesday, October 8, 2014

Your Special Day - Heartfelt Creations


Happy Wednesday!

It's time for the new release for October, the All Geared Up Collection!

Shift your creativity into high gear with the All Geared Up collection from Heartfelt Creations! This imaginative mix of gears, cogs, and mechanical flowers uses deep shades of rust, brown, teal, red and cream to create a fabulous industrial vibe. Clever vanity license plates, chains, wire, rugged stripes and distressed graphics mesh perfectly with Steampunk or masculine projects, and will keep your wheels turning with ideas for "girly grunge" creations, too. The versatile All Geared Up dies feature fanciful sprockets, gears, cogs, chains and license plates that can be shaped into innovative 3-D embellishments or die cut from white cardstock to create beautiful doily accents. Six hand drawn stamp sets continue the mechanical theme with a large Cogs and Gears background stamp, themed accent stamps, mechanical bouquets and playful sentiments that are "geared" to carry your project across the finish line with a smile. The All Geared Up Collection has been designed to inspire the bold in you....so let's gear up!

My first project with this collection is called "Your Special Day".  I love this teal and brown color combination!


Such beautiful and rich colors in the designer papers!  I heat embossed the main image on the designer paper using Clear Bark Embossing Powder.  I then added a mechanical flower with Brown Gala Glitz, leaves, some Natural Jute Ribbon and a brad.  You can see the complete instructions for this at the bottom of my post.

Be sure to visit the HC Blog and see all the awesome projects by the designers this week and a new video by Emma Lou showing you some fun techniques!

I'm submitting this to the following challenges:

Word Art Wednesday #153 - Anything Goes
Addicted to Stamps & More #116 - Anything Goes

Thanks for stopping by!

Blessings!

Kathy


Your Special Day

Heartfelt Creations Products and Products Carried by HC:

HCPC 3634 - Tarnished Gears PreCut Set
HCD 754 - All Geared Up
HCD 745 - Luggage & Tags Die
HCDP1 248 - All Geared Up Paper Collection
452255 - Grand Calibur
368770 - Scor-Pal

9brn - Brown Gala Glitz

Other Products:

Paper: Early Espresso (SU), Aegean (Coredinations)
Ink: VersaMark Watermark (Tsukineko), Java (PowderPuffs - Quick Quotes)
Accessories: Clear Bark Embossing Powder (Recollections), Brown Twill, 1.5" Jute Ribbon Natural (Really Reasonable Ribbon), brad (Bo Bunny - Weekend Market), orange stick, pop dots, Fast Grab Tacky Glue (Aleenes).

Instructions: Make card base with Early Espresso measuring 5 3/8" square. Cut mat with Aegean card stock measuring 5 3/16" square and ink edges with Java Ink. Cut striped designer paper (dp) 5" x 1 1/2" and cut teal/brown dp 5" x 3 1/2". Stamp image (as pictured) on teal/brown dp with VersaMark and heat emboss with Clear Bark Embossing Powder. Ink the two papers with Java and glue down as pictured to Aegean mat. Cover seam of two papers with Brown Twill and secure in back of mat. Add to card base with pop dots. Cut ticket sentiment from dp with Luggage & Tags Die, ink edges with Java and add as pictured with pop dots.

Die cut 2 leaves from Early Espresso and 3 from Aegean. Die cut 1 small flower with Early Espresso and 1 from teal/brown dp. Shape all pieces with orange stick or pen as desired and ink with Java. Trim pieces of Jute Ribbon and add as shown using Fast Grab Tacky Glue. (For the "bow" on top right, I removed a couple of the fibers in the middle and tied it to shape into a bow.) Add leaves and flower as shown using Fast Grab Tacky Glue. Add clock face brad to "bow" center. Add Brown Gala Glitz to flower center using Art Institute Glue Dries Clear.


Monday, October 6, 2014

Creative Blog Hop


Happy Monday!

A couple of weeks ago I received an email from a sweet friend, Chris Olsen, who I use to work with on the Our Daily Bread Designs Challenge Team.  Chris told me about something called the Creative Blog Hop and gave me a couple of examples of what it was.

The Creative Blog Hop is an ongoing blog hop that works on a nominating system where I am to nominate 2-3 other designers whom I admire and inspire me.  The idea is to learn more about designers in blogland by asking and answering 4 questions.

I was very honored to be nominated by Chris (you can read about it here) as someone who inspires her, especially where she is one amazingly creative person that inspires me!  To top it off, Chris is one of the sweet ladies I know and a dear sister in Christ!  If you don't know Chris, please take a few minutes to visit her blog and see the gorgeous creations she makes!  Here's a little sample of Chris' work...wow!


And another beauty created by Chris...


Isn't Chris' work stunning?  Her work has definitely always inspired me!


Here are the questions I am to answer:

1. What am I working on right now?

I am currently working as a designer for Heartfelt Creations.  I just finished a couple of projects for them that will be posted in a couple of weeks and I am about to start working on their new release for November.

Here is my latest project I posted for Heartfelt Creations this past week. This was colored with chalk inks.


In addition to designing for Heartfelt Creations, I also do administrative work for them behind the scenes as paid work.  This has been a huge blessing for me to earn a little money at home after being a stay home mom for the past 15 years.  (I can't believe it's been that long!)  I had been praying for something I could do to earn money and still be at home for my sons and to continue doing design work.  I knew if I went to work full-time outside the home, my creating time would be very limited if at all.  Heartfelt Creations was a tremendous answer to my prayers and they are a wonderful company to work for!

A verse I memorized many years ago in Ephesians always comes to mind when I think of what I prayed for and what God did in my life.  “Now to Him who is able to do exceedingly abundantly above all that we ask or think...” Ephesians 4:20.  This is one of those times that God did far more than I asked for or could have imagined and  I'm so thankful to have Him in my life!

2. How does my design work differ from others in my genre?

My work is similar to a lot of other people.  We all get creative ideas and inspiration from each other.  I do like my designs to be balanced and not overly done.  I'm kind of a perfectionist and will sometimes agonize over the slightest details on my designs like where to put an adhesive pearl or button to finish the design.  I drive myself crazy sometimes with this!

Another thing I do differently from a lot of people is color images with pencils and mineral spirits.  Many people now use markers like Copic, etc., but I just love using my pencils!  I love to find the perfect colors and to use shading to make things come alive.  Here's one of my more recent projects I made.  The flowers and butterfly were colored with pencils to match the designer paper on the background.


I am very focused on color in my designs.  I can be very picky about the colors I use on my projects.  It drives my crazy if colors aren't the right shades or tones to be together.  I spend a lot of time on making sure they are.  For example, the sunflowers above were done by layering 4 different colors and blending after each.

3. Why do I create what I do?

I have to create!  God created me to be creative!  It brings me so much joy to take things and create something with my hands! I have done so many different crafts since I was very little and have tons of supplies to prove it!  I love paper crafting because I can do so many different things with it.  I can create a card, a box, an altered project, and add all sorts of supplies from my other crafts to embellish them.  For example, I use to do weaving on a loom and have tons of fibers still.  I love incorporating those natural fibers on my projects.  Here's one of my projects here using blue fibers from my stash that I added to ribbon and twine.


4. How does my creative process work?

When I get a new collection from Heartfelt Creations to work with, I lay everything out and chose an image(s) to work with.  I try to find the perfect colors of papers, ribbons, and embellishments to go with the designer papers and then find the perfect pencil colors that will match.  I have a pencil coloring sample book I used to match them and if I don't have the right one, I try to create it by combining different pencil colors together.  If I still can't come up with the perfect colors, I will sometimes use inks instead to color images using make up applicators.

On a rare occasion, I will think of something I want to make and it will all come together quickly and easily and be just like I pictured it.  About 95% of the time, I have no idea what I'm going to make.  I just start with the image or die cuts and it just gradually develops into something I like.

There are times when I get stumped along the way and I'll have to get up and do something else for a while.  Usually, when I go back to it I see it in a new way and the creative process starts to flow again.  I often pray for God to be with me and my work and help me to create something beautiful.  He never fails me.  Here's one of my projects that took a lot of prayer and I love how it came out.  This is one where I used chalk inks and make-up applicators to color the flowers to match the background designer paper.


So that's a little about me.  Although I don't have anyone in particular to nominate (lots have already done this type of hop, don't have a blog or are very busy), I would like to give you a couple of the MANY people that I admire and that inspire me with their work.

Becca Feeken - Amazing Paper Grace - I just love everything Becca makes, her work is just gorgeous!  Becca is one of the first people I started following and the one that led me to Our Daily Bread Designs originally.

Marisa Job - Designs By Marisa - Marisa's work is just stunning and she is amazingly creative!  Everything she makes is a work of art!  She is one of the few people in blogland that I've actually had the pleasure of meeting in person and she is such a sweet lady!

Pam Simpson - Pams Crafts - I haven't been following Pam for very long, but wow her creations are just beautiful!  I love what she does with die cuts and she definitely inspires me with her work!

Well that just 3 people that I admire and I'm inspired by.  I could list many others, but the list would go on and on! So many talented people out there and it's so wonderful that everyone freely shares their work!

Thank you, Chris, for nominating me for the Creative Blog Hop! Such an honor to be chosen by you!   I could have easily nominated you as an inspiration in return!

Blessings!

Kathy


Thursday, October 2, 2014

Secret Garden Quilt Card


Happy Thursday!

Today I have a quilt card I made for my sister's birthday.  I kept the embellishments to a minimum so I wouldn't be covering up the pretty star pattern.  (Don't look too closely though...I have a little to much spacing between some pieces.)


I made the top quilt piece for this last year with my crafting buddy in California, Brenda.  Sure do miss us crafting together on Thursday nights... :-(  Brenda had a bunch of patterns from her quilting (fabric) folder and we decided on this one here.


We're not sure where this came from so I don't know who to give credit to if needed.  Basically, we cut 1" squares for each block and cut the pieces diagonally for the half squares.  Brenda had a 1" square punch which makes it a lot easier than using a paper cutter.  I can't get perfect 1" squares with my cutter.

This is the same technique I used on my Christmas Quilt Card here back in 2011.  The Quilted Card Technique is originally from Split Coast Stampers in the Resources section here.  It's a fun technique if you want to try it out!

Here's the inside of the card, just a simple sentiment.


Card recipe:

Stamps: Well Scripted (SU)
Paper: Tan, off-white (Recollections), Secret Garden  Patterns & Solids (Graphic 45)
Ink: Soft Suede (SU) for sentiment, Antique Linen Distress (Ranger) for sponging
Accessories: Button, peach floss, Cream Seam Binding, Bow-Easy Tool (Really Reasonable Ribbon), Square Lattice Embossing Folder (SU), Labels One, Decorative Labels One (Spellbinders), SU Grid Paper.

I'm submitting this to the following challenges:

Word Art Wednesday Challenge #152 - Anything Goes

Thanks for stopping by to visit!

Blessings!

Kathy


Wednesday, October 1, 2014

Sun Kissed Wishes - Heartfelt Creations


Happy Wednesday!

It's that fun time of the week to show you a little inspiration from Heartfelt Creations!

This week I used an older HC release, the Sun Kissed Collection...always one of my favorites!


I love using this technique on stamped images of heat embossing with embossing enamel and coloring with chalk inks and make up sponges.  I love the way it looks and it's so quick and easy to color!  (You can click on the picture to get a closer view if you would like.)

Be sure to visit the HC Blog to see all the beautiful creations by the designers this week!

I'm submitting this to the following challenges:

Word Art Wednesday Challenge # 152 - Anything Goes

Thank you for stopping by to visit!

Blessings!

Kathy


Sunkissed Wishes

Heartfelt Creations Products and Products Carried by HC:

HCPC 3599 - Balloon and Bicycle PreCut Set
HCPC 3533 - Sun Kissed Fleur PreCut Set
HCPC 3537 - Sun Kissed Fleur Swirls PreCut Set
HCD 734 - Sun Kissed Fleur Die
452255 - Grand Calibur
368770 - Scor-Pal
DDOTS - Double Dots
459222 - McGill Paper Blossoms Tool Kit
159223 - McGill Paper Blossoms Molding Mat
Other Products:

Paper: Natural White (Neenah), Apricot Appeal (SU)
Ink: Pumpkin Spice, Spanish Olive (VersaMagic), VersaMark Watermark
Accessories: Scrollwork Embossing Folder (Cuttlebug), make-up applicators, glue dots, pop dots, Bow-Easy Tool, Cream Seam Binding (Really Reasonable Ribbon), button, Aged Ivory Embossing Enamel (Stampendous), heat tool, Elegant Ovals (Spellbinders).

Instructions: Make 4 1/4" x 5 1/2" card base with Natural White. Cut mat 4 1/16" x 5 5/16" with Apricot Appeal and emboss with Scrollwork Embossing Folder. Add mat to card base with Double Dots. On Natural White with VersaMark Ink, stamps flower image and flowers and heat emboss with Aged Ivory Embossing Enamel applying heat from underneath. Die cut flower image with Elegant Ovals largest die and die cut flowers with matching die. Stamp sentiment next to flower image as pictured with Pumpkin Spice Ink. Color image with inks and make-up applicators. Color an assortment of smaller flowers the same way, shape with mat and tool kit and add to card with glue. Add Lettuce Entertain You Prills to flower centers using Art Institute Glue. Add also to button center using glue dot. Make 3-loop bow with seam binding and Bow-Easy Tool, add button and add to card using glue dots.

Wednesday, September 24, 2014

Classic Sunflower Notepad - Heartfelt Creations


Happy Wednesday!

It's inspiration time from Heartfelt Creations!  Today we are doing a blog hop with Creative Embellishments so you will see lots of inspiration from designers using their beautiful products.  To see the beautiful inspiration from Creative Embellishments, click here.

My project today is a covered junior notepad.


(You can click on the photo for a better view.)


Here's a look at the inside.


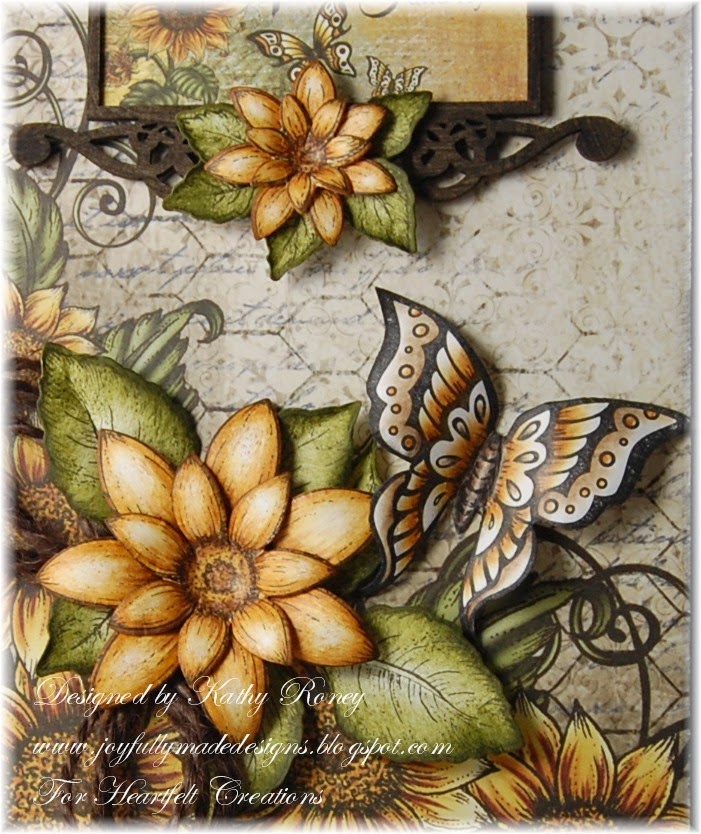
Here's a little close up of the beautiful flowers and butterfly on the cover.


I love making these notepads, they make beautiful gifts with a matching card.  I used the Junior Legal Pad Wish List tutorial from Split Coast Stampers here, adjusting the measurements for a full size pad.  I've included the adjusted measurements in the instructions at the bottom of my post.

I used the Classic Sunflower designer papers to embellish the pad cover and pad topper.  The frame on the cover is from Creative Embellishments' Mini Ornate Frames set that I painted with black acrylic paint and added a piece of designer paper to the back of it.  I embellished the cover with flowers, leaves and a butterfly from the Classic Sunflower Collection.  The flowers and butterfly were colored with pencils and mineral spirits and the leaves were inked with Forest Moss Distress Ink.

Be sure to visit the HC Blog to see the beautiful creations by the designers this week!  Emma Lou also has a new video showing you a fun coloring technique and a sneak peek of the All Geared Up Collection being released October 8th!

I'm submitting this to the following challenge:

Word Art Wednesday Challenge #151 - Anything Goes

Thanks for stopping by to visit!

Blessings!

Kathy


Classic Sunflower Notepad

Heartfelt Creations Products and Products Carried by HC:

HCPC 3630 - Summer's Day PreCut Set
HCPC 3626 - Classic Sunflower PreCut Set
HCPC 3545 - Open Leaf PreCut Set
HCD 753 - Classic Sunflower Die
HCD 736 - Classic Leaf Die
HCDP1 - 247 - Classic Sunflower Paper Collection
452255 - Grand Calibur
368770 - Scor-Pal
459222 - McGill Paper Blossoms Tool Kit
159223 - McGill Paper Blossoms Molding Mat
SMP001 - Stamp Mat Pad
Metal Glue Tip

Other Products:

Paper: Solar White (Neenah), Black (Recollections), More Mustard (SU)
Ink: Onyx Black (VersaFine), Forest Moss, Vintage Photo Distress (Ranger)
Accessories: Black acrylic paint dauber (Ranger), Mini Ornate Frames (Creative Embellishments), Dark Brown Jute String (Really Reasonable Ribbon), Scor-tape, sponges, bow maker tool, craft knife, cutting mat, pop dots, Fast Grab Tacky Glue (Aleenes), Junior Size Writing Pad (office supply store), mineral spirits, Prismacolor pencils: Black, Yellow Ochre, Goldenrod, Burnt Ochre, Chocolate, Ginger Root, Sandbar Brown.

Instructions: Use tutorial from Split Coast Stampers for Junior Notepad found here using adjusted measurements as noted. Base: Cut More Mustard 10 1/2” x 8 1/4”, score at 5 1/8” and 5 3/8”.  Pad Topper: Cut designer paper 4 7/8” x 2 1/8” and score at 7/8” and 1 1/8”.  Add to pad top with double-sided tape following the tutorial.  Add pad to inside of base with double-sided tape following the tutorial.  Mat for inside: Cut designer paper 8” x 4 7/8”, ink edges with Forest Moss, and glue to base.  Mat for front: Cut Black mat 4 15/16" x 8 1/16" and glue to base.  Cut designer paper piece shown for front cover measuring 4 3/4" x 7 7/8", ink edges with Black Ink, glue to black mat and glue both to front cover.

Paint Mini Ornate Frame with black acrylic paint and let dry. Select image from designer paper tag assortment sheet, trim to fit behind frame, glue with Art Institute Glue and Metal Glue Tip. Trim any excess with craft knife and cutting mat. Add to notepad cover as pictured using pop dots.

On Solar White with Onyx Black, stamp Classic Sunflower, butterfly from Summers Day Set, 2 of 3-leaf stems, 1 of 9-leaf stems from Open Leaf Set. Color flowers and butterfly with pencils and mineral spirits. Fussy cut butterfly and shape as desired. Die cut flowers with Classic Sunflower Die, shape with mat and tool kit, glue together to form a small flower and a larger one. Die cut leaves with Classic Leaf Die, ink with Forest Moss Ink using sponge and shape with mat and tool kit. Make large 3-loop bow with Jute String and add to cover using Fast-Grab Glue. Arrange flowers, leaves (small leaves are cut into pieces) and butterfly as shown and glue all down.


Wednesday, September 17, 2014

Sunflower Bouquet - Heartfelt Creations


Happy Wednesday!

It's time for a little inspiration from Heartfelt Creations!  This week I have another card using the Classic Sunflower Collection!


This collection is just gorgeous, I love working with it for sure!  Beautiful images for coloring and the colors on the designer papers are so pretty!

I colored the images with pencils and mineral spirits, fussy cut the sunflower bouquet and butterfly and die cut the sunflowers with the matching die.  Here's a little close up of the image for you.


Be sure to visit the HC Blog to see all the beautiful creations by the designer this week!

I'm submitting this to the following challenge:

Word Art Wednesday Challenge #150 - Anything Goes

Thank you for stopping by today!

Blessings!

Kathy


Sunflower Bouquet

Heartfelt Creations Products and Products Carried by HC:

HCPC 3628 - Sunflower Bouquet PreCut Set
HCPC 3627 - Sunflower Stem PreCut Set
HCPC 3626 - Classic Sunflower PreCut Set
HCD 753 - Classic Sunflower Die
HCDP1 - 247 - Classic Sunflower Paper Collection
452255 - Grand Calibur
368770 - Scor-Pal
459222 - McGill Paper Blossoms Tool Kit
159223 - McGill Paper Blossoms Molding Mat


Other Products:

Paper: Solar White (Neenah), Black (Recollections)
Ink: Onyx Black (VersaFine), Peeled Paint, Vintage Photo Distress (Ranger)
Accessories: Chestnut Flocking Powder (Martha Stewart), Flower Soft Glue, Havana Brown Seam Binding, Burgundy Jute String, Bow-Easy Tool (Really Reasonable Ribbon), flower button, glue dots, pop dots, orange stick or pencil, mineral spirits, Prismacolor Pencils: Kelp Green, Marine Green, Black, Yellow Ochre, Goldenrod, Burnt Ochre, Chocolate, Dark Purple, Black Cherry, Black Raspberry.

Instructions: Make 5" square card base with Black. Cut mat with green designer paper measuring 4 13/16" square, ink edges with Vintage Photo and glue to card base. Cut 9/16" x 4 13/16" with Black and cut gold designer paper 1/2" x 4 13/16". Ink edges of gold with Vintage Photo and glue 2 pieces together as shown. Glue to card as shown. Cut card front from designer paper (pictured) measuring 3 7/8" square, ink edges with Vintage Photo. Cut Black mat measuring 4 1/16" square and glue 2 pieces together. Add to card with pop dots.

Stamp main image from Sunflower Bouquet and butterfly image from Sunflower Stem on Solar White with Onyx Black. Color with pencils and mineral spirits and fussy cut. Add bouquet image to card front with pop dots. Ink butterfly with black ink, shape with orange stick or pencil and add to card as pictured by gluing body only with Art Institute Glue (AIG). Stamp Classic Sunflower image on Solar White with Onyx Black and cut with Classic Sunflower Die. Color 2 small flowers and 1 ladybug with pencils and mineral spirits. Shape with mat and tools. Ink edges of flowers with Vintage Photo and ladybug with black. Add ladybug with pop dot as pictured. Add 1 flower as pictured using AIG. Make 3 loop bow with Havana Brown and make 5 loop bow with Burgundy Jute String using Bow-Easy Tool. Add bows as shown using glue dots. Add second flower to bow center. Add flower button to top right using glue dots. Add Pot of Gold Prills to butterfly and flower centers. Add flocking to flower centers on main image using Flower Soft glue.

Wednesday, September 10, 2014

Sunflower Patch - Heartfelt Creations


Happy Wednesday!

It's time for the release of the new Classic Sunflower Collection from Heartfelt Creations!  I absolutely LOVE this collection!!!  What a beautiful combination of fall images, flowers and designer papers!  The colors on the papers are stunning!  You can read more about the new collection here on the Heartfelt Creations website.

Here is my first creation with this gorgeous collection!


For my card, I used the Sunflower Patch image and added an extra flower using the Classic Sunflower Set and matching die.  The images were colored with pencils and mineral spirits and the main image was die cut with Labels 22.  The blue die cut mat behind the image is designer paper from the collection.

Here's a close up of the image for you.


Be sure to visit the HC Blog to see the gorgeous creations by the designers this week!

I'm submitting this to the following challenges:

Word Art Wednesday #149 - Anything Goes
Really Reasonable Ribbon #102 - Autumn Colors & Ribbon or Trim

Thanks for stopping by to visit!

Blessings!

Kathy


Sunflower Patch

Heartfelt Creations Products and Products Carried by HC:

HCPC 3629 - Sunflower Patch PreCut Set
HCPC 3626 - Classic Sunflower PreCut Set
HCD 753 - Classic Sunflower Die
HCDP1 - 247 - Classic Sunflower Paper Collection
452255 - Grand Calibur
368770 - Scor-Pal
DDOTS - Double Dots
459222 - McGill Paper Blossoms Tool Kit
159223 - McGill Paper Blossoms Molding Mat


Other Products:
Paper: Solar White (Neenah), French Roast, Fudgesicle (Coredinations), Typhoon (Bazzills)
Ink: Onyx Black (VersaFine), Nautical Blue (Memento), Vintage Photo Distress (Ranger)
Accessories: Square Lattice Embossing Folder (SU), Cocoa Jute String, Bow-Easy Tool (Really Reasonable Ribbon), Labels 22 Die (Spellbinders), button, distressing tool, water mister, adhesive pearls, pop dots, glue dots, mineral spirits, Prismacolor Pencils: Yellow Ochre, Goldenrod, Burnt Ochre, Chocolate, Black, Kelp Green, Marine Green, Blue Lake, China Blue, Black, Steel.

Instructions: For card base, cut French Roast 4 5/8" x 9 3/4" and score and fold at 4 7/8" to make a 4 5/8" x 4 7/8" top fold card. Cut mat with Typhoon measuring 4 7/16" x 4 11/16" and glue to base. Cut mat with Fudgesicle 4 1/4" x 4 1/2", emboss with folder, distress edges lightly and glue to base/mat. Stamp Sunflower Patch and Classic Sunflower images on Solar White with Onyx Black. Color Sunflower Patch image and one of the smaller sunflowers from the Classic Sunflower Set with pencils and mineral spirits. Die cut the Sunflower Patch image with Labels 22 second largest die. Die cut the flowers with the matching die. Ink the edges of the one flower with Vintage Photo Ink, mist with water on the back and gently shape with mat and tool kit as desired. Add the flower to the Sunflower Patch image as shown using Art Institute Glue. Die cut the blue (jeans) designer paper with the largest Labels 22 die and ink edges with Nautical Blue. Add image to die cut with pop dots and add blue die cut to card base with Double Dots. Make a multi-loop (I did 7 loops) bow with Cocoa Jute String and Bow-Easy Tool and add as shown with glue dots. Add button threaded with string to the bow center using glue dots. Add adhesive pearls to top right corner.

Wednesday, September 3, 2014

Majestic Blooms Box - Heartfelt Creations


Happy Wednesday!

It's time for a little inspiration from Heartfelt Creations!  Today I have a pre-made gift box I bought at Michaels that I decorated with designer papers from the Raindrops on Roses Collection, Majestic Morning flowers and Burst of Spender leaves!


Here's a better view of the top with the beautiful flowers!


Here's a peek at the inside which I also covered with the designer papers.


Be sure to visit the HC Blog to see all the beautiful creations by the designers this week!  There is also a sneak peek of the new Sunflower Collection coming out September 10th!  Heartfelt Creations has also announced the list of Semifinalists for the design team!!!  Congratulations to all the Semifinalists!  Make sure to vote for your favorite top 5 and be eligible to win a gift certificate!

I'm submitting this to the following challenges:

Word Art Wednesday Challenge #148 - Anything Goes

Thanks for visiting today!

Blessings!

Kathy


Majestic Blooms Box

Heartfelt Creations Products and Products Carried by HC:

HCPC 3578 - Majestic Morning Background PreCut Set
HCPC 3546 - Classic Leaf PreCut Set
HCD 742 - Majestic Blooms Die
HCD 736 - Classic Leaf Die
HCD 743 - Raindrops on Roses Die
HCDP1 240 - Raindrops on Roses Paper Collection
452255 - Grand Calibur
459222 - McGill Paper Blossoms Tool Kit
159223 - McGill Paper Blossoms Molding Mat
Other Products:

Paper: Solar White (Neenah)
Ink: Onyx Black (VersaFine), Peeled Paint Distress (Ranger)
Accessories: Sparkle Sheer Shimmer Spritz (Tsukineko), glue gun, splat mat (Darice), Mod Podge, White 1/4" Silk Ribbon (May Arts), Bow-Easy Tool, 1/5" White Netting, String Beads Pearlized (Really Reasonable Ribbon), adhesive pearls, Diamond Stickles (Ranger), 3.75" White Gift Box (Michaels), mineral spirits, Prismacolor Pencils: Clay Rose, Rosy Beige, Black Cherry.

Instructions: Measure your pre-made box and trim the designer papers to fit each side of the box and lid both inside and out. For my box, I used the 12" x 12" sheet with roses in each of the 4 corners. I trimmed each corner, inked the edges with Peeled Paint Ink and glued to the box using Mod Podge. Use coordinating papers for the box inside, lid inside and sides using same process. For the top of the lid, I used the card front in the designer paper that matches the 12" x 12" image in a smaller version (3 5/8" square) and added it using same process. Die cut the Raindrops on Roses Die lattice piece with white card stock and glue to the lid top.

Stamp the Majestic Morning Background on Solar White with Onyx Black and color with pencils and mineral spirits. I used 9 of the 12 flowers for mine (2 of the smallest and 1 each of the next 7 sizes) to create 3 separate flowers in different sizes. Use the mat and tool kit to shape the flowers and glue them together using a glue gun for extra hold. Stamp 2 of the Classic Leaf open stems on Solar White using Onyx Black, die cut with Class Leaf Die and ink with Peeled Paint. Shape and pinch leaves with your fingers. Add stems and flowers to lid as pictured using glue gun. Add string beads, netting piece (tie across middle with string to form a fake bow) and a multi-loop bow using glue gun. Add adhesive pearls, stickles as desired. Spray with Sparkle Shimmer Spritz as desired.

Monday, September 1, 2014

Featured Stamper!!!


Happy Monday everyone!!!

I have some VERY happy news!  I'm so excited to be chosen as the “Featured Stamper” this week at Split Coast Stampers!!!  What an honor it is to be selected!  If you're not familiar with it, each week they select someone to honor their work in their gallery of creations.  People can then go through the featured stamper's gallery and chose a creation to copy and change two things on it.  Then they post their creation to the gallery using a special code for the challenge.  (There's also no time limit to participate!)  You can read about it here and view the gallery here.

Hope you are all having a wonderful holiday weekend!

Blessings!

Kathy