Be Joyful

Rejoice in the Lord always. Again I will say, rejoice! Let your gentleness be known to all men. The Lord is at hand. Be anxious for nothing, but in EVERYTHING by prayer and supplication, with thanksgiving, let your requests be made known to God; and the PEACE OF GOD, which surpasses all understanding, will guard your hearts and minds through Christ Jesus. Philippians 4:4-7

These are verses I memorized years ago and they are written on my heart. There are times when I still need to remember not to be anxious, but I eventually listen to my heart saying these verses. I didn't really understand what the "peace of God" was until I experienced it. It's having peace inside you, even when you're going through heartbreaking situations and trials. It does "surpass ALL understanding" and you know it comes from GOD alone. Praise the Lord for His wonderful promises!


I love, love, love what I do. I am passionate about the things I create and the talents God has placed in me. I SO appreciate the time you take to look at my things and the comments you all leave me!

Blessings to you!

Kathy

Saturday, March 31, 2012

Our Daily Bread Design's Shining the Light Challenge - ODBDSL102 - Favorite ODBD Stamp Set

Happy Saturday everyone!

It's time for another challenge at ODBD!

This week's challenge:

 Today marks the last March Anniversary challenge at Our Daily Bread Designs.  Since we are celebrating the Anniversary of Our Daily Bread Designs, why not end our Anniversary challenges with your favorite stamp set from Our Daily Bread Designs!!!  We can't wait to see your ODBD creations!!
To make the challenge even more fun, we will be giving out a prize, a $15 gift certificate to be used toward stamps at the Our Daily Bread Designs store!! Entries for the prize must be submitted by Friday, April 6th at 8 a.m. EST. One random winner will be chosen and announced next Saturday.
While it is not required to use Our Daily Bread Designs images and sentiments on most of our challenges, this month it is an Our Daily Bread Designs only challenge month in honore of the ODBD 4th Anniversary.  Three or more of our participants will be chosen for the  Shining the Light Award .  In order to qualify for this award or join the challenge, however, you must use Our Daily Bread stamps and have your submission added to Mr. Linky by Friday, April 6th at 8 a.m. EST. If you upload your creations to Splitcoast Stampers or any other online gallery, please use the keyword is ODBDSLC102. When creating your posts on blogs please include a link to the challenge.


Here is my card for the challenge! It's hard to pick just one stamp set (I love them all), but this one has been on my mind lately. I love this quote! I decided to make a slider card using the Fleur de Lis Shapeabilities Pendants Die. It's small and delicate, but I like the way it came out!   I love these violet blue colors too!  I think I'm just going to keep it at my craft desk for a pretty reminder of God's Love. 

For ingredients used:

Stamps: God's Love (Our Daily Bread Designs)
Paper: Almost Amethyst, Pear Pizzazz (Stsmpin' Up), Solar White (Neenah)
Ink: Onyx Black(VersaFine), Almost Amethyst (Stampin' Up)
Accessories: Sponge, ribbon (Michaels' Celebrate It), piercer, flower(Recollections), charm(RAK from Sabrina), brad, adhesive pearls(Recollections), burst punch (Fiskers), Frond punch (Martha Stewart), Fanciful Flourish (Cheery Lynn Designs), Spellbinders' Dies: Labels One, Fleur de Lis Shapeabilities Pendant, Parisian Accents, Floral Ovals

For more inspiration on the challenge, please visit my DT Sisters and see their awesome creations!


I'm also submitting this the to latest Stampin' Sister's in Christ Challenge #132 .  Here is the Bible Verse.

SCRIPTURE:
Romans 8:31b-32 "If God is for us, who can be against us? He who did not spare his own Son but handed him over for us all, how will he not also give us everything else along with him?”

CHALLENGE:
create a card or project that uses everything! The opposite of a CAS - toss on the embellishments and/or different papers, textures.

I can't do CAS anyway, so this one is EASY!!! 

That's it for now! I hope to see you join in the challenge! There's lots of beautiful ODBD stamp sets to choose from!

Have a wonderful weekend!

Blessings!

Kathy

Wednesday, March 28, 2012

Treat Holders - You Bless Me!

Hi there!

After doing the tutorial yesterday, I had the urge to make some for some special people in my life!  These are people that "Bless Me!".  I found the perfect stamp that I just received from Our Daily Bread Designs for the March Release, "Sentiments Collection".  I have a feeling I'll be using this set a LOT!

For some reason, I just don't like doing the same thing over and over, so each one of these is different.  I can never decide which one I like the best, so I just do a bunch of different ones!


I used the basic tutorial I did yesterday, but didn't do the "base" part.  I also used Spellbinder's Dies instead of a punch.

For the ingredients I used:

Stamps:  Sentiments Collection (Our Daily Bread Designs)
Paper:  The Watercolor Bouquet Collection (K & Co), Tea Party Designer Series Paper, Certainly Celery Pattern Paper (Stampin' Up), White (Georgia Pacific), Solar White (Neenah)
Ink: Onyx Black (VersaFine)
Accessories: Ribbons (Michael's & Really Reasonable Ribbon), 3 x 4 Treat Bags (Wilton), Crop-a Dile, Scor-tape, Modern Lable Punch (SU), Doily Lace Edge Punch (Martha Stewart), Classic Scallop Ovals Large Dies, Labels 20 Dies (Spellbinders), Arrow Border Edge Punch (E K Success).

That's it for now!  I hope you have a chance to try these treat holders out, they are super easy and make a cute gift!

Blessings!

Kathy

Tuesday, March 27, 2012

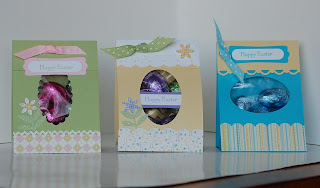
Easter Treat Holder Tutorial - My First Tutorial!

Hi there!

For a long time, I've been wanting to try writing up a tutorial.  Before I was a Mom,  a loooong time ago, I use to write training manuals and create new procedures at an insurance company.  So I figured I should be able to do tutorials!!!  Yesterday, someone asked me about the Easter Treat Holders I did a couple of years ago, so I thought the time was right and I would give a tutorial a try!  Here's what I came up with!

There's lots of different treat holder tutorials out there, but this is how I did mine a couple of years ago.   I used one from "The Ultimate Paper Crafts Collection's" "Valentine Treat Bags" by Linda Beeson for the bag base.  These are cute for any type of treat bag you need.  These are the Easter Treat Bags that I originally did and posted a couple of years ago.


Supplies:

One 2 3/4" x 9 1/2" piece cardstock
One  2 3/4" x 3" piece cardstock or coordinating paper (optional for bottom of bag)
One 2 3/4" x 2" piece cardstock or coordinating paper (optional for topper on bag)
Scor-Pal or scoring tool
Punches for border and window
Stamps
Ink
Ribbon
Crop-a-dile or other hole punch (optional)
Treat bags 3" x 4" (I used Wilton's)
Chocolate eggs or other treats


Step-by-Step

Step 1
Score the 2 3/4" x 9 1/2" piece cardstock at 3 1/2",  4 1/4",  5",  8 1/2".


Step 2
Fold cardstock in half at 4 1/4" score line.


Step 3
Fold the 3 1/2" and 5" score lines in opposite direction to form the bottom of the bag.


Step 4
Fold the cardstock at the 8 1/2" score line for the top flap.


At this point, you can decorate however you want.


For my Easter Treat Bags, I did the following:

Step 5
Score the 2 3/4" x 3" cardstock/designer paper at 3/4",  1 1/2", and 2 1/4".  (Note: If you use an edge punch, the length can be anywhere between 3" - 3 1/4" depending on the "waste" the punch creates.)


Step 6
Fold score lines as shown to fit bottom of the bag as it was done with the bag in steps 2 & 3.


Step 7
Punch border on one edge for the front of the bag.


Step 8
Adhere bottom mat to bottom of bag using scor-tape or strong adhesive.  Make sure pieces stay together well when folded.


Step 9
Punch window opening on front center with wide oval punch or other punch.


Step 10
For topper, score 2" x 2 3/4" piece cardstock at 1" and fold.  (Note: Picture shows piece 2 1/4" x 2 3/4" piece adding 1/4" for punch waste that I ended up cutting off.)


Step 11
Punch border on one end.


Step 12
Adhere to top of bag with scor-tape or other strong adhesive.


Step 13
Fill treat bags with treats, but not too full.  Add score-tape as shown.


Step 14
Fold in sides of treat bag to fit without sticking out on sides and adhere to score-tape on flap.


Step 15
Then adhere to front of bag to completely close.


Decorate as desired! 

On this one, I did 2 holes on top with a Crop-a-Dile and put ribbon through it.  There's tons of different things you can do with this basic bag!


Well, that's it, my first tutorial for my Blog!  I did this the same way the Split Coast Stamper Tutorials are usually written up to give myself something to go by.  I hope you find this useful and have lots of fun with it!  Lots of pictures and steps, I am a little detailed...hope I included everything though!

If you wanted to make a bunch of these, you could get 3 bags from one sheet of 8 1/2" x 11" cardstock.  I would probably try scoring first and then cutting the main piece for the bags the next time I did a bunch of these.

Let me know how I did, if it goes well, maybe I'll do some more!


Blessings!

Kathy


Sunday, March 25, 2012

Almost Easter - Flourishes & Cheery Lynn Challenges

Hi there!

This is a very quick card I put together for Easter using one of my most favorite dies, Fanciful Flourish by Cheery Lynn Designs.  The colors on this look blue in the photo, but are actually more lavender.  I'd like to sponge some Almost Amethyst around the sentiment with the die in place, but a little late now!


I'm submitting this to the Flourishes' FTTC161 Sketch Challenge and the Cheery Lynn Designs' Challenge #20 for Easter.

For ingredients used:

Stamps: Well Scripted (Stampin' Up)
Paper: Natural White (Neenah), Almost Amethyst, Pear Pizzazz (SU)
Ink: Onyx Black (VersaFine)
Accessories: Fanciful Flourish (Cheery Lynn), Floral Oval (Spellbinders), Ornate Flower Embossing Folder (Sizzix), Rose Leaf Punch (Martha Stewart), adhesive pearls, rick rack (Recollections), flower & satin trim (RAK from Sabrina), pearl string (? old, old old).

That's it for now!  Hope everyone is having a wonderful weekend! 

Blessings!

Kathy

Saturday, March 24, 2012

Our Daily Bread Designs Shining the Light Challenge - ODBDSLC101 - Silk or Faux Silk

Happy Saturday everyone!

It's time for another challenge at Our Daily Bread Designs!

This week's challenge:

Today marks the third March Anniversary challenge at Our Daily Bread Designs. . One of the traditional gifts is silk for the fourth anniversary. This week's challenge is to use silk or faux silk on your creation with your Our Daily Bread Designs stamps. Angie has created a wonderful tutorial here for the faux silk technique.


To make the challenge even more fun, we will be giving out a prize, a $15 gift certificate to be used toward stamps at the Our Daily Bread Designs store!! Entries for the prize must be submitted by Friday, March 30th at 8 a.m. EST. One random winner will be chosen and announced next Saturday.

While it is not required to use Our Daily Bread Designs images and sentiments on most of our challenges, this month it is an Our Daily Bread Designs only challenge month in honore of the ODBD 4th Anniversary. Three or more of our participants will be chosen for the Shining the Light Award .In order to qualify for this award or join the challenge, however, you must use Our Daily Bread stamps and have your submission added to Mr. Linky by Friday, March 30th at 8 a.m. EST. If you upload your creations to Splitcoast Stampers or any other online gallery, please use the keyword is ODBDSLC101. When creating your posts on blogs please include a link to the challenge.
Now for my take on the challenge:


For this card, I used the Scripture Series 2 Stamp Set from ODBD using 1 Timothy 6:17, "God richly gives us everything to enjoy."  Beautiful verse, beautifully designed with the fonts.
Instead of doing Angie's faux silk technique, I decided to use this luscious silk ribbon from Really Reasonable Ribbon, this ribbon is gorgeous and rich!  I did 2 other challenges with this, SC377 Sketch Challenge and F4A108 Monochromatic Challenge borth at Split Coast Stampers.
For some reason, I struggled this week with this challenge and finally gave up and asked God to HELP me!  I promised Him I would give Him ALL the Glory!  So here you have it, this is what He came up with!!!  Thank you Lord!!!  :-D
For all ingredients used:
Paper: BM - Hermit, Iced Cocoa (Core'dinations), Ancestry Designer Paper 12x12 & Mat Pad (K & Co)
Ink: Onyx Black (VersaFine), Amaretto (Powder Puffs - for sponging edges)
Accessories: Silk ribbon (Really Reasonable Ribbon), Adhesive Pearls (Recollections), flower (RAK from Sabrina), head pin/pearls/beads (Michaels), sponge, Classic Scalloped Ovals Large #5, Floral Ovals #3, Elegance M-Bossibilities (Spellbinders).
For more inspiration for the challenge, please visit the other design team members and see their gorgeous creations.
That's it for now!  Hope to see you join in on the ODBDSLC101 Challenge this week!
********************************************************************
On another note....If you like my creations, please see my sidebar for a contest I'm currently in!  You can also read more about it in my March 21st post here.  Thank you so much!
********************************************************************
Blessings!
Kathy

Thursday, March 22, 2012

RAK of Wonderful Goodies from Jill!!!

Hi there!


I mentioned on my Rain or Shine Challenge post for Elphine House Austalia that I had received a RAK from my sweet friend Jill.  It was actually a birthday present, but she sent me a LOT of things!!!  I think of it more as a RAK...random act of kindness!  Here's a picture of all the goodies together:


Here's some close-ups so you can see them better...

These are some die cuts she made from Cheery Lynn Dies that are GORGEOUS! You can see the flower swirl that I used on my Rain or Shine Card already. I'm saving these all to only used on special projects! I don't have any of these dies either...yet anyway, lol!


This next picture shows a GORGEOUS stamp set from Sweet & Sassy Stamps of a beautiful rose.   Jill knows how much I love roses! I've never seen their stamps before, but definitely need to check them out more! I love this set and can't wait to use it! You can also see images on the right that Jill stamped for me from a Heartfelt Creations Stamp Set. There's a bunch of images there to color...can't wait to do these too!!!


Jill also sent seam binding ribbon from Stampin' Up...2 whole spools!!!  Seam binding is my new favorite thing to use!!!  These are 2 favorite colors of mine to use, baja breeze and very vanilla!!!


This is the sweet card that Jill made...isn't is beautiful???  Really cool how she did the flower with floss!


How awesome to receive all these goodies!!!  Jill did a perfect job of picking things I would love and they're all things I don't have!  That's not easy, I have a LOT of stuff!!!   Thank you Jill for being SO generous!  You're such a sweet, dear friend of mine!!!

You can visit Jill at her beautiful blog Ribbon Challenged!

Blessings!

Kathy

Wednesday, March 21, 2012

Heartfelt Creations Design Team Semi-Finalist!!!

Hi there!

I have exciting news, I applied for the Heartfelt Creations Design Team Contest, and have been selected as a semi-finalist!!!  You can read more about it here on their Blog and see the other semi-finalists selected.  For this contest, I will need everyone's help!!!  They are having their customers involved in selecting the finalists and voting for their favorites.  If you like my creations, PLEASE let them know by voting for me on their blog!   Here's part of the post:

Vote for your favorite Semi-finalists: We would love to have you particpate and vote your 5 favorite semi-finalists listed above. Review each one of their blogs and then CLICK HERE to submit your vote. When you vote, you will also be entered into a drawing to be eligible to win a $50 HC Gift Certificate. You can only vote one time and you have to select 5 or more to be eligible to participate. Voting ends on April 13th, 2012


These are the 3 projects that I submitted to them along with the instructions I gave.
My first project is a corner bookmark that I made for a challenge on Flourishes’ Blog recently.


Products Used on this Project:

Stamps:  A Year in Flowers 1 (Flourishes)
Paper: White (Papertry Ink), Solar White (Neenah), Typhon (Bazzills), Watercolor Bouquet (K & Co.)
Ink: Onyx Black (Versafine)
Accessories: Fleur de Lis Squares Die, Classic Petal Edgeabilities (Spellbinders); Scor-Pal or other scoring tool; Scor-Tape or other strong adhesive; ribbon (Michaels); Adhesive Pearls (Recollections & Want2Scrap); Prismacolor Pencils: White, Black, Indigo Blue, Blue Violet Lake, Blue Denim, Kelly Green, Apple Green, Kelp Green.

Bookmark Instructions:   (Followed Corner Bookmark Instructions from Split Coast Stampers.) Cut 1 - 4” x 4” piece each of white and Typhon cardstock, cut 1 – 2 3/4” x 2 3/4” piece of Typhon cardstock.  Mark the center of three sides of the white 4” cardstock square.  Place cardstock square on paper cutter so two of the marked spots are aligned and cut triangular piece off.  Line up the other 2 markings and cut the same way.  Place these pieces aside.  Take the Typhon cardstock and mark and score in the same manner as the white, but do not cut.  Prefold these scored lines.  Using the Classic Petal Edgeabilities, create decorative edge on each piece of cardstock bottom edge.  Glue white cardstock piece inside of the Typhon piece allowing the white to show slightly on the bottom below the Typhon.  Fold the corners over and tape together to hold in place.  Take the 2 ¾” square Typhon cardstock and line up diagonally in paper cutter.  Cut the square in half into 2 triangles.  Adhere one of the triangles to the back of the bookmark using Scor-Tape or strong adhesive.  Remaining pieces are not needed.  Stamp flower image on Solar White cardstock and color with Prismacolor Pencils.  Die cut image with Fleur de Lis Die.  Adhere pearls to flower centers.  Glue square diagonally to front of bookmark.  Decorate with bow and more pearls.


My second project is a design team card I did for Our Daily Bread Designs using “stamped” flowers.


Products Used on This Project:

Stamps: The Light of Life, Flower Border (Our Daily Bread Designs)
Paper: Natural White (Neenah), Island Indigo (Stampin’ Up)
Ink: Onyx Black (Versafine)
Accessories: Fleur de Lis Punch (EK Success), Rebecca Embossing Folder (Cuttlebug), Classic Ovals and Labels 18 Nestibilities (Spellbinders), adhesive pearls (Recollections & K&Co), Seam Binding (Really Reasonable Ribbon), Bow Maker, Prismacolor Pencils: Peacock Blue, Olive Green, olderless mineral spirits.


Card Instructions: Cut 5 ½” x 8 ½” piece of Island Indigo and score at 4 ¼” for card base.  Cut 5 5/16” x 4 1/6” Natural White Cardstock for card mat and emboss with embossing folder.  Glue mat to card base.  Stamp sentiment on Natural White Cardstock and diecut and emboss with Classic Ovals die #5.  Stamp Flower Border on Natural White Cardstock.  Diecut and emboss with Labels 18 outside image and then Classic Ovals die #4 inside image.  Color image with Prismacolor Pencils.  Stamp additional flowers. color, and fussy cut to adhere to inside of frame.  Use pop dots adhesives to add depth to cut flowers.  Adhere frame to sentiment piece with pop dots and glue to card center.  Add pearls to decorate.  Make a triple bow with Bow Maker and glue to lower right corner.  Add flower to bow center.  For inside of card, cut 4” x 5 ¼” piece of Natural White Cardstock.  Punch bottom edge with Fleur de Lis Punch and adhere to inside of card.


My third project is a card I did trying out the Faux Letterpress Tutorial  posted on Split Coast Stampers a couple of  weeks ago.


Products used on this project:

Stamps: Mustang (Serendipity), Teeny Tiny Wishes (Stampin Up)
Paper: Black (SU), Kraft (DCWV Stack), Tan (not known)
Ink: Night of Navy (Stampin Up), Onyx Black (Versafine), Saddle Brown (StazOn), Rich Cocoa (Momento), Amaretto, Midnight Confession (Powder Puffs).
Accessories: Labels 18 Dies (Spellbinders),  Paper Lace II Embossing Folder (Cuttlebug), black hemp cord (Darice), twine, Stud Metal Art (K & Co), “leather” trim (Jo-Ann’s), mini brads (Recollections), Modern Label & Word Window Punches (Stampin Up), piercer and mat, Prismacolor Pencils: Chocolate, Light Umber, Dark Brown, Bronze, Black, and mineral spirits.


Card instructions: Cut 8 ½” x 11” piece of black cardstock and score at 4 ¼” and fold for card base.  Cut a 4 1/16” x 5 5/16” of kraft cardstock.  Ink the top of the embossing folder with Night of Navy Ink and emboss the kraft cardstock piece so the ink is on the background of the design.  Run the Saddle Brown ink pad across the top of the raised image, leaving some spots without ink, till you like the look it gives.  Ink the edges of this piece with Amaretto using a sponge.  Using tan paper, stamp Mustang image with Black Onyx.  Cut out image with Labels 18 die #4.  Color image with Prismacolor Pencils using all colors and burnishing to blend.  Use small amount of mineral when done to slightly  blend.  Put image back in the die and sponge with Rich Cocoa and then slightly sponge the bottom part of the image with Midnight Confession.  Using a piercer and mat,  pierce the corners of the mat as shown.  Cut black cardstock with the Labels 18 die #4, cut in half horizontally, matting the top and bottom of the image with each half.  Trim the sides slightly where the black extends beyond the sides of the image, then glue together.  Pierce large holes on the two bottom corners.  Stamp sentiment on tan cardstock with black ink and punch out using the word window punch.  Ink edges with Rich Cocoa and Midnight Confession.  Punch out the Modern Label mat with Black cardstock and adhere to the sentiment.  Pierce holes on each side,  insert the mini brads, and trim any ends that show.  Line up the sentiment directly below the image, pierce holes on the top of the sentiment  that line up with the holes made in the image.  Use 2 small pieces of the black hemp cord threading through the holes and knotting to appear like a sign hanging.   Adhere leather trim about 2/3 of the way down on the mat.    Adhere the mat to the card base.  Using pop dots, adhere the image and sentiment as shown.  Adhere the Stud Metal Arts as shown on the trim and the top right corner of the card.  Take a small piece of twine, make a knot, and adhere to card.

Heartfelt Creations will be mailing me products to use to make 2 creations for the final round this week that will be due on April 13th.  I can't wait to see what they send me to create with!!!

Blessings!

Kathy

Tuesday, March 20, 2012

Elphine House Australia - Rain or Shine Challenge

Hi there!

It's time for another challenge at Elphine House Australia!  This time the challenge is...


Rain or Shine 
With Spring approaching fast, you never know what type of weather you'll get, so we would love to see you add some RAIN or SUNSHINE to your Elisabeth Bell creation.
It’s that simple!
Use ANY Elisabeth Bell Design in order to qualify for
any 2 stamps of your choice from
Elphine House Australia.
 
Random.org will choose our winner again next time, and will be announced at the beginning of the next challenge.


Here is my take on the challenge:


After I finished this with the birthday sentiment, I added to pearls to the basket.  Now it looks more like an Easter card!   I may have to make another one of these for Easter!  The image for this is a brand new stamp by Elphine House Australia called "Carrie Thoughtful Breeze".  This is another stamp named after Lynne, one of our design team members, daughter who has some serious health issues.  Really sweet for Helen and Lew at EHA to do this for Carrie.

There are a couple of RAK supplies on this I received from sweet cyber friends.  The pink and white lace are from Sabrina which I already posted, but I have another here that I still need to show you.  The swirly circle on the bottom right, is from a RAK my sweet friend Jill sent to me.  I believe this is a dies cut from a Cheery Lynn Die.  Jill wrote the name on the back of it for me, but I glued it down before I wrote it down, lol!  I wasn't sure how to use this, but I love how it came out here!  I may need to order one of these dies!  I'll be doing a separate post to show you all the goodies that Jill sent to me!

I'm entering this into Really Reasonable Ribbon's "Spring" Theme Challenge which you can see here.

Also, I used the paper folding technique that you can see at the top left corner.  I made this for the F4A107 Challenge at Split Coast Stamper that you can see here

Lastly, I'm entering this into the Stampin' Sisters in Christ Challenge #131 showing something related to the new season.  The Scripture is:

He made the moon to mark the seasons...” Psalm 104:19


For all ingredients used:

Stamps: Carrie Thoughtful Breeze (Elphine House Australia), Birthday Blessings (Our Daily Bread Designs)
Paper: The Preppy Princess Stack (DCWV), "pink" cardstock (DCWV)
Ink: Onyx Black (VersaFine), Old Olive (Stampin' Up)
Accessories: Large Petite Scallops, Classic Scallops Ovals Large, Floral Ovals, Classic Petal Edgeabilities, Decorative Inserts Four Edg. (Spellbinders), Fanciful Flourish (Cheery Lynn Designs), Prismacolor Pencils, mineral spirits, adhesive pearls (Michaels),  lace, trim (RAK), swirly flower diecut (RAK), sponge, flowers (Prima, wedding supplies - Mike's), square punch EKS), doily (Wilson cake supply), arrow border (EKS)

That's it for now...hope to see you join in the challenge at Elphine House Australia!

Blessings!

Kathy

Saturday, March 17, 2012

Your Heart's Delight

Hi there!


*******************************************************************************
If you're looking for my post on the "4th Anniversary Blop Hop for Our Daily Bread Designs", please "hop" down one post to find it!!!  :-D
*******************************************************************************


This is a card I made for the latest Stampin' Sisters in Christ Challenge #130 to:

Create a card or project that uses both dark and light. Opposite colors; black/white, brown/ivory, deep blue/baby blue, red/pink etc.

This is my submission for the Challenge:


I decide to use a deep blue and baby blue combination.  The blues are actually much darker than they look here, the paper is Night of Navy from Stampin Up.  This week I received a new Spellbinders' Die "Floral Ovals" and the "Elegance" M-Bossibilites Embossing Folder which I used here.  Both of the are GORGEOUS!!!  I fell in love with this Floral Oval the minute I saw it, and I know I'll be using it a lot!

The Scripture Verse Psalm 37:4, is from Our Daily Bread Designs' Scripture Series 2 Set.  This is a wonderful Verse and beautifully designed with the fonts.

For the ingredients I used:

Stamp: Scripture Series 2 (ODBD)
Paper: Solar White (Neenah), light blue cardstock (DCWV Stack), Night of Navy (Stampin' Up)
Ink: Onyx Black (Versafine), Night of Navy (SU)
Accessories: Classic Ovals Large & Classic Scalloped Ovals Large, Floral Ovals , Elegance M-Bossabilities EF (Spellbinders), Fleur de Lis Punch (EKS) (inside card), adhesive pearls (Want 2 Scrap), button heart, sponge, flowers (Recollections & Michael's $1 bin), Branch with Leaves Die (Sizzix).

That's it for now!  Hope you're having a wonderful weekend!

Blessings!

Kathy


ODBD's 4th Anniversary Release Blog Hop!


Welcome to the Our Daily Bread designs 4th Anniversary Special Design Team Edition Release Blog Hop! If you got here from Gemiel's Blog , you are in the right place! If not, you might want to start at the ODBD Blog so you are sure to not miss anyone! If any links are lost along the way, you can always get the entire list of links from the ODBD Blog as well!

The bread sticks are so excited to be celebrating this special milestone in the life of ODBD! It is such a blessing to work for a company that brings glory to God in every stamp set created, and offers us the tools we need to do the same with every card we create! If you are a long term follower of ODBD, then you know that each year, the Design Team submits a favorite Scripture for the special anniversary sets, and those suggestions have been the sum total of all the "Scripture Collection" stamp sets in the store. This year, the special sets include our favorite Scriptures, but also quotes and sentiments that we feel would be great on cards or projects. I think you will find some of the most encouraging and uplifting words available in stamps in these special anniversary sets!

So now, here are the Details of the Anniversary Hop:

  • The Hop will run 8am EDT Mar. 17 until 8pm EDT Mar 18.
  • The winners will be announced on the ODBD Blog on Mar 19.
  • Four hoppers will win a FREE ANNIVERSARY SET and One blessed hopper will win The Complete Anniversary Bread Basket Bundle!!!
Here is what you have to do to be qualified to win one of these prizes:
  • Hop to each designer’s blog and leave a comment
  • Return to the Our Daily Bread designs blog and leave a comment telling us that you completed the hop, making note if there were any you could not comment on.
  • Along with your statement that you completed the hop, leave some Anniversary wishes for Kelley and the gang at ODBD!


Now... for the brief details of my card:

God's Great Peace...


My Bible verse for the Anniversary Release, is:

 "Great Peace have they who Love Your law, and nothing can make them stumble." Psalm 119:165.

This beautiful verse, one of my favorites, is in the new Scripture Collection #8 Set from ODBD.  I love this verse.  I love that it's not just "Peace" we will have, it's "Great Peace"!  I love that  it's not somethings, it's "N-O-T-H-I-N-G" can make us stumble"!  How wonderful is that to know!  I did notice though, it's not that we "like" His Law", it's that we "Love" His Law!


For ingredients I used:

Paper: Natural White (Neenah), Capers (Bazzills), 'coral' (cardstock stack - DCWV)
Ink: Versamark
Accessories: Fleur de Lis punch (EKSuccess), beads (Darice), pin (RAK), adhesive pearls (Recollections), Prawn R24 Copic Sketch Marker (to color the pearls), Branch with Leaves Die (Sizzix) (inside the card), flowers (Prima & RAK), Labels 20 Die (Spellbinders), Petal Pink Liquid Pearls (Ranger), piercer, Paper Lace II Embossing Folder (Cuttlebug), stylus, seam binding & pleated ribbon (Really Reasonable Ribbon), Fanciful Flourish Die (Cheery Lynn Designs), Flourishes #9 Die (Sizzix).

I'm also entering this in the:

Really Reasonable Ribbon Challange #44 Spring Theme with Ribbon which you can find here
Cheery Lynn Designs Challenge #19 Add a Flourish which you can find here.

Now I will send you to the next stop on the hop, Sabrina's Blog!

Have a wonderful weekend!  Good luck with the hop!

Blessings!

Kathy

Thursday, March 15, 2012

Really Reasonable Ribbon - I Won!!!

Hi there!

I'm so excited!!!  I just found out I won the latest challenge at Really Reasonable Ribbon!!!  This was for their Monocromatic Green Challenge for this card I made...


You can see is here on their website!  Thank you Really Reasonable Ribbon!  Their ribbons are fabulous and REALLY  are reasonable!

Blessings!

Kathy

Saturday, March 10, 2012

Light Up in Green

Hello again!

I'm back with another card today!  I made this card for a 3 different challenges which is unusual for me!  I decided to use one of the brand new March Release stamps from Our Daily Bread Designs called The Light of My Life.


The first challenge is for Split Coast Stampers SC374 Sketch Challenge, again.  The second is for Cheery Lynn Designs Challenge #18 to use doilies (I have a doily from a RAK, but it was too big for this).  The third challenge is for Really Reasonable Ribbon RRR43 to do monochromatic green.

The sentiment is stamped on the solar white paper, then die cut with the label die from the Parisian Accents set, and sponged while in the die.  I then die cut another label from the white and glued the 2 labels together to look like a motiff.  I noticed this looked good together a few weeks ago when I was doing the Spellbinders competition, and finally got around to doing it...although I'm sure it's already been done before by someone else.  :-)


The ingredients used:

Stamps: The Light of My Life (Our Daily Bread Designs - March Release)
Paper: Cardstock Stack (DCWV - green), The Preppy Princess Stack (DCWV), Solar White (Neenah), White (Georgia Pacific - inside card)
Ink: Onyx Black (VersaFine), Green with Envy (Powder Puffs)
Accessories: Doilies (Wilton), Parisian Accents, Standard Circles Large #4 (Spellbinders), Fanciful Flourish (Cheery Lynn Designs), Doily Lace Edge Punch (Martha Stewart - inside card), ribbon (Really Reasonable Ribbon), adhesive pearls (Recollections & Want 2 Scrap), resin rose (Recollections), ribbon flowers (Michaels), Copic Sketch Marker YG63 Pea Green (colored the pearls in the middle of the flower), sponge

That's it for now.  Hope you are having a blessed weekend!

Blessings!

Kathy

Our Daily Bread Designs Shining the Light Challenge - ODBDSLC100

Happy Saturday!

It's time for another Shining the Light Challenge at Our Daily Bread Designs! 

This week's challenge:
Since next week will be the Our Daily Bread Designs Anniversary Blog hop, this challenge will last two weeks.
Today marks the second March Anniversary challenge at Our Daily Bread Designs. The anniversary stone given for the fourth anniversary is topaz and the birthstone for March is aquamarine. This week we want to see aqua or topaz (blue) with your favorite scripture, sentiment, or quote. You must use Our Daily Bread Stamps to link your creation.
To make the challenge even more fun, we will be giving out a prize, a $15 gift certificate to be used toward stamps at the Our Daily Bread Designs store!! Entries for the prize must be submitted by Friday, March 23rd at 8 a.m. EST. One random winner will be chosen and announced next Saturday.

While it is not required to use Our Daily Bread Designs images and sentiments on most of our challenges, this month it is an Our Daily Bread Designs only challenge month in honor of the ODBD 4th Anniversary. Three or more of our participants will be chosen for the Shining the Light Award . In order to qualify for this award or join the challenge, however, you must use Our Daily Bread stamps and have your submission added to Mr. Linky by Friday,
March 23rd at 8 a.m. EST. If you upload your creations to Splitcoast Stampers or any other online gallery, please use the keyword is ODBDSLC100. When creating your posts on blogs please include a link to the challenge.

Here is my sample for the challenge this week!

After taking this picture, I decided to add some leaves and some pearls around the quote.  I like it much better, but when I re-did the picture it made the card look more blue than aqua.  It makes it look like a different card, but it's actually the same one!  I figured I'd give you both pictures!
The stamp I used for the quote, is from the God's Love Set released in January.  There's something about this quote that I just LOVE.  I keep saying it over and over in my head!  I tried to pick a favorite verse, but that's like picking your favorite child!  I love them all!

For ingredients used:

Stamps: God's Love (Our Daily Bread Designs)
Paper: Natural White (Neenah), Mocha Devine (Bazzills), The Linen Closet Stack & Cardstock Matstack (DCWV)
Ink: Vintage Sepia (VersaFine)
Accessories: Adhesive pearls (Recollections), stick pin with beads (RAK from Sabrina), flowers (RAK, Recollections, Prima), leaves (Recollections), ribbon (Michaels), seam binding (Really Reasonable Ribbon), heart button ( Dress It Up), Classic Ovals & Scalloped Ovals Large Nestibilities, Classic Petal Edgeabilities (Spellbinders), Fanciful Flourish Die (Cheery Lynn), sponge.


I also made this card using last week's Sketch Challenge SC374 at Split Coast Stampers...I'm a little late with this one!

For more inspiration for the challenge, please visit my Design Team Sisters!

Thanks for stopping by!  Hope to see you enter in the ODBD's Challenge this week!  Lots of fun happening at ODBD this month with their 4th Anniversary!
Have a great weekend!
Blessings!
Kathy
Tuesday, March 6, 2012

Updated: - Elphine House Australia Challenge - Pearls & Lace

Hi there!

It's time for a new challenge at Elphine House Australia! This week the challenge is to use pearls and lace! Oh, how easy! I'm always using pearls and lace! Here's what I came up with for the challenge this week!


This is a brand new stamp from Elphine House Australia called, "Carrie Swan Princess". How sweet and precious is she! I am never disappointed with Elisabeth Bell, her illustrations are so adorable and amazing! After I finished my card, I realized that swans are supposed to have orange beaks! Oh well, my swan is a little unique lol!

For supplies used:

Stamps:  Carrie Swan Princess (Elphine House Australia)
Paper: Dusty Durango (SU), Solar White (Neenah), The Mariposa Stack (DCWV)
Ink:  Onyx Black (Versafine)
Accessories:  Labels 20 (Spellbinders), lace (Jo-Anns), ribbon (Michaels), flower (Recollections), adhesive pearls & Nestibling (Want2Scrap), Diamond Stickles (Ranger), white gel pen, Prismacolor Pencil, mineral spirits.


Hope you can join us for the Pearls & Lace Challenge at EHA!

Blessings!

Kathy

   *************************************************************

Oops!  I forgot to include this in the Stampin Sisters in Christ's latest challenge #129, "Things with Wings"!  (My sticky note stuck for this stuck to a different project, lol!)  This is the Bible Verse with the challenge.

Psalm 91:4a "He will cover you with his feathers, and under his wings you will find refuge."

As I was reading this verse, I thought about feathers and how delicate they can be to the touch and yet how strong they are when being used to fly.  It reminds me of how gentle God can be with us giving us peace and refuge, and yet how strong He truly is.  What a blessing God is to me and I'm so thankful He is in my life!  Blessings!  Kathy

Saturday, March 3, 2012

Island Flowers - ODBDSLC99 - Stamped Flowers

Happy Saturday!

It's time for a new Shining the Light Challenge at Our Daily Bread Designs! 

This week's challenge: Since our March challenges are now beginning and this month marks the FOURTH Anniversary of Our Daily Bread Designs, all our challenges will focus on the Anniversary!!! Since one of the traditional gifts for the fourth anniversary is flowers. We would like to see flowers on your creations. Not just flower embellishments but flower stamps. You must use Our Daily Bread Stamps to link your creation.


To make the challenge even more fun, we will be giving out a prize, a $15 gift certificate to be used toward stamps at the Our Daily Bread Designs store!! Entries for the prize must be submitted by Friday, March 9th at 8 a.m. EST. One random winner will be chosen and announced next Saturday. If you are not using ODBD stamps, please do not enter more than once. Additional entries without using ODBD stamps will not be commented on or will they qualify for prizes.

While it is not required to use Our Daily Bread Designs images and sentiments on your creations, we would love to see them if you have them.As a way of recognizing those who do use Our Daily Bread Designs stamps, we will again be choosing 1 to 2 creations to spotlight for our Shining the Light Award.Inorder to qualify for this award, however, you must use Our Daily Bread stamps and have yoursubmission added to Mr. Linky by Friday, March 9th at 8 a.m. EST. If you upload your creations to Splitcoast Stampers or any other online gallery, please use the keyword is ODBDSLC99. When creating your posts on blogs please include a link to the challenge.

Here is my sample for the challenge this week!


I used the Flower Border Stamp (ODBD) for the frame and fussy cut a couple of pieces for the inside of the frame and popped them a little with pop dots.  The Verse, Psalm 43:3, is from a brand new March release set from Our Daily Bread Designs called "The Light of Life".   Beautiful fonts on this, and I like how 2 different ones are used together.   I wanted to do a "cream on cream" card with 1 dramatic color.   I love how the flowers stand out with the Island Indigo SU paper behind the cream and the seam binding and flower on top.

For ingredients used:

Stamps: Flower Border, and The Light of Life (Our Daily Bread Designs)
Paper: Natural White (Neenah), Island Indigo (SU)
Ink: Black Onyx (Versafine)
Accessories: Fleur de Lis punch (EKS), Rebecca embossing folder (Cuttlebug), Classic Ovals Nestibilities, Labels 18 (Spellbinders), adhesive pearls (Recollections & K&Co.), seam binding (Really Reasonable Ribbon), Prismacolor Pencils, Mineral Spirits, scissors. 

For more inspiration for the challenge, please visit my Design Team Sisters:


Thanks for stopping by today, hope you all have a wonderful and blessed weekend!

Blessings!

Kathy