Be Joyful

Rejoice in the Lord always. Again I will say, rejoice! Let your gentleness be known to all men. The Lord is at hand. Be anxious for nothing, but in EVERYTHING by prayer and supplication, with thanksgiving, let your requests be made known to God; and the PEACE OF GOD, which surpasses all understanding, will guard your hearts and minds through Christ Jesus. Philippians 4:4-7

These are verses I memorized years ago and they are written on my heart. There are times when I still need to remember not to be anxious, but I eventually listen to my heart saying these verses. I didn't really understand what the "peace of God" was until I experienced it. It's having peace inside you, even when you're going through heartbreaking situations and trials. It does "surpass ALL understanding" and you know it comes from GOD alone. Praise the Lord for His wonderful promises!


I love, love, love what I do. I am passionate about the things I create and the talents God has placed in me. I SO appreciate the time you take to look at my things and the comments you all leave me!

Blessings to you!

Kathy

Thursday, September 27, 2012

Design Team Postition

Hi there!

My position as a designer for Heartfelt Creations is almost done :-( and they have started the voting for those that will continue for another 6 month term.  If you like my creations, would you consider voting for me on their Blog?  This is the exerpt from the post yesterday announcing the new semi finalists and the voting for the current designers that will continue to the next term. 


Hi Everyone,
There are many fun things happening today on the Heartfelt Creations blog. We are showcasing more beautiful samples with the Delicate Asters Collection, announcing DT Semi-finalists, and giving you a chance to vote on your favorite semi-finalists and current design team members.

DT Semifinalists: Today we are pleased to announce the HC Design Team Semifinalists. Choosing from such great talent and diversified submissions is very difficult and we appreciate all the applicants that participated in the design team call. Without further ado, here are the semifinalists:Therese Broman, Holly Thompson, Gini Cagle, Glenda Brooks, Alica Ziakova, Olga Jewell, Vicki Dutcher, Nataliya Simpson, Lisa Allen, Ujjwal Goel, Yuliet Ramos, Sharm Nidyanandan, Stephanie Dinnell, Stacie Johnson, Mary Faus, Karyl Sibley, Lisa Eisner, Linda M. Loew, Monica Edwards. Congratulations! The semi-finalists will be recieving some HC products and then they will be creating two projects for the final round. The design team finalists will be announced on October 31.

Vote for your favorite Semifinalists: We would love to have you particpate and vote your 5 favorite semi-finalists listed above. Review each one of their blogs and then CLICK HERE to submit your vote. When you vote, you will also be entered into a drawing to be eligible to win a $50 HC Gift Certificate. You can only vote one time and you have to select 5 or more to be eligible to participate. Voting ends on October 17th, 2012
Vote for your favorite Designers: When we announce a new design team call that also means that we have a tough time deciding which of the current designers continue on the HC design team. We decided to do things a little differently this time and are giving you the opportunity to get involved and vote for 5 or more of your current favorite design team members. You can CLICK HERE and submit your vote. When you vote, you will also be entered into a drawing to be eligible to win a $50 HC Gift Certificate. You can only vote one time and you have to select 5 or more to be eligible to participate. Voting ends on October 17th, 2012.


I LOVE creating with Heartfelt Creations' products and pray I will be able to continue as one of their designers. 

Blessings!

Kathy
 

Wednesday, September 26, 2012

Heartfelt Creations - Altered Frame

Happy Wednesday!

It's time for some more inspiration from Heartfelt Creations!


This week I have an unfinished wood frame I bought at Michaels that I altered with designer papers and stamps (old and new ones).  The main part of the frame has one of the designer paper images with the birdhouse in the bottom right corner.  I used Mod Podge to glue it to the frame and cut the paper for the opening and and trimmed the outside.  Then I just added a bunch of embellishments to it...you can add as much or as little as you want!  This was actually fun to make and would make a nice gift for someone!  Some of the embellishments I used are "leftovers" from other projects that I saved.  If you click on the picture, you get a better view of the details on it.  Also, complete instructions are at the end of the post.

Please visit the Heartfelt Creations Blog to see all the Designer's gorgeous creations this week along with instructions of how they created them!

I'm submitting this to the following challenges:

Word Art Wednesday #47 - use Scripture or uplifting sentiments.
Stampin' Sisters in Christ Challenge #158 - include something handmade.

I hope this gives you some inspiration and gift ideas!

Blessings!

Kathy


Delicate Asters Altered Frame

Heartfelt Creations Products & Products Carried by HC:


Other Products Used:

Paper: Solar White (Neenah), purple cardstock (DCWV)

Ink: Onyx Black (VersaFine), Always Artichoke (SU)

Accessories: Florentine Gold Microbeads (Martha Stewart), adhesive pearls (Want2Scrap), metal stickers (Michaels), hole punch, mineral spirits, heat gun, Old Fashioned Olive Embossing Powder (SU), Eggplant Embossing Powder (Recollections), pop dots, scissors, unfinished wood frame (Michaels), sand paper, Mod Podge, foam brush, Olive Green Acrylic Paint (Michaels), craft knife, cutting mat, sponge, Prismacolor Pencils: Black Grape, Marine Green, Black, Cool Greys, French Greys, Jasmine, Yellow Ochre, Goldenrod, Chocolate

Instructions:

Frame: Sand edges of frame if needed, wipe off dust, and paint with Olive Green Paint. Let dry. Use green designer paper with birdhouse for front of frame placing birdhouse on lower right. Add to frame with Mod Podge, let dry, and trim excess with craft knife. Sand and ink edges with Always Artichoke. On lower left corner, stamp large Twining Aster (Delicate Twining Aster Set) and color with pencils. On top left corner, stamp flourish (Rye Grass Flourish Set) with Always Artichoke Ink.

Embellishments: On Solar White with Onyx Black Ink, stamp 1 butterfly (Delicate Asters & Butterflies Set), 2 of each flower and 3 leaves (Delicate Asters Set), large birdhouse (Bird Haven Set), 2 flying birds & 1 sitting bird (Brookside Manor), and 1 small bucket (Classic Editions Set). Color all with pencils. Fussy cut butterfly and cut remainder with match dies. On purple designer paper with VersaMark Ink, stamp 2 large, 2 medium, 4 small, 4 extra small flowers (Bold Delicate Asters Set), and heat emboss with Eggplant Embossing Powder. On green designer paper with VersaMark Ink, stamp 3 leaves (from same set) and heat emboss with Old Fashioned Olive Embossing Powder. Cut all with matching dies. Cut 3 tiny flowers from the same die set with purple designer paper for the “bold” flower center. Shape and assemble flowers as shown and add microbeads to centers. With Solar White Cardstock, cut 2 fences (Garden Romance Die) and 1 hanger (Decorative Metal Die). With green designer paper, cut 2 branches (Classic Editions Die). Make small slit in bucket and insert branches and glue. Add all embellishments to frame as shown.

Frame insert: With Solar White Paper and Onyx Black Ink, stamp corner script aster (Script Aster Background Set) and Bible Verse (Believe Set) as shown. Color aster with pencils and cut to fit inside frame. Finish back of frame with purple cardstock and Mod Podge. Add flying bird with pop dot and add pearls.


Tuesday, September 25, 2012

ODBDSLC124 - Something Musical

Happy Tuesday!

It's time for a new Shining the Light Challenge at Our Daily Bread Designs!

This week's challenge: Something Musical
Create a card or project with some musical element. It can include a musical theme, some words in the sentiment in verse having to do with music or instruments, an embossing folder, dp or etc.
This will be a two week challenge...I hope this gives you more time to participate.

To make the challenge even more fun, we will be giving out a prize, a $15 gift certificate to be used toward stamps at the Our Daily Bread Designs store!! Entries for the prize must be submitted by Sunday, October 7th at 8 p.m. EST. One random winner will be chosen and announced next Saturday.

While it is not required to use Our Daily Bread Designs images and sentiments on your creations, we would love to see them if you have them. As a way of recognizing those who do use Our Daily Bread Designs stamps, we will again be choosing three or more of our participants for the Shining the Light Award . In order to qualify for this award or join the challenge, however, you must use Our Daily Bread stamps and have your submission added to Mr. Linky by Sunday, October 7th at 8 p.m. EST. If you upload your creations to Splitcoast Stampers or any other online gallery, please use the keyword is ODBDSLC124. When creating your posts on blogs please include a link to the challenge.

Now for my take on the challenge this week...


I love this little chickadee from the You Will Find Refuge Stamp Set!  It's so cute and I love having the matching die for it so I can place it wherever I want.  Here's a picture of the actual set that shows the Verse I used:


I stamped the chickadee on yellow designer paper (Weekend Market) and colored it a little with pencils.  These papes are so pretty and rich that I really didn't need to do much to make this card.

Card Recipe:

Stamps: You Will Find Refuge (Our Daily Bread Designs)
Paper: Blue (Recollections), Weekend Market (Bo Bunny)
Ink: Onyx Black (VersaFine), Amaretto (Powder Puffs)
Accessories: Bow-Easy, Golden Maple Silk Ribbon (Really Reasonable Ribbon), Chickadee Die (Our Daily Bread Designs), spacer bead, adhesive pearls (Michaels), Elegant Scrollwork Die (Memory Box), mineral spirits, Prismacolor Pencils: Black, Indigo Blue, Chocolate, Goldenrod, Burnt Ochre

Please visit the other designers to see their gorgeous creations this week and leave them some love!

  • Katherine Lawson - Guest Designer

  •  
     
     
    I'm also entering this in the following challenges:
     
    Word Art Wednesday Challenge #46 - Proverbs 17:17 for Scripture or uplifting words
     

    Really Reasonable Ribbon - RRR56 - Autumn Colors and Ribbon

    Hope to see you join in the challenge this week on Our Daily Bread Designs.  Remember you have 2 weeks this time!

    Blessings!

    Kathy


    Wednesday, September 19, 2012

    Heartfelt Creations' Inspiration

    Happy Wednesday!

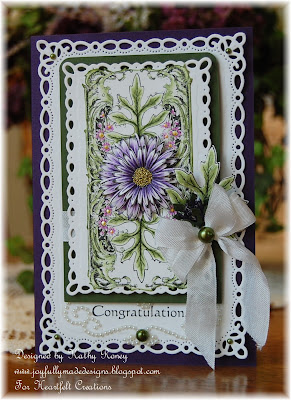
    I have two cards to show you today!  The first is done with the new Delicate Asters Collection.


    Congratulations


    This beautiful image is from the Delicate Asters & Butterflies Set that I colored with pencils and added a flower on top to give it dimension.    I thought this was pretty with the Romantic Rectangles behind it.  (You can click on the picture for a better view and the complete card recipe and instructions are at the bottom of the post.)


    Holiday Season


    The second card I have for you is done with the Ornamental Light Collection.  The main image is one of the journal blocks that I cut from the Frosty Blanket Paper Collection.  These are fun and easy to make cards with!  I loved the mauves and grays on this block image and designed the card to compliment it.

    Be sure to check out all the designers creations this week on the HC Blog, they're amazing to look at! 

    I'm also submitting this to the latest Word Art Wednesday Challenge #46.

    Have a wonderful week!

    Blessings!

    Kathy


    Congratulations
    Heartfelt Creations Products & Products Carried by HC:
    HCPC 3494 – Delicate Asters PreCut Set
    HCPC 3499 – Delicate Asters and Butterflies PreCut Set
    HCPC 3449 – Doorway to My Heart PreCut Set
    HCD 726 – Delicate Asters Die
    HCD 724 – Classic Editions Die
    HCDP1  226 – DelicateAsters Paper Collection
    Product ID:159223 - Paper Blossoms Molding Mat
    Product ID:459222 - Paper Blossoms Tool Kit
    Product ID: 159723 – Art Institute Glue – Dries Clear
    SF03602 - Prismacolor Pencil Set 120 pc.

    Other Products Used:
    Paper: Solar White (Neenah), Pansy, Rain Forest (Bazzills)
    Ink: Onyx Black (VersaFine), Green with Envy (Powder Puffs)
    Accessories: Corner Rounder Punch (Stampin’ Up), Romantic Rectangles Die (Spellbinders), White Seam Binding (Really Reasonable Ribbon), Adhesive Pearls & Nestabling (Want-2-Scrap), Bow-Easy, Buttercup Liquid Pearls (Ranger), sponge, pop dots, white gel pen, mineral spirits

    Instructions:
    Base: With Pansy cardstock cut 6 1/4” x 8 1/2", score at 4 1/4", and fold to create card that measures 4 ¼” x 6 ¼”.  Stamp sentiment on white cardstock and cut with largest die from Romantic Rectangles so that sentiment is on the bottom center as shown.  Glue to card base.
    Image: On Solar White cardstock with Black Onyx ink, stamp flower image from Delicate Asters and Butterflies Set.  Stamp 2 each of the 2 smallest flowers from the Delicate Asters PreCut Set.  Color all with pencils (Lavender, Violet, Dark Purple, Kelp Green).   Fussy cut flower image and ink edges with green ink.  Cut flowers with matching dies, shape with tool kit and mat as desired, glue together, and add microbeads to flower center.  Add liquid pearls to flower image as shown.  Add flower to flower image.  Cut second largest frame from the Romantic Rectangles Dies with white cardstock and glue to image.  Cut Rain Forest cardstock 3” x 4 5/8”.  Round 2 top corners.  Wrap ribbon around the green mat as shown and tape to back.  Add image to green mat with pop dots.
    Embellishments: Trim Nestabling to fit over sentiment on base and add image to base with pop dots.  Stamp leaves (1) from Delicate Asters Set on Solar White with Black Onyx Ink, color with pencils (Kelp Green), and cut with matching die.  On Pansy cardstock, cut 3 smallest flowers from the Delicate Asters Dies.  On Rain Forest cardstock, cut 1 leaf branch from Classic Editions Dies.  Shape all together as shown to form a flower bud and glue together.  Highlight the purple bud with white gel pen.  Make bow with Bow-Easy.   Add all to card as shown.  Add adhesive pearls as shown.


    *******


    Holiday Season

    Heartfelt Creations Products & Products Carried by HC:
    HCPC 3415-1 – Petite Poinsettia PreCut Set
    HCPC 3488 – Decorative Metal Fixtures PreCut Set
    HCPC 3493 – Yuletide Sentiments PreCut Set
    HCD 725 Decorative Metal Fixtures Die
    Product ID: 125156 - Layered Poinsettia Die
    HCDP1 – 225 – Frosty Blanket Paper Collection
    Product ID:159223 - Paper Blossoms Molding Mat
    Product ID:459222 - Paper Blossoms Tool Kit
    Product ID: 159723 – Art Institute Glue – Dries Clear

    Other Products Used:
    Paper: Solar White (Neenah), Capers, Brocade, Ash (Bazzills)
    Ink: Onyx Black (VersaFine), London Fog (Momento)
    Accessories: Triad Leaves Embossing Folder (Sizzix), adhesive pearls (Recollections), Detail Clear Embossing Powder (Stampendous), pop dots, Plum marker (LePlume II – Marvy), heat gun, white gel pen, sponge, mineral spirits, Prismacolor Pencils: Black, Black Raspberry, Mahogany Red

    Instructions:
    Card base: Cut Brocade cardstock 5 1/2" x 8 1/2" and score at 4 1/4".  For mat, cut Ash cardstock 5 5/16” x 4 1/16”, emboss with folder.
    Image: Cut journal panel from designer paper.  Stamp sentiment with black ink and heat emboss with clear embossing powder.  Ink edges with London Fog Ink.  Cut mat with Ash at 3 3/16” x 4 3/16”, cut Brocade mat at 3 3/8” x 4 3/8”.  Glue image and 2 mats together.  Add to card base with pop dots.
    Embellishments: Die cut large bracket with Brocade and glue to card as shown.  For flower, stamp 2 extra small poinsettia flowers on Solar White with Black Onyx, color with pencils, and cut with matching dies.  With Capers cardstock and Onyx Black Ink, stamp 1 small poinsettia flower and cut with die.  Mold flowers as desired with mat and tool kit.  Glue together and add to bracket in corner as shown with pop dot.  For lamppost, stamp pole and light on Ash cardstock with Onyx Black Ink, color with pencils, add white gel pen to flame of light, cut with matching dies, and ink edges with black ink.  Glue light and post together with glue.  Add to image as shown with pop dots.  Add black pearls to card as shown.

    Tuesday, September 18, 2012

    ODBDSLC123 - Stamp Your Own Background

    Happy Tuesday!

    It's time for a new Shining the Light Challenge at Our Daily Bread Designs!

    This week's challenge:

    Stamp your own background on a card or project. 

     
    To make the challenge even more fun, we will be giving out a prize, a $15 gift certificate to be used toward stamps at the Our Daily Bread Designs store!! Entries for the prize must be submitted by Sunday, September 23rd at 8 p.m. EST. One random winner will be chosen and announced next Saturday.

    While it is not required to use Our Daily Bread Designs images and sentiments on your creations, we would love to see them if you have them. As a way of recognizing those who do use Our Daily Bread Designs stamps, we will again be choosing three or more of our participants for the Shining the Light Award . In order to qualify for this award or join the challenge, however, you must use Our Daily Bread stamps and have your submission added to Mr. Linky by Sunday, September 23rd at 8 p.m. EST. If you upload your creations to Splitcoast Stampers or any other online gallery, please use the keyword is ODBDSLC123. When creating your posts on blogs please include a link to the challenge.


    Here's my take on the challenge this week...


    Since I don't have any background stamps, I created my own using 3 different stamp sets!  Silly me decided I would color the images on white!  This is only 1/2 of what I actually stamped and colored, lol!  What was I thinking?  After I was done, I then embossed it with a snowflake folder.

    Card Recipe:

    Stamps: Dreams, Holiday Ornaments, Luke 2:11 (Our Daily Bread Designs)
    Paper: Solar White (Neenah), Red Devil, Capers (Bazzills)
    Ink: Onyx Black (VersaFine), VersaMark
    Accessories: Fleur de Lis Squares (Spellbinders), Snowflakes #8 Embossing Folder (Sizzix), ribbon, snowflake button (Michaels), distressing tool, adhesive pearls (Want2Scrap), mineral spirits,  heat tool, Old Fashioned Olive Embossing Powder (SU), Prismacolor Pencils: Cool Greys 10%, 70%, Bronze, Kelp Green, Crimson Red, Tuscan Red

    Please visit the other designers to see their fabulous creations this week!


  • Katherine Lawson - Guest Designer
  •  
    I'm also submitting this to the latest Word Art Wednesday Challenge #45.
     
    Hope you can join in the challenge this week!
     
    Blessings!
     
    Kathy
     

    Friday, September 14, 2012

    Elphine House Australia - 3-2-1 Recipe

    Hi there!

    It's time for a new challenge at Elphine House Australia!  This time the challenge is:


    WHAT ARE WE DOING THIS MONTH???

    The challenge is.....


    "It's a 3, 2, 1 Recipe"
    What that means is to please use 3 of one thing and 2 of another, then lastly 1 of yet another thing.... YOU get to choose your ingredients.

    Using ANY Elisabeth Bell Design


    Please note: YOU MUST USE AN ELISABETH BELL Designed Stamp in order to qualify for
    2 stamps that Elphine House Australia is giving away.
    Remember, if you do not use a design by Elisabeth Bell, Your entry will not be counted for the prize, and will be deleted from our list of entries.

    Helen and Lew from Elphine House Australia, have decided to "SURPRISE YOU" with the 2 stamps. So it's a Mystery. =)


    Random.org will choose our winner next time, and will be announced at the beginning of the next challenge.

    (Our next challenge will be on October 15th)

    For my creation this week, I used a new stamp named "Daisy Standing Tall". 


    She is so sweet!  I love her little face and old-fashioned clothes!  I decided to use pinks and greens and selected these Preppy Princess Stack Papers from DCWV.  The sketch I used is for the latest sketch challenge at Split Coast Stampers SC402.  The vine in the top corner is the Madera Corner Die that I've had for a while and finally using...it's so beautiful!  The little tag is made with a new die I just got named Marvelous Squares.  I bought this from Crop Stop with a gift certificate I won at Word Art Wednesday...woo hoo!  I can't wait to use the rest of the dies!

    For the Challenge, the recipe ingredients for my card are 3 - die cuts, 2 - mats/layers, and 1 - bow.

    I'm submitting this to the following challenges:
    Sketch Challenge SC402 (SCS)
    Word Art Wednesday Challenge #45

    Complete recipe:

    Stamps: Daisy Standing Tall (Elphine House Australia), Teeny Tiny Wishes (SU)
    Paper:  Solar White (Neenah), The Preppy Princess Stack (DCWV), pink (DCWV Cardstock Stack)
    Ink:  Onyx Black (VersaFine)
    Accessories:  Floral Ovals, Marvelous Squares (Spellbinders), adhesive pearls (Michaels), Nestabling (Want-2-Scrap), flower punch (EKSuccess), White Opal Liquid Pearls (Ranger), embroidery floss, 1/8" hole punch, Tool Kit, mat (McGill), mineral spirits, White Gel Pen, Rose Petal Seam Binding (Really Reasonable Ribbon), Black Multi Liner Marker (Copic), branch punch (Marth Stewart), spacer bead (Michaels), Madera Corner Die (Memory Box), Bow-Easy, Prismacolor Pencils

    Thanks for stopping by!

    Blessings!

    Kathy


    Wednesday, September 12, 2012

    Heartfelt Creations September Release!

    Happy Wednesday!

    We are pleased to introduce the Delicate Asters Collection. You are creative. Show your friends with this unique Aster collection. With beautiful elegant petals and Monarch butterflies, this set will represent you in a lively popping way. The typography makes speaking from your heart quick and easy. Our paper is a great value for those looking to get their money’s worth on materials. Since there are two different designs on the paper’s front and back, you get 24 different designs in one package. Now you have a variety of options when you get bored.

    There are 6 new PreCut Stamp Sets, one 12x12 Paper Collection, and one beautiful new exclusive Spellbinders die designed for Heartfelt Creations. Leave a comment on the HC blog by September 18th and you will be eligible to win the entire release valued at $145.92 .


    This collection is SO amazing!!!  The stamps and dies are gorgeous!  I love how delicate the flowers are and how beautiful the different sizes look together!  I'm not that experienced at making flowers, but I really love how these ones come out!  The designer papers are stunning and make creating with the stamps and dies an absolute dream!  It honestly took a little while to actually cut the papers because they are SO beautiful!  I wasn't the only one either!


    The card I made here uses a sentiment block that I cut from one of the papers that has a bunch of different ones on it.  All I did here was frame the sentiment block with the Decorative Window Die, trimmed it, and add embellishments!  (Complete details are at the end of the post.)  These sentiment blocks are something new with this collection that I love!  The journal blocks are also included that I like to just stamp sentiments on and add to cards.  The other designers have created some gorgeous albums with this also!  Of course, you can always use them as actual journal blocks for scrapbooking! :-)

    Please visit the HC Blog to see all the gorgeous creations by the designers!  Also, make sure to leave a comment there to be eligible to win the entire release!

    I am submitting this to the latest Word Art Wednesday Challenge #45 using Scripture or uplifting sentiments or quotes.  Also, to the Stampin' Sisters In Christ Challenge #156 - create with bright colors only, no black, brown, or neutrals.

    Thank you for stopping by and hope this gives you some inspiration!

    Blessings!

    Kathy


    Card Recipe:

    He Cares For You

    Heartfelt Creations Products & Products Carried by HC:
    HCPC 3494 – Delicate Asters PreCut Set
    HCPC 3480 – Brookside Manor PreCut Set
    HCD 726 – Delicate Asters Die
    HCD 723 Garden Romance Die
    HCD 708 – Decorative Window Scene
    HCDP1  226 – Delicate Asters Paper Collection
    Product ID:159223 - Paper Blossoms Molding Mat
    Product ID:459222 - Paper Blossoms Tool Kit
    Product ID: 159723 – Art Institute Glue – Dries Clear
    SF03602 - Prismacolor Pencil Set 120 pc.

    Other Products Used:
    Paper: Solar White (Neenah), Pansy (Bazzills)
    Ink: Onyx Black (VersaFine)
    Accessories: Square Lattice Embossing Folder (Stampin’ Up), Florentine Gold Microbeads (Martha Stewart), White Seam Binding (Really Reasonable Ribbon), bead spacer (Michaels), adhesive pearls (Want-2-Scrap), pop dots, Bow-Easy, mineral spirits

    Instructions:
    Card base: Cut Pansy cardstock 5 1/2" x 8 1/2", score at 4 1/4", and fold.  Emboss 1 ¼” of bottom front.
    Image: Cut sentiment block piece from the Delicate Asters Paper Collection.  Cut white cardstock with Decorative Window Die.  Trim sentiment to fit under window and glue behind it.  Add to base with pop dots.
    Embellishments: On Solar White with Black Onyx Ink stamp small butterfly with Brookside Manor Set, color with pencils (Violet), and cut with matching die from Garden Romance Collection.  With Delicate Asters Set, stamp 3 leaves, 2 each of the 3 smallest sized flowers.  Color with pencils (Violet & Kelp Green), cut with matching dies from the Delicate Asters Dies, shape with mat and tool kit as desired, and glue together.  Add microbeads to flower center and the 2 flowers on the sentiment paper.  Add all to card as shown.  Make bow with Bow-Easy and add to card.  Glue pearl to spacer bead and adhere to center of bow.


    Tuesday, September 11, 2012

    ODBDSLC122 - Birds

    Happy Tuesday!

    It's time for a new Shining the Light Challenge at Our Daily Bread Designs!

    This week's challenge: Use a bird or birds on your creation.

    To make the challenge even more fun, we will be giving out a prize, a $15 gift certificate to be used toward stamps at the Our Daily Bread Designs store!! Entries for the prize must be submitted by Sunday, September 16th at 8 p.m. EST. One random winner will be chosen and announced next Saturday.

    While it is not required to use Our Daily Bread Designs images and sentiments on your creations, we would love to see them if you have them. As a way of recognizing those who do use Our Daily Bread Designs stamps, we will again be choosing three or more of our participants for the Shining the Light Award . In order to qualify for this award or join the challenge, however, you must use Our Daily Bread stamps and have your submission added to Mr. Linky by Sunday, September 16th at 8 p.m. EST. If you upload your creations to Splitcoast Stampers or any other online gallery, please use the keyword is ODBDSLC122. When creating your posts on blogs please include a link to the challenge.


    Here's my take on the challenge this week...


    I used a little bird charm I bought at Michaels and attached it with a chain and jump ring to the bow.  The quote from Mother Teresa is from the Let Us Begin Stamp Set from Our Daily Bread Designs.  Here's a view of the whole set...
     

    Next time, I'd like to use the lotus flower corners so I can do some coloring!  Here's the complete card recipe:

    Stamps: Let Us Begin (Our Daily Bread Designs)
    Paper: Almanac (Prima), Black (Recollections), Iced Cocoa (Coredinations)
    Ink: Onyx Black (VersaFine), Mocha Mama (Powder Puffs), Capers (Bazzills)
    Accessories: Detailed Embossing Powder (Stampendous), heat gun, Labels 23 (Spellbinders), rhinestone flourish, silk leaves (Recollections), chain, jump ring, brad, charm (Michaels), flower (RAK from Sabrina), ribbon (Jo-Ann's), distressing tool, Fanciful Flourish (Cheery Lynn).

    There's lots more inspiration from my design teammates along with our Guest Designer this month, Katherine Lawson!  Please visit their blogs and get inspired!


  •  


    Hope you can join in the challenge this week!
     
    I'm submitting this to the latest Word Art Wednesday Challenge #44 which you can find here! 
     
    Blessings!
     
    Kathy


    Wednesday, September 5, 2012

    Heartfelt Creations Inspiration

    Happy Wednesday!

    It's time for some more inspiration using Heartfelt Creations stamps, dies, and designer papers!  This week I have 2 different cards to show you, each using a different collection.  On the first card, "Pomegranates in Blue", I used the Classic Editions Collection.


    These are pomegranates that I turned into blueberries.  The berry on the right is popped up using the matching die.  I added some of the Organic Fillers off to the side to add a little more interest.  These were fun to work with to "fill" things in!  Instructions for all these cards are at the end of the post and can also be seen on the Heartfelt Creations Blog along with all the other designer's gorgeous creations for this week!  Also, if you want a better view of my cards, just click on the picture!

    The second card, "Wedding Day", is from the Garden Romance Collection


    This was very simple to make...no coloring on this one!  I just heat embossed the "On" with silver embossing powder, punch out the middle of the "O" and popped it up with the "your wedding day" on paper underneath.  It's much prettier in real life with all the sparkle!

    I'm submitting the "Pomegranates in Blue" card to the Stampin' Sisters in Christ Challenge #154 - make a birthday card in honor of them celebrating their 3rd Birthday!  Happy Birthday!!!

    I'm also submitting this to the Word Art Wednesday Challenge #44, use Scripture or uplifting sentiments.


    Next week, Heartfelt Creations will be releasing the "Delicate Asters Collection" and I will have a creation from it to show you.  There is a sneak peak on the HC Blog if you would like to see it.  This Collection is STUNNING!  The stamps, dies, and the designer papers are all so gorgeous!  I honestly had a hard time cutting the papers they're so beautiful!!!

    In the meantime, thanks for stopping by!  I hope you found some joy and inspiration here!  I really love, love, love what I do and I hope you do too!

    Blessings!

    Kathy


    Pomegranates in Blue

    PCPC 3363 – Inspire Me Sentiments PreCut Set
    HCD 724 – Classic Editions Dies
    HCPD1-224 – Classic Editions Paper Collection
    Product ID:159723 – Art Institute Glue – Dries Clear

    Other Products Used:
    Paper: Solar White (Neenah), Capers (Bazzills), blue (Recollections)
    Ink: Onyx Black (VersaFine)
    Accessories: Labels 23 Grand, Labels 13, Classic Scalloped Ovals Large, Classic Ovals Large (Spellbinders), Triad Leaves Embossing Folder (Sizzix), pop dots, white pearl cotton thread (DMC), ribbon (Michaels), adhesive pearls (Want-2-Scrap), spacer beads (Michaels), mineral spirits, Prismacolor Pencils: Indanthrone Blue, Moss Green, Kelp Green

    Instructions:
    Card base: Cut Capers cardstock 5 1/2" x 8 1/2", score at 4 1/4", and fold.  Emboss front with Triad Leaves Embossing Folder.  Die cut green designer paper with Labels 23 Grand and add to base with pop dots. 

    Image: On Solar White cardstock with Onyx Black Ink, stamp pomegranate vine and 1 pomegranate from Organic Fillers Set and color with pencils as desired.  Cut pomegranate vine with Classic Ovals Die, cut 1 pomegranate with matching die, and add to image with pop dot.  With blue paper, cut scalloped oval and glue to back of image.  Add image to base with pop dots.

    Embellishments: On Solar White cardstock with Onyx Black Ink, stamp 1 stem spray and 2 berry clusters, color with pencils and cut with match dies.  Cut 2 holly sprays with die.  Arrange all around side of image as shown and glue in place.  Make bow with Bow-Easy and glue to card.  Stamp sentiment on Solar White with Black Onyx and cut with Labels 13.  Add thread to sentiment making a bow, add pearl, and add to card.  Add blue spacer beads and pearls as shown.
    ************

    Wedding Day

    Heartfelt Creations Products & Products Carried by HC:


    Other Products Used:
    Paper: Solar White (Neenah), Stormy Gray (Coredinations)
    Ink: VersaMark
    Accessories: Ornate Flower & Frame Embossing Folder (Sizzix), 1” Circle Punch (EKSuccess), 1 1/2" Circle Punch (Marvy), Classic Scalloped Ovals Large, Classic Ovals Large, Floral Ovals (Spellbinders), Metallic Silver Opaque Embossing Powder (Recollections), heat gun, pop dots, glue, organdy white ribbon , button (Jo-Ann’s), 1/2 pearl (SU Pretties Kit), pearl swirl (Recollections)

    Instructions:
    Card base: Cut white cardstock 5 1/2" x 8 1/2” and score at 4 1/4".  For mat, cut Stormy Gray cardstock 4 1/8” x 5 3/8”, emboss with folder, wrap and cross ribbon around mat on left side and tape down.  Glue mat to base.

    Image: Stamp sentiment and “On” on white cardstock separately with VersaMark and heat emboss with embossing powder.  Punch out sentiment with 1 1/2" punch.  Die cut “On” with Classic Ovals Die and punch out center of “O” with 1 “ Circle punch.  Add sentiment circle under die cut with pop dots as shown.  Add gray die cut made with Classic Scalloped Ovals Large to image with pop dots.  Die cut Floral Oval with white and glue to gray die cut.  Add all to card base with pop dots.

    Embellishments:  Make box with Bow-Easy.  Add to card as shown.  Add clear button and 1/2  pearl to bow center.  Add pearl swirls.
     

    Tuesday, September 4, 2012

    ODBDSLC121 *2nd Week* You Leave Me in Stitches

    Hi there!

    I hope everyone in the USA has had the opportunity to enjoy the holiday weekend. For many it is the last hurrah before school begins, for others school already begun. I have one of each myself! 
    Since many go away for Labor Day weekend in the USA, we extended the "You Keep Me in Stitches" challenge to give our viewers ample time to play along. The linky is the same as last week's so you can add your creation on either post. Today the team would like to share more samples for this challenge.

    This week's challenge:
    "You leave me in stitches"

    To make the challenge even more fun, we will be giving out a prize, a $15 gift certificate to be used toward stamps at the Our Daily Bread Designs store!! Entries for the prize must be submitted by Sunday, September 2nd at 8 p.m. EST. One random winner will be chosen and announced next Saturday.


    While it is not required to use Our Daily Bread Designs images and sentiments on your creations, we would love to see them if you have them. As a way of recognizing those who do use Our Daily Bread Designs stamps, we will again be choosing three or more of our participants for the Shining the Light Award . In order to qualify for this award or join the challenge, however, you must use Our Daily Bread stamps and have your submission added to Mr. Linky by Sunday, September 9th at 8 p.m. EST. If you upload your creations to Splitcoast Stampers or any other online gallery, please use the keyword is ODBDSLC121. When creating your posts on blogs please include a link to the challenge.
     
    Here is my second take on the "stitches" challenge. 


    Once again, I did faux stitching!  This one came out a little better than last's weeks faux stitching.  I started this card with Proverb 9:11 verse in a beautiful font and the Fairy Belle designer paper.   I wouldn't normally put this two colors together, but the designer paper ties it all in nicely.
     
    For all ingredients used:
     
    Paper: Fairy Belle (Prima), Solar White (Neenah), Baja Breeze (SU), plum (DCWV Stack)
    Ink: Onyx Black (VersaFine)
    Accessories: White gel pen, piercer, mat, adhesive pearls (Michaels), spacer bead (Michaels), Bow-Easy, Floral Ovals, Classic Scalloped Ovals, Classic Ovals Large (Spellbinders), Medium Branch Punch (Martha Stewart), flower punch (EKSuccess), distressing tool, Elegant Scrollwork Die (Memory Box), Baja Breeze Seam Binding (SU - RAK from Jill), lace (Jo-Ann's), Paper Lace II Embossing Folder (Cuttlebug)
     
    Please visit the other designers for their beautiful creations!
     
    I'm also submitting this to the latest Word Art Wednesday Challenge # 43.

    Hope you can join in the challenge this week if you haven't already!
     
    Blessings!
     
    Kathy