Be Joyful

Rejoice in the Lord always. Again I will say, rejoice! Let your gentleness be known to all men. The Lord is at hand. Be anxious for nothing, but in EVERYTHING by prayer and supplication, with thanksgiving, let your requests be made known to God; and the PEACE OF GOD, which surpasses all understanding, will guard your hearts and minds through Christ Jesus. Philippians 4:4-7

These are verses I memorized years ago and they are written on my heart. There are times when I still need to remember not to be anxious, but I eventually listen to my heart saying these verses. I didn't really understand what the "peace of God" was until I experienced it. It's having peace inside you, even when you're going through heartbreaking situations and trials. It does "surpass ALL understanding" and you know it comes from GOD alone. Praise the Lord for His wonderful promises!


I love, love, love what I do. I am passionate about the things I create and the talents God has placed in me. I SO appreciate the time you take to look at my things and the comments you all leave me!

Blessings to you!

Kathy

Wednesday, May 31, 2017

Birthday Petunia Border


Happy Wednesday!

It's time for a little Heartfelt Creations inspiration!

This week I have a very clean and simple card using the Classic Petunia Collection.


The sentiment was stamped directly on the card base. I used a birthday sentiment, but you could use any sentiment you like.

I die cut the beautiful border using one of the Regal Borders & Pocket Dies. I love this die, definitely one of my favorites! On top of the border die I added a flower border colored with pencils and mineral spirits. The flower border is from the Large Classic Petunia Set and die cut with the matching die from the Large Classic Petunia Die.

For finishing touches, I added Clear Wink of Stella and glitter to the flowers and a few adhesive pearls to the border die cut and card base.

Be sure to  visit the Heartfelt Creations' Blog to see all the beautiful creations by the designers this week!

I'm submitting this to the following challenge:

Word Art Wednesday #284-285 - Anything Goes

Thanks so much for stopping by to visit!

Blessings!

Kathy


Birthday Petunia Border

Heartfelt Creations Products and Products Carried by HC:

HCPC 3785 - Small Classic Petunia Set
HCPC 3786 - Large Classic Petunia Set
HCD1-7140 - Large Classic Petunia Die
HCD1-779 - Regal Borders & Pockets Die
368770 - Scor-Pal
159723 - Designer Dries Clear
Other Products: Paper: Neenah Solar White, White; Ink: VersaFine Onyx Black; Accessories: half pearls, Clear Wink of Stella, mineral spirits, paper stumps, Prismacolor Pencils: Deco Pink, Mulberry, Dahlia Purple, Dark Purple, Page Sage, Prussian Green, Scotch Mounting Tape

Instructions: Card measures 6" x 4 1/4". Cut white cardstock 6" x 8 1/2", score at 4 1/4" and fold to make card base. Stamp sentiment from Small Classic Petunia Set on lower right with black ink. Die cut border with white cardstock using Regal Borders & Pocket Die. Adhere border about 1/2" from top of card using pieces of Scotch Mounting Tape.
Stamp petunia border from Large Classic Petunia Set on Solar White with Onyx Black Ink. Color with pencils and mineral spirits using paper stumps. Die cut with matching die from the Large Classic Petunia Die Set. Adhere to border using Designer Dries Clear Glue and small pieces of Scotch Mounting Tape for flowers that are above border.
Add Minnie Pearl Prills to flower centers using Designer Dries Clear Glue. Once dry, add Clear Wink of Stella to flowers and sprinkle with Shell White Glitter. Add adhesive pearls as pictured.

Wednesday, May 24, 2017

Petunia Birthday Cluster


Happy Wednesday!

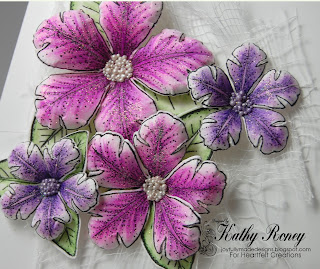
Today I'm back with another card made using the new Classic Petunia Collection from Heartfelt Creations! Love this collection for spring cards!


This is a rather clean and simple design which I like to do sometimes. I stamped the sentiment directly on the white card base and added a little cheesecloth under the flowers to add interest. The flowers were colored with pencils and mineral spirits using paper stump. Love that these have matching dies to cut them out. Here is a little close up of the flowers for you.


I added Clear Wink of Stella and Shell White Glitter to the flowers after shaping them. I also used Prills for the flower centers.

Be sure to visit the Heartfelt Creations' Blog to see all the beautiful creations by the designers this week! Such a creative bunch!

I'm submitting this to the following challenge:

Word Art Wednesday #284-285  - Anything Goes

Thanks so much for stopping by to visit!

Blessings!

Kathy


Petunia Birthday Cluster

Heartfelt Creations Products and Products Carried by HC:

HCPC 3785 - Small Classic Petunia Set
HCPC 3786 - Large Classic Petunia Set
HCD1-7139 - Small Classic Petunia Die
HCD1-7140 - Large Classic Petunia Die
368770 - Scor-Pal
Deluxe Flower Shaping Kit
159723 - Designer Dries Clear
Other Products: Paper: Neenah Solar White, 12" x 12" White; Ink: VersaFine Onyx Black; Accessories: half pearls, cheesecloth, Clear Wink of Stella, water mister, mineral spirits, paper stumps, Prismacolor Pencils: Deco Pink, Mulberry, Dahlia Purple, Dark Purple, Page Sage, Prussian Green, Lavender Lace, Parma Violet, Violet, Dioxazine Purple Hue

Instructions: Card measures 6" x 4 1/4". Cut white cardstock 12" x 4 1/4", score at 6" and fold to make card base. Stamp sentiment from Small Classic Petunia Set on lower right with black ink.
On Solar White with Onyx Black Ink, stamp large flowers and leaves from Large Classic Petunia Set and medium flowers and leaves from Small Classic Petunia Set. Color with pencils and mineral spirits using paper stumps. Die cut with matching dies from the Small Classic Petunia Die Set and Large Classic Petunia Die Set. Shape flowers and leaves by misting the backs with water and shaping with the Deluxe Flower Shaping Kit. Adhere three of the flowers to leaves using Designer Dries Clear Glue.

Cut a piece of cheesecloth and shape and pull as desired. Place cheesecloth on card as shown and glue flowers/leaves over it using Designer Dries Clear Glue. Shape and trim cheesecloth as desired. Add Minnie Pearl Prills to pink flower centers and Lavender & Lace Prills to the violet flowers using Designer Dries Clear Glue. Brush flowers with Clear Wink of Stella and then sprinkle with Shell White Glitter. Add adhesive pearls to top right.

Wednesday, May 17, 2017

Thankful Petunias


Happy Wednesday!

It's time again for me to share a card with you using Heartfelt Creations' new Classic Petunia Collection!

This week I'm using one of the images from the Classic Petunia Bouquet Set along with one of the small petunias from the Small Classic Petunia Set. Both have matching dies to cut the images.


The images were colored with pencils and mineral spirits. The "frame" was created with the designer papers using a die from the Cut Mat Create 2A Set to cut the center away. The green background is also paper from the collection that I stamped the sentiment on.

Be sure to visit the Heartfelt Creations' Blog to see what the designers have for you this week!

I'm submitting this to the following challenge:

Word Art Wednesday #282-283  Anything Goes

Thanks so much for stopping by to visit!

Blessings!

Kathy


Thankful Petunias

Heartfelt Creations Products and Products Carried by HC:

HCPC 3785 - Small Classic Petunia Set
HCPC 3787 - Classic Petunia Bouquet Set
HCPC 3474 - Heartfelt Expressions Set
HCD1-7139 - Small Classic Petunia Die
HCD1-7141 - Classic Petunia Bouquet Die
HCD1-751 - Cut Mat Create 2A Die
HCDP1 278 - Classic Petunia Paper Collection
368770 - Scor-Pal
Deluxe Flower Shaping Kit
159723 - Designer Dries Clear
Other Products: Paper: Neenah Solar White, 12" x 12" White; Inks: VersaFine Onyx Black; Accessories: half pearls, water mister, glue dots, pencil, Lavender Seam Binding, Bow-Easy Tool, Scor-Tape, Scotch Mounting Tape, mineral spirits, paper stumps, Prismacolor Pencils: Lavender Lace, Parma Violet, Violet, Dioxazine Purple Hue, Page Sage, Prussian Green, Grape Jelly Memento Ink

Instructions: Card measures 6 1/4" x 6 1/4". Cut white cardstock 6 1/4" x 6 1/4" two times. Score edge of one of these at 1/4" on one side, add scot-tape above score line and adhere the two pieces together to create the card base. Cut green designer paper from the Classic Petunia Paper Collection 6 1/4" x 6 1/4", ink edges with Bamboo Leaves Ink and adhere to card base.
Cut card panel pictured from designer paper and die cut center using the Large Rounded Rectangle Die from the Cut Mat Create 2A Set. Ink edges with Grape Jelly Ink and set "frame" aside.
Stamp petunia bouquet from Classic Petunia Bouquet Set and small petunias and leaves from Small Classic Petunia Set on Solar White with Onyx Black. Color images with pencils and mineral spirits. Die cut with matching dies from the Classic Petunia Bouquet Die and Small Classic Petunia Die Sets. Shape one small flower and leaves by misting the backs with water and shaping with the Deluxe Flower Shaping Kit.
Adhere bouquet flower image to "frame" as shown using Stamp Mat Pad under the outside leaves. Add doubled Stamp Mat Pad under flowers that will be inside the "frame". Place "frame" over the mat and lightly pencil the lower right corner to mark where the "frame" edge will be to give you a guide of where to stamp the sentiment. Stamp the sentiment from the Heartfelt Expressions Set with Onyx Black as shown. Add "frame" over green mat using Stamp Mat Pad.
Make a 3-loop bow using Lavender Seam Binding and Bow-Easy Tool, then adhere to top right of card using glue dots. Add small flower to bow center using glue dots. Add Lavender & Lace Prills to flowers centers using Designer Dries Clear Glue. Add adhesive pearls as pictured.

Wednesday, May 10, 2017

Birthday Petunias


Happy Wednesday!

It's the second Wednesday of the month which means it's time for the release of the new Heartfelt Creations collection! This month we have the Classic Petunia Collection!

For my card I used the Classic Petunia Paper Collection for the card panel and added petunias and leaves from the Small Classic Petunia Set and a hanging plant from the Classic Petunia Bouquet Set.


I color the images with pencils and mineral spirits using paper stumps. They were added to the card panel using a combination of glue and Scotch Mounting Tape to give varying height.

Be sure to visit the Heartfelt Creations' Blog to see all the beautiful creations by the designers this week! What a talented bunch they are for sure!

I'm submitting this to the following challenge:

Word Art Wednesday #282-283 - Anything Goes

Thanks so much for stopping by to visit!

Blessings!

Kathy


Birthday Petunias

Heartfelt Creations Products and Products Carried by HC:

HCPC 3785 - Small Classic Petunia Set
HCPC 3787 - Classic Petunia Bouquet Set
HCD1-7139 - Classic Petunia Small Die
HCD1-7141 - Classic Petunia Bouquet Die
HCDP1 278 - Classic Petunia Paper Collection
368770 - Scor-Pal
Deluxe Flower Shaping Kit
159723 - Designer Dries Clear
Other Products: Paper: Neenah Solar White, Stampin Up Lavender Lace; Inks: VersaFine Onyx Black; Accessories: half pearls, water mister, Scotch Mounting Tape, mineral spirits, Prismacolor Pencils: Lavender Lace, Parma Violet, Dioxazine Purple Hue, Page Sage, Prussian Green, Yellow Ochre, Goldenrod, Burnt Ochre, Chocolate

Instructions: Card measures 4 1/4" x 6 1/4". Cut white cardstock 8 1/2" x 6 1/4", score at 4 1/4" and fold to make card base. Cut Lavender Lace 4 1/8" x 6 1/8", cut designer paper panel pictured 4" x 6", glue pieces together and add to card base with Scotch Mounting Tape.

Stamp flowers and leaves from Small Classic Petunia Set and hanging plant from Classic Petunia Bouquet Set on Solar White with Onyx Black Ink. Color with pencils and mineral spirits using paper stumps. Die cut with matching dies from Classic Petunia Small Die Set and Classic Petunia Bouquet Die Set. Shape flowers and leaves by lightly misting on back and shaping with the Deluxe Flower Shaping Kit. Glue 3 leaves to the back of 3 of the flowers. Adhere hanging plant as pictured using Scotch Mounting Tape and glue. Arrange flowers above plant and adhere with glue and Scotch Mounting Tape as desired.

Brush all stamped flowers and flowers on designer paper with Clear Wink of Stella and sprinkle with Shell White Glitter. Add 3 flat back pearls to bottom left.

Wednesday, May 3, 2017

Lords Unfailing Love


Happy Wednesday!

Today I have a card using a set that came out on Black Friday this past year called Courage and Strength.  I love this beautifully scripted image of encouragement.


I stamped the image in black ink and colored a little with pencils.

The "frame" was created using the Blushing Rose Paper Collection and an oval die. I love this designer paper with the pretty little roses.

Be sure to visit the Heartfelt Creations' Blog to see all the beautiful creations by this designers this week! We also have new designers on the team so be sure to check out them out too!

I'm submitting this to the following challenges:

Word Art Wednesday #280-281 - Anything Goes

Thank you so much for stopping by to visit!

Blessings!

Kathy


Lords Unfailing Love

Heartfelt Creations Products and Products Carried by HC:

HCPC 3763 - Courage and Strength Set
HCDP1-271 - Blushing Rose Paper Collection
368770 - Scor-Pal
159723 - Designer Dries Clear

Other Products: Paper: Stampin Up Very Vanilla, Cream, Purple Parade (The Paper Studio); Ink: VersaFine Onyx Black; Accessories: Spellbinders Classic Ovals Large Die, green silk ribbon, Bow-Easy Tool, half pearl, glue dots, Scotch Mounting Tape, mineral spirits, Prismacolor Pencils: Imperial Violet, Dioxazine Purple Hue, Grape Jelly Memento Ink

Instructions: Card measures 4" x 5 1/4". Cut cream cardstock 4" x 10 1/2", score at 5 1/4" and fold to make card base. Cut Purple Parade cardstock 3 3/4" x 5" and ink edges with Grape Jelly. Cut Cream cardstock 3 1/2" x 4 3/4" and adhere the two mats together. Wrap ribbon around mats and secure on back. Add mats to card base with Scotch Mounting Tape.

Cut card panel pictured from Blushing Rose Paper Collection and die cut center with Classic Ovals Large Die. Ink inside and outside edges with Grape Jelly Ink. Stamp sentiment from Courage and Strength Set on Very Vanilla cardstock and color with pencils as desired. Trim to fit within window panel, add behind panel with Scotch Mounting Tape, then adhere to mat.

Make multi-loop bow using Bow-Easy Tool and add as pictured using glue dots. Add half pearl to bow center using glue dot.