Be Joyful

Rejoice in the Lord always. Again I will say, rejoice! Let your gentleness be known to all men. The Lord is at hand. Be anxious for nothing, but in EVERYTHING by prayer and supplication, with thanksgiving, let your requests be made known to God; and the PEACE OF GOD, which surpasses all understanding, will guard your hearts and minds through Christ Jesus. Philippians 4:4-7

These are verses I memorized years ago and they are written on my heart. There are times when I still need to remember not to be anxious, but I eventually listen to my heart saying these verses. I didn't really understand what the "peace of God" was until I experienced it. It's having peace inside you, even when you're going through heartbreaking situations and trials. It does "surpass ALL understanding" and you know it comes from GOD alone. Praise the Lord for His wonderful promises!


I love, love, love what I do. I am passionate about the things I create and the talents God has placed in me. I SO appreciate the time you take to look at my things and the comments you all leave me!

Blessings to you!

Kathy

Wednesday, March 26, 2014

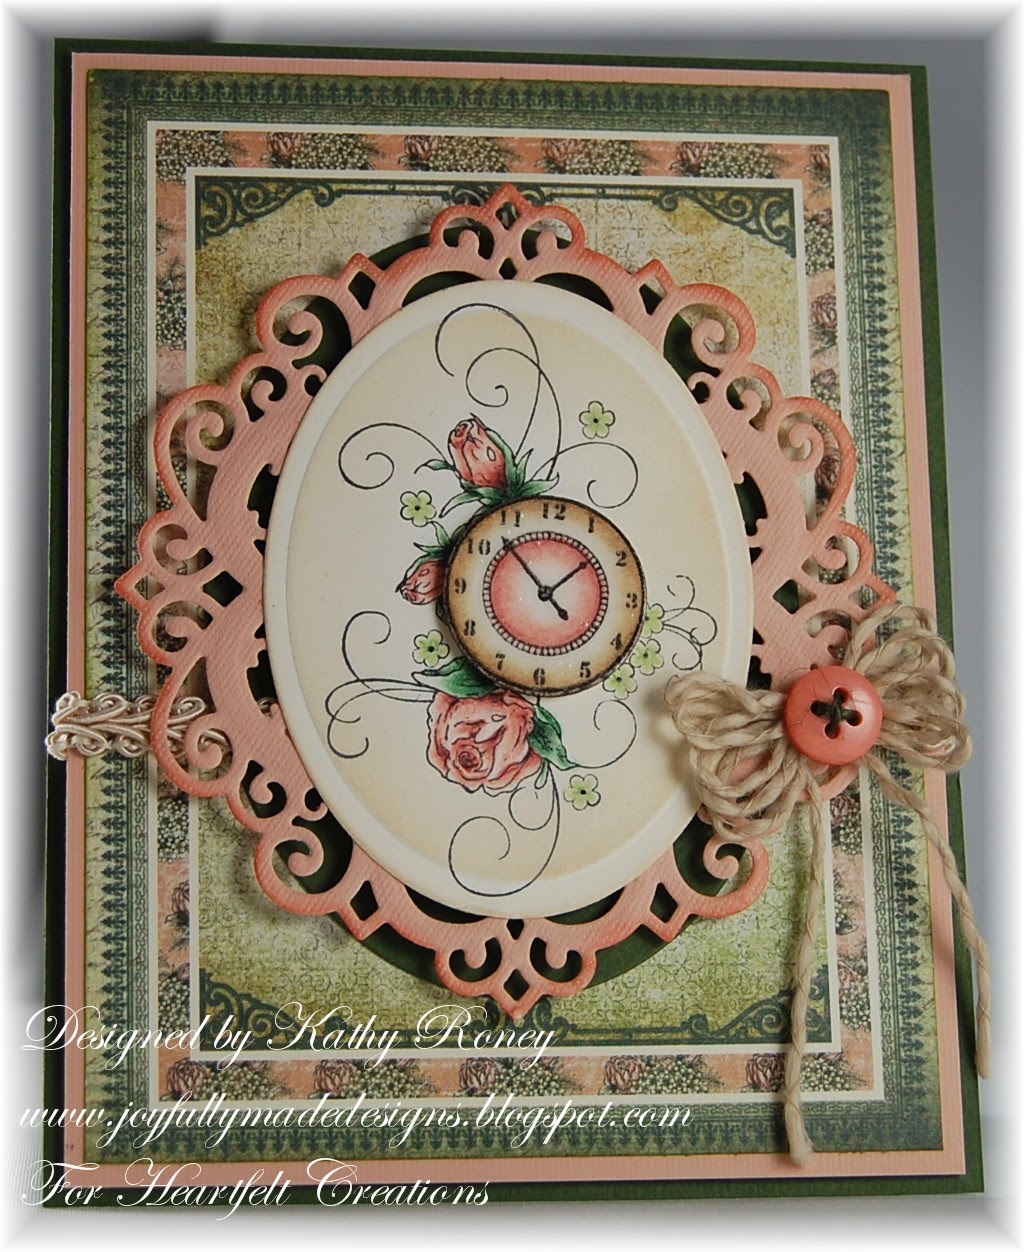
Heartfelt Creations - Floral Clock


Happy Wednesday!

It's time some Heartfelt Creations inspiration!  This week I have a card made with the Floral Clocks and Timeless Clock Sets.


The main image on this is from the Floral Clock Set.  I added a second clock face popped over the image from the Timeless Clock Set.  The images were colored with pencils and mineral spirits to match the colors in the designer papers on the mat.  This mat is one of the beautiful card fronts in the pack.

The lacy medallion matting the image is the Raindrops on Roses Die.  I love this die cut and have found lots of uses for it!

Be sure to visit the HC Blog to see all the beautiful projects by the designers this week!  You will also see a sneak peak of the next collection coming out April 9th along with a new video from Emma Lou on creating shimmery mix media backgrounds with your stamps.

I'm submitting this to the following challenges:

Word Art Wednesday Challenge #125 - Anything Goes
Really Reasonable Ribbon #91 - Welcome Spring & Ribbon or Trim

Thank you for visiting today!

Blessings!

Kathy


Floral Clock

Heartfelt Creations Products and Products Carried by HC:

HCPC 3595 - Floral Clocks PreCut Set
HCPC 3592 - Timeless Clock PreCut Set
HCD 744 - Once Upon a Time Die
HCD 743 - Raindrops on Roses Die
HCDP1 241 - Once Upon a Time Paper Collection
354802 - Classic Ovals Large Die
452255 - Grand Calibur
368770 - Scor-Pal

Other Products:

Paper: Natural White (Neenah), Rain Forest (Bazzills), Neutrals Stack (DCWV) card stocks
Inks: Onyx Black (VersaFine), Green with Envy (Powder Puffs), Wheat, Red Brick (VersaMagic)
Accessories: Fibers, Bow-Easy, twine, button, black marker, Aleene's Paper Glaze, mineral spirits, Prismacolor Pencils: Page Sage, Olive Green, Ginger Root, Light Umber, Dark Brown, Light Peach, Nectar, Henna, Chestnut, Dark Green, Black.

Instructions: Make 4 1/4" x 5 1/2" card base with Rain Forest.  Mat with peach card stock measuring 5 5/16" x 4 1/16".  Trim card front from designer paper and ink edges with green.  Glue mats together.  Die cut oval with Rain Forest and glue over oval on card front image to cover.  Add trim as shown across card mat and add mat with pop dots.  Die cut circle medallion from Raindrops on Rose Die with peach card stock  ink edges slightly with Red Brick Ink, and add to card with pop dots.  Stamp flower image on Natural White card stock with Onyx Black and color with pencils.  Stamp and color clock face image in same manner.  Die cut flower image with ovals die, sponge image while in die with Wheat Ink, and again outside of die on edges.  Add to circle medallion with glue.  Die cut clock face and add over image with pop dots.  Cover clock face with Aleene's Paper Glaze.  Add bow and button with twine. 

Saturday, March 22, 2014

CottageCutz - Happy Together

Happy Saturday!

Hope you are having a wonderful weekend!  Today I have a side-step card to show you using a bunch of CottageCutz Dies!


The last time I did a side-step card it was with crows, this time it's deer!  This is a fun card shape when you want to create a scene.  As soon as I saw these dies, I thought it would be fun to put them all together!  Here's a bit of a side view for you.  You can also click on the photos for a closer view.


The back fold has the pine trees from the Woodland Cabin and the Woodland Pine Trees Dies.  The middle fold has the rest of the Woodland Cabin Dies.  The front has the Woodland Fawns, Garden Birdhouse Tree, and the grass from the Canadian Goose Die.

I used brown, yellow, and salmon pink card stock for the cabin and white card stock, colored with chalk inks, for the rest.  The brown card stock is Brownie from Coredinations which I also used to make the card base.  To create the base, I used the Side Step Card tutorial on Split Coast Stampers that you can find here.

The sentiment is from Happy Together by Stampin Up, stamped on the salmon pink colored card stock with Rich Cocoa by Memento.  I then punched it with the Word Window punch and added it over the grass with pop dots.

The ribbon embellishment is made with Salmon Pink Seam Binding, Cocoa Jute String (both from Really Reasonable Ribbon), fibers from my stash and a button.  I did separate triple loop bows, glued them together with glue dots, then add the button with a fiber bow in it on top.

These are the dies I used:


I'm submitting this to the following challenges:

Word Art Wednesday Challenge #124 - Anything Goes
Really Reasonable Ribbon #91 - Welcome Spring & Ribbon or Trim

Card Recipe:

Stamp: Happy Together (SU)
Paper: Solar White (Neenah), Brownie (Coredinations), "Pink Salmon" (DCWV Stack), yellow (scraps)
Ink: Rich Cocoa (Memento), Pink Grapefruit (VersaMagic), Green Tea, Mocha Mama, Amaretto, Creamy Cocoa, Feathered Gray (PowderPuffs)
Accessories: Bow-Easy Tool, Pink Salmon Seam Binding, Cocoa Jute String (Really Reasonable Ribbon), fibers, button, pop dots, make-up applicators, Word Window Punch (SU)

Thank you for stopping by today!

Blessings!

Kathy


Wednesday, March 19, 2014

Heartfelt Creations - Celebrate


Happy Wednesday!

It's time for a little Heartfelt Creations inspiration!  This week I have another card using the Once Upon a Time Collection released last week.  This time I used the Alarm and Watch, Time Sentiments, and Timeless Clock Sets.


I love this little alarm clock, I have one just like it on my craft desk only it doesn't look this nice...it's orange with "Cars" movie pictures on it!  I definitely need to alter it!  Here's a little close up for you!


The background mat is designer paper from the collection.  The images were colored with pencils and mineral spirits to match the colors in the collection.  The alarm clock was fussy cut and the other pieces (including the clock face) were cut with the matching die.  You can see complete instructions at the end of my post.

Be sure to visit the HC Blog to see all the beautiful creations by the designers this week and see who the lucky comment winner is for the new release!

I'm submitting this to the Word Art Wednesday Challenge #124 - Anything Goes.

Thanks for stopping by to visit!

Blessings!

Kathy


Celebrate

Heartfelt Creations Products and Products Carried by HC:

HCPC 3591 - Alarm and Watch PreCut Set
HCPC 3594 - Time Sentiments PreCut Set
HCPC 3592 - Timeless Clock PreCut Set
HCD 744 - Once Upon a Time Die
HCDP1 241 - Once Upon a Time Paper Collection
452255 - Grand Calibur
368770 - Scor-Pal
DDOTS - Double Dots
459222 - McGill Paper Blossoms Tool Kit
159223 - McGill Paper Blossoms Molding Mat

Other Products:

Paper: Natural White (Neenah), Early Espresso (SU), green (DCWV Neutrals)
Ink: Onyx Black (VersaFine), Dark Chocolate (Palette)
Accessories: Trim, lace, button, fibers, Bow-Easy, adhesive pearls, brad, mineral spirits, Prismacolor Pencils: Dark Green, Black, Sepia, Espresso

Instructions: Make 4 1/4" x 5 1/2" card base with Early Espresso.  Cut mat with green card stock measuring 4 1/16" x 5 5/16".  Cut second mat with designer paper measuring 3 7/8" x 5 3/16", ink edges with Dark Chocolate, and glue to green mat.  Wrap lace and trim around mats and secure in back.  Add mats to base with double dots.  On Natural White with Onyx Black Ink, stamp alarm clock, Timeless Clock, and Time Sentiments.  Color images with pencils and inks.  Fussy cut clock and die cut remainder with Once Upon a Time Die.  Add brad to center of clock face and add to alarm clock image using pop dots.  Add all to card arranging as shown using pop dots and glue dots.  Stamp "Celebrate" from Time Sentiments on designer paper, fussy cut, and add over sentiment circle as shown with pop dots.  Add adhesive pearls, bow, and button.

Wednesday, March 12, 2014

Heartfelt Creations - Once Upon a Time Release


*This is my second post for today.  If you are looking for my CottageCutz post, please see post below this or click here.

Happy Wednesday everyone!

It's new release time for the Once Upon a Time Collection at Heartfelt Creations!

We all agree that time is precious, so we are pleased to invite you to celebrate the memorable moments in your life with the debut of the Once Upon a Time Collection.   Deep shades of copper, teal and rose are complimented by neutrals in cream, grey, and beige all artfully layered with sumptuous images of time pieces, clock faces, florals, flourishes and script backgrounds.  Detailed stamps feature clocks, sentiments and collaged images designed to coordinate with the Once Upon a Time die which saves you precious time by cutting 12 clock faces or circle sentiments with one pass through your die cutting machine. You will reach for the timeless images of this versatile collection for special occasions and everyday moments alike. 
Leave a comment on the Heartfelt Creations blog by March 18th to be eligible to win the entire collection valued at $197.00

My first card with this collection is a birthday card using the Floral Clocks and Time Sentiment Sets.


The images were colored with pencils and mineral spirits matching the colors in the beautiful card front (the mat) from the designer papers.  Here's a close up of the image for you.


Behind the images I used the Raindrops On Roses Die cut with Natural White Cardstock with a peach circle die cut behind it.  You can see complete instructions for my card at the bottom of this post.

Be sure to visit the HC Blog to see all the beautiful creations by the designers this week and make sure to leave a comment for a chance to win the entire collection!

I'm submitting this to the Word Art Wednesday Challenge #123 - Anything Goes.

Thanks for stopping by to visit today!

Blessings!

Kathy


Birthday Time

Heartfelt Creations Products and Products Carried by HC:

HCPC 3595 - Floral Clocks PreCut Set
HCPC 3594 - Time Sentiments PreCut Set
HCD 744 - Once Upon a Time Die
HCD 743 - Raindrops on Roses Die
HCDP1 241 - Once Upon a Time Paper Collection
354806 - Standard Circles Large Die
452255 - Grand Calibur
368770 - Scor-Pal
159723 - Art Institute Glue - Dries Clear
DDOTS - Double Dots

Paper: Aspen (Bazzills), Neutrals Stack (DCWV), Natural White (Neenah) card stock
Ink: Onyx Black (VersaFine), Mocha Mama (Powder Puffs), Forest Moss Distress (Ranger), Red Brick (VersaMagic)
Accessories: Dew Drops (The Robin's Nest), Ivory Jute String (May Arts), ribbon (Offray), Bow-Easy, button, Champagne Microbeads (Recollections), mineral spirits, Prismacolor Pencils: Ginger Root, Light Umber, Dark Brown, Light Peach, Nectar, Henna, Chestnut, Dark Green, Black, Pale Sage, Olive Green

Instructions: Make 4 1/4" x 5 1/4" card base with Aspen card stock.  Cut peach colored mat 4 1/16" x 5 5/16".  Cut card front from designer paper, ink edges with Forest Moss Ink, and glue together.  Cut circle with peach card stock and glue to card front covering circle image.  Die cut circle medallion with Natural White card stock and glue over peach circle.  Wrap lace around and secure.  Add to base with pop dots.  Stamp flower image on Natural White with Onyx Black Ink, color with pencils, and fussy cut.  Stamp image again and fussy cut 4 additional small flowers, color, and pop over flowers on image.  Add microbeads to flower centers with glue.  Stamp "Birthday Time" sentiments, color, and die cut.  Trim "Birthday Time" tag from designer paper and ink edges with Red Brick.  Arrange images with tag as shown and adhere to card with pop dots and glue dots.  Add gold Dew Drops as shown.  Add bows and button.

Happy Easter - CottageCutz


Happy Wednesday!

Hope everyone is having a wonderful day!  Today I have an Easter card for you using 3 of the new Garden Delight Dies from The Scrapping Cottage!


I've used the Garden Floral Frame, Garden Delight Butterflies, and the Garden Butterfly Vine.  All the pieces were die cut with white card stock and colored with chalk inks (Aloe Vera & Pink Grapefruit VersaMagic) and make up applicators.  This is a quick technique I like to use sometimes on the more "lacy" type dies.  It doesn't need to be perfect, just add some color wherever you like!

Here is a close up of the beautiful dies:


I glued the die pieces to a white mat that was stamped with a sentiment and embossed with a folder.  I then added a mat using Lime Granita (Coredinations) and popped it on a white card base.   The butterfly was slightly shaped with my fingers, glued down by the body only so the wings came up and decorated with a little bit of Diamond Stickles on the edges.  White Opal Pearls were also added to the butterfly body and flower centers.  To finish the card, I added a small bow and adhesive pearl.

These are the dies I used:


Card recipe:

Stamps: Well Scripted (SU)
Paper: White (Recollections), Lime Granita (Coredinations)
Ink: Onyx Black (VersaFine), Aloe Vera, Pink Grapefruit (VersaMagic)
Accessories: Doily Lace Embossing Folder (Darice), adhesive pearl, White Seam Binding (Really Reasonable Ribbon), Bow-Easy Tool, White Opal Liquid Pearls, Diamond Stickles (Ranger)

I'm submitting this to the Word Art Wednesday Challenge #123 - Anything Goes.

Thanks for stopping by today!

Blessings!

Kathy

Wednesday, March 5, 2014

Heartfelt Creations - Matchbook Candy Holder


Happy Wednesday everyone!

It's time for some Heartfelt Creations inspiration!  This week I have a little treat holder to show you!


This is a matchbook candy holder that holds a Ghirardelli chocolate inside.  Here's the side view for you.


And inside view.


Isn't this cute?  I found the tutorial for this on Split Coast Stampers which you can find here in case you would like to try it out.

The images on mine are colored with pencils and mineral spirits on white card stock.  (At the bottom of the post you can see the complete instructions for this.)

Be sure to visit the HC Blog to see all the beautiful creations by the designers this week!  There is also a sneak peak of the new collection being released next week, Once Upon a Time!

I'm submitting this to the following challenges:

Word Art Wednesday Challenge #122 - Anything Goes.

Thanks for stopping by today!

Blessings!

Kathy


Matchbook Candy Holder

Heartfelt Creations Products and Products Carried by HC:

HCPC 3581 - Majestic Morning Accents PreCut Set
HCPC 3554 - Love at Christmas PreCut Set
HCPC 3480 - Brookside Manor PreCut Set
HCD 723 - Garden Romance Die
HCDP1 240 - Raindrops on Roses Paper Collection
ANC850 - Spring Bling Prills
159723 - Art Institute Glue - Dries Clear
452255 - Grand Calibur
368770 - Scor-Pal
SMP001 - Stamp Mat Pad

Other Products:

Paper: Solar White Cardstock (Neenah)
Ink: Onyx Black Ink (VersaFine)
Accessories: Diamond Stickles (Ranger), Moss Green Micro Gingham, Bow-Easy (Really Reasonable Ribbon), brads, adhesive pearls (Recollections), chocolate candy square (Ghirardelli fits perfectly for this), mineral spirits, Prismacolor Pencils: Rosy Beige, Clay Rose, Black Cherry, Black, Kelp Green, Marine Green.

Instructions: Treat holder is made using the Matchbook Candy Holder Tutorial here.   Use white card stock for outside of holder and light green designer paper for the inside piece that holds the candy.  Before scoring the outside piece, stamp the flower image and sentiment on front as shown.  Color with pencils, then score according to tutorial.  Stamp butterfly and color same way.  Cut butterfly with matching die and shape with tool kit and mat.  Glue to holder as shown.  Add "Lettuce Entertain You" Prills to flower centers using Art Institute Glue Dries Clear.  Add Diamond Stickles to flower edges and butterfly.  Make gingham bow and add to holder along with an adhesive pearl as shown.


Sunday, March 2, 2014

CottageCutz - Congratulations

Happy Sunday!

Today I have a slider card to show you using some pretty pastel colors for spring and 4 beautiful CottageCutz Dies.  I used 2 new dies from the  Garden Delight Release, Garden Poppies and Garden Delight Butterflies and 2 dies from previous collections, Victorian Window and Laundry Line.


Here's a view from the side so you can see it really is a slider card!  (It's hard to tell from the first photo!)


The card base and all the die cuts were done with white card stock and the pieces were colored with VersaMagic Chalk Inks and make up applicators.  I used Thatched Straw and Spring Pansy on the window, bird, and butterfly.  The flowers and stems were colored with Spring Pansy and Aloe Vera.

This is a 4 1/4" x 4 1/4" slider card.  I used an embossing folder border for the lower front.  I added the window die with pop dots using a piece of lace under it to show through the window to look like a curtain.  I cut the flower piece in half so I could put some on each side of the window.  I added a second layer of flowers on the "open" ones glueing them at their center and then added Lemon Chiffon Mini Prills.  The bird was added with a pop dot.  Then I added ribbon and trim below the window using Scor-Tape.

For the inside of the card, I stamped the sentiment on a piece of white card stock and added it with pop dots to keep the card open.  I then glued the butterfly down it's center with glue and added Lemon Chiffon Mini Prills.

These are the dies I used:


I'm submitting this to the Word Art Wednesday Challenge #121 - Anything Goes.

Card recipe:

Paper: White (Recollections)
Ink: Onyx Black (VersaFine), Aloe Vera, Spring Pansy, Thatched Straw (VersaMagic)
Accessories: Diamond Stickles (Ranger), Lemon Chiffon Mini Prills (US Art Quest), Pirouette Border Embossing Folder (Cuttlebug), trims, lace, tool and mat kit (McGill).

Thanks for stopping by today to visit!

Blessings!

Kathy