Be Joyful

Rejoice in the Lord always. Again I will say, rejoice! Let your gentleness be known to all men. The Lord is at hand. Be anxious for nothing, but in EVERYTHING by prayer and supplication, with thanksgiving, let your requests be made known to God; and the PEACE OF GOD, which surpasses all understanding, will guard your hearts and minds through Christ Jesus. Philippians 4:4-7

These are verses I memorized years ago and they are written on my heart. There are times when I still need to remember not to be anxious, but I eventually listen to my heart saying these verses. I didn't really understand what the "peace of God" was until I experienced it. It's having peace inside you, even when you're going through heartbreaking situations and trials. It does "surpass ALL understanding" and you know it comes from GOD alone. Praise the Lord for His wonderful promises!


I love, love, love what I do. I am passionate about the things I create and the talents God has placed in me. I SO appreciate the time you take to look at my things and the comments you all leave me!

Blessings to you!

Kathy

Wednesday, July 30, 2014

Pink Arianna Blooms - Heartfelt Creations


Happy Wednesday!

It's time for a little inspiration from Heartfelt Creations!  Today's card has lots of white and pink!


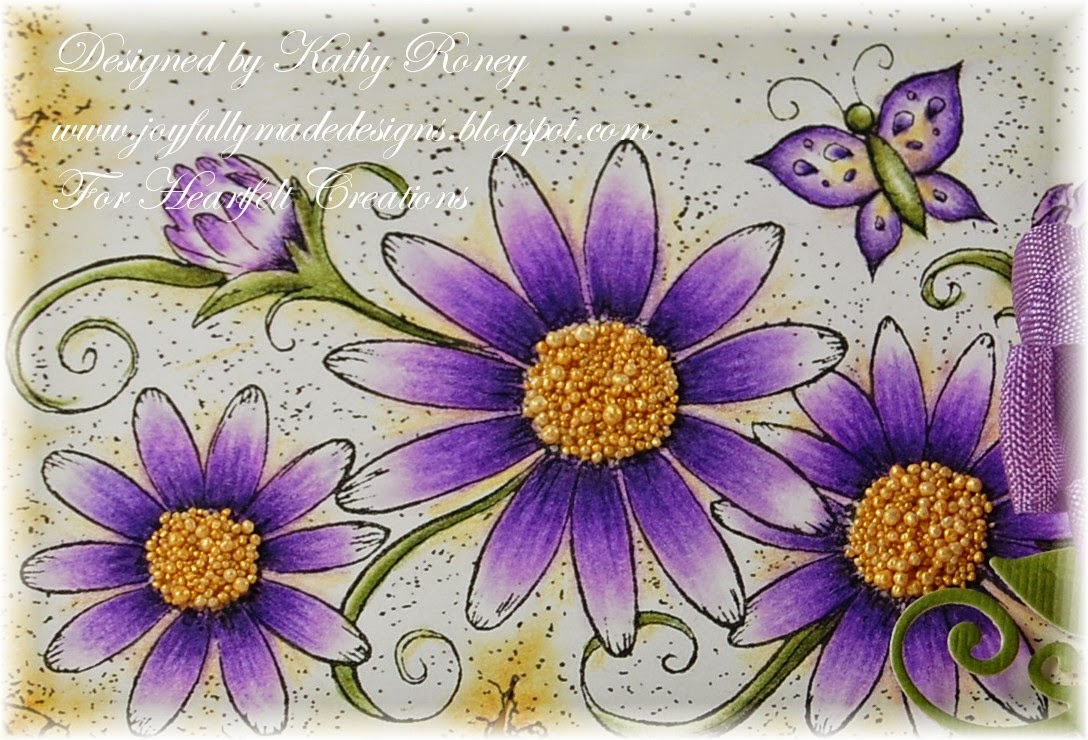
I used the Arianna Blooms Collection for the flower and sentiment.  The flower was made with the Arianna Blooms Set and matching die using 3 of the flowers that were stamped and inked on white card stock using Victorian Velvet Ink with a pretty center of Tu-Tu Pink Prills that matched perfectly!  I layered a white and pink die cut from the Arianna Lace Die underneath the flower instead of using leaves.  I love how it came out and it's so pretty with the white background and touch of pink.  The elegant sentiment is from the Arianna Blooms Bouquet Set that I stamped directly on the Decorative Labels One die cut...I love doing that!  Here's a little close up of the flower for you.


Be sure to visit the HC Blog to see all the beautiful creations for you today by the designers!  Emma Lou also has a sneak peek of the new Christmas Collection being released on August 13th!

I'm submitting this to the following challenges:

Word Art Wednesday Challenge #143 - Anything Goes
Addicted To Stamps & More #106 - Anything Goes

Thank you for visiting today!

Blessings!

Kathy


Pink Arianna Blooms

Heartfelt Creations Products and Products Carried by HC:

HCPC 3608 - Arianna Blooms PreCut Set
HCPC 3609 - Arianna Blooms Bouquet PreCut Set
HCD 747 - Arianna Lace Die
HCD 748 - Arianna Blooms Die
253731 - Decorative Labels One
452255 - Grand Calibur
368770 - Scor-Pal
459222 - McGill Paper Blossoms Tool Kit
159223 - McGill Paper Blossoms Molding Mat
Spring Bling Prills

Other Products:

Paper: White (Recollections), Sugar-N-Spice (Cordinations)
Ink: Onyx Black (VersaFine), Victorian Velvet Distress Ink (Ranger)
Accessories: Bead spacer, adhesive pearls, trim (Jo-Ann's), White Seam Binding, Bow-Easy Tool (Really Reasonable Ribbon), Sparkle Sheer Shimmer Spritz (Imagine Crafts), pop dots, glue dots. Aleene's Paper Glaze, 1/8" Scor-Tape.

Instructions: Make a 4 1/8" square, top fold card base with white. Cut mat with Sugar-N-Spice measuring 3 15/16" square. Add mat to base with pop dots. Cut largest Decorative Labels One Die with white and stamp sentiment on lower right with Onyx Black. Glue die cut to mat and adhere trim across as shown using Scor-tape.

For flower, die cut largest lace flower with white and smaller lace flower with Sugar-N-Spice. Glue together offsetting as shown and glue to mat. Stamp Arianna Blooms flowers on white with Victorian Velvet and die cut with matching die. Using 3 largest blooms to make flower, ink edges with Victorian Velvet, spray with Sparkle Shimmer Spritz, shape with mat and tool kit and glue together as shown offsetting petals. Glue to lace flower as pictured. Add Pink Tu-Tu Prills to flower center using Art Institute Glue Dries Clear and let dry. Make 3 loop bow with White Seam Binding using Bow-Easy Tool and add to trim with glue dots. Glue mini adhesive pearl to spacer bead using Aleene's Paper Glaze and let dry. Add this to bow center using glue dots. Add adhesive pearls to top right as shown.

Wednesday, July 23, 2014

Friends Frame - Heartfelt Creations


Happy Wednesday!

It's time for a little inspiration from Heartfelt Creations!  This week I have a little frame I bought at Michaels that I decorated and inserted with a sentiment and flowers.


For the inside, I stamped the flowers and “friends” sentiment together so they would fit nicely inside the frame.  I then colored the flowers with pencils and mineral spirits and dotted them with White Opal Liquid Pearls.

For the outside, I stamped some Posy Patch Flowers, colored them the same way, shaped them and added them to the frame with some of the beautiful new leaf and vines from the Cut Mat Create Dies.  I used a glue gun to adhere everything to make sure it stayed well.  I then added some Prills to the flower centers, a fiber bow and a button.

I think this makes a really sweet gift for a friend!  I've been collecting these frames from Michaels and have finally found a great use for them!  These would be cute gifts for Christmas or teacher gifts with a different sentiment!

Be sure to visit the HC Blog to see all the beautiful creations by the designers this week!  So much beautiful work there!

I'm submitting this to the following challenge:

Word Art Wednesday Challenge #142 - Anything Goes

Thank you for stopping by today!

Blessings!

Kathy


Friends Frame

Heartfelt Creations Products and Products Carried by HC:

HCPC 3618 - Everyday Blooms PreCut Set
HCPC 3616 - Vines and Blooms PreCut Set
HCPC 3303 - Posy Patch Flowers PreCut Set
HCD 750 - Cut Mat Create Set 1 B
HCD 751 - Cut Mat Create Set 2 A
452255 - Grand Calibur
368770 - Scor-Pal
SMP001 - Stamp Mat Pad
Spring Bling Prills
159723 - Art Institute Glue - Dries Clear
Paper Blossoms Tool Kit
Paper Blossoms Molding Mat

Other Products:
Paper: Solar White (Neenah), Green Linen (Recollections)
Ink: Onyx Black (VersaFine)
Accessories: Bow-Easy Tool (Really Reasonable Ribbon), Ivory Burlap String (May Arts), button, glue gun, White Opal Liquid Pearls (Ranger), 2.2" x 2.2" Photo Frame (Michaels), mineral spirits, Prismacolor Pencils: Periwinkle, Blue Violet Lake, Kelp Green, Marine Green, Black.

Instructions: Stamp flower image and sentiment together on Solar White with Onyx Black placing so as to fit inside your frame opening. Color image with pencils and add White Opal Liquid Pearls to flower centers. Trim image to fit inside frame. Stamp Posy Patch Flowers (3 - smallest, 1 each next two sizes up) on Solar White with Onyx Black. Color with pencils and cut with matching dies. Lightly mist with water on back and shape with mat and tool kit. With Green Linen Cardstock, cut 1 small leaf (HCD 751) and 1 small vine (HCD 750). Pinch leaves together slightly with fingers. Add leaves/vines and flowers as shown to frame using glue gun. Make multi-loop bow with string and tool, add to frame as pictured using glue gun. Add button with string to bow with glue dot.

Tuesday, July 22, 2014

Welcome Baby - CottageCutz


Happy Tuesday!

Today I have a “Welcome Baby” card for you using 2 new CottageCutz Dies from The Scrapping Cottage, Baby Lion and Baby Giraffe.


Aren't these little guys cute?  Here's a little close up of them.


I used various scraps of yellow, tan, gold and cream card stock to cut these and inked the edges with Creamy Cocoa Chalk Ink (PowderPuffs - Quick Quotes).  The eyes were colored with a black marker and dotted with a white gel pen.

To make my card, I started with a white card base.  I cut a yellow mat and stamped the sentiment on the bottom right corner, cut a smaller mat to fit the top using a plaid designer paper that I embossed with an embossing folder, then glued the mats together.  The baby animals were added using glue and pop dots under their heads.  I wrapped some trim across the mats and added it to the card base with pop dots.  I finished this off with adhesive pearls and a bow with a button.

These are the dies I used:


Card recipe:

Stamps: Short & Sweet (SU)
Paper: White (Recollections),  yellow (DCWV Stack), Itsy Bitsy Baby Boy Designer Paper (K & Co.), scraps of yellow, tan, gold, cream.
Ink: Onyx Black (VersaFine), Creamy Cocoa (PowderPuffs - Quick Quotes)
Accessories: Black marker, white gel pen, pop dots, glue dots, button (Jo-Ann's), White Seam Binding, White Trim, Bow-Easy (Really Reasonable Ribbon), white embroidery floss, adhesive pearls, Square Lattice Embossing Folder (SU).

I'm submitting this to the following challenges:

Word Art Wednesday Challenge #141 - Anything Goes

Thanks for stopping by!

Blessings!

Kathy

Wednesday, July 16, 2014

Summer Song Thank You - Heartfelt Creations


Happy Wednesday!

It's that time once again for a little inspiration from Heartfelt Creations!  This week I have a card for you using some pretty blue designer papers and stamps from the Cut Mat Create Collection.


The main image is from the Summer Song PreCut Set which I colored with pencils and mineral spirits.  The butterfly is from the Birds and Blooms PreCut Set which I also colored with pencils and fussy cut it to add to the image.  The “Thank you” sentiment is from the Summer Glory PreCut Set.

For the background mat, I used one of the 6" x 6" blocks and trimmed it to fit on the card.  I've always loved the color blue, and this is one of my favorite pieces from the designer papers.

Be sure to visit the HC Blog to see the gorgeous creations this week by the designers!

I'm submitting this to the following challenges:

Word Art Wednesday #141 - Anything Goes
Really Reasonable Ribbon #99 - Things With Wings & Ribbon

Thanks for stopping by to visit!

Blessings!

Kathy


Summer Song Thank You

Heartfelt Creations Products and Products Carried by HC:

HCPC 3617 - Bird and Blooms PreCut Set
HCPC 3615 - Summer Song PreCut Set
HCPC 3614 - Summer Glory PreCut Set
HCPC 245 - Cut Mat Create Paper Collection
HCD 750 - Cut Mat Create Set 1 B
HCD 749 - Cut Mat Create Set 1 A
452255 - Grand Calibur
368770 - Scor-Pal
SMP001 - Stamp Mat Pad
Spring Bling Prills
159723 - Art Institute Glue - Dries Clear

Other Products:

Paper: Solar White (Neenah), Typhoon (Bazzills)
Ink: Onyx Black (VersaFine), Blue Moon (PowderPuffs - Quick Quotes)
Accessories: Olive Wrinkled Ribbon, Bow-Easy (Really Reasonable Ribbon), fibers, button, pop dots, glue dots, mineral spirits, Prismacolor Pencils: Periwinkle, Blue Violet Lake, Black, Kelp Green, Marine Green, Deco Yellow, Jasmine.

Instructions: Make card base with Typhoon Cardstock measuring 4 1/4" x 5 1/2". Cut blue flowered 6" x 6" designer paper block (shown) trimming it down to 4 1/16" x 5 5/16" and ink with Blue Moon. Wrap ribbon around mat as shown covering the blue strip in the designer paper and adhere it to card base. Stamp image on Solar White with Onyx Black and color with pencils. Die cut image with the medium rounded rectangle (HCD 750) and ink edges with Blue Moon and Black. Die cut Typhoon mat with medium rounded rectangle (HCD 749) and add image to it with pop dots. Add to mat as shown with pop dots. Stamp butterfly image on Solar White with Onyx Black, color butterfly only and fussy cut. Shape butterfly slightly with fingers and add to image as shown with glue. Add Lemon Chiffon Prills to flower centers using Art Institute Glue Dries Clear and let dry. Stamp sentiment on Solar White with Onyx Black and die cut with label strip (HCD 750). Add sentiment as shown with glue dot. Make triple loop bow with Olive Wrinkled Ribbon, multi loop blue fiber bow and button threaded with twine and bow tied in back. Add all to card as pictured with glue dots over top of sentiment.

Saturday, July 12, 2014

Fancy Baby Booties - CottageCutz

Happy Saturday!

Today a have a cute baby “Congratulations” card for you using one of The Scrapping Cottage's  new CottageCutz Dies, Fancy Baby Booties!


I used a cream and brown color combination for this.  The booties were die cut with Natural White Cardstock and colored with Antique Linen and Vintage Photo Distress Inks.  I used a 4 1/4" square card base make with Fudgesicle Cardstock and a Natural White mat.  The mat was embossed on the top 2/3 with Square Lattice Embossing Folder and the sentiment was stamped with Vintage Photo Distress Ink.  I finished it with adhesive pearls, a bow and a button with a fiber bow.

Here is the die I used:


Card Recipe:

Stamp: Well Scripted (SU)
Paper: Natural White (Neenah), Fudgesicle (Coredinations), Sunshine (My Mind's Eye)
Ink: Antique Linen, Vintage Photo Distress Inks (Ranger)
Accessories: Sponges, button, fibers, Bow-Easy, Havana Brown Seam Binding (Really Reasonable Ribbon), Square Lattice Embossing Folder (SU), adhesive pearls.

I'm submitting this to the following challenges:

Word Art Wednesday #140 - Anything Goes.

Thanks for stopping by today!

Blessings!

Kathy

Wednesday, July 9, 2014

Everyday Blooms - Heartfelt Creations


Happy Wednesday!

It's time for the release of the new Cut Mat Create Collection!


Have you ever wished for a magic wand that creates professional looking layouts, perfectly matted cards, and multi-layered paper crafting projects in the wink of an eye? The revolutionary Cut, Mat, Create Collection from Heartfelt Creations is a unique system designed with stress-free crafting in mind. You can finally liberate cherished family photos hidden away in dusty shoe boxes and create stylish scrapbook pages with ease—and without restrictive plastic pockets!  The dies create a grid that fits perfectly on a 12" page, allowing for limitless layout possibilities.  Use with stamps and papers to create precisely matted cards or mini albums.  The 4 die sets contain 27 individual dies. The 6 coordinating stamp sets also complement previous collections. The luxurious papers work hand in glove with both dies and stamps. Whether you are a paper crafting novice or a design diva, you will love the freedom, simplicity and versatility of this innovative, must have collection.

Here is my first card using this collection.


I decided on a purple and yellow combination for these gorgeous flowers which I colored with pencils and mineral spirits.  Here's a little close up for you!


What a fun collection of beautiful stamps, designer papers and lots and lots of dies!  Be sure to visit the HC Blog to see what the designers have for you today!

I'm submitting this to the following challenges:

Word Art Wednesday #140 - Anything Goes.

Thanks for stopping by!

Blessings!

Kathy


Everyday Blooms

Heartfelt Creations Products and Products Carried by HC:

HCPC 3618 - Everyday Blooms PreCut Set
HCDP1 245 - Cut Mat Create Paper Collection
HCD 750 - Cut Mat Create Set 1 B
HCD 751 - Cut Mat Create Set 2 A
452255 - Grand Calibur
368770 - Scor-Pal
SMP001 - Stamp Mat Pad
Spring Bling Prills
159723 - Art Institute Glue - Dries Clear
Double Dots

Other Products:

Paper: Solar White (Neenah), green (DCWV Stack), Scattered Straw Distressed (Coredinations)
Ink: Onyx Black (VersaFine), Purple Hydrangea (VersaMagic), Banana Bliss (PowderPuffs - Quick Quotes)
Accessories: Lavender Seam Binding, Bow-Easy Tool (Really Reasonable Ribbon), twine, button, sanding block, pop dots, glue dots, mineral spirits, Prismacolor Pencils: Lavender, Parma Violet, Violet, Dioxazine Purple Hue, Kelp Green, Marine Green, Jasmine, Yellow Ochre, Goldenrod, Chocolate.

Instructions: Make card base with green card stock measuring 4 1/4" x 5 1/2". Cut purple designer paper 4 1/16" x 5 5/16" and ink edges with Purple Hydrangea. Adhere to card base. Stamp flower image on Solar White with Onyx Black and color with pencils. Fussy cut image and ink edges with Banana Bliss. Cut large rounded rectangle (HCD 751) from Scattered Straw Cardstock. Sand edges and ink with Banana Bliss. Add image to mat with pop dots and add to card with Double Dots. Add “Heart of Gold” Prills to flowers centers using Art Institute Glue Dries Clear and let dry. Cut small leaf flourish (HCD 751) and small vine (HCD 750) with green card stock. Pinch leaves together slightly and add as pictured to image. Make 3 loop bow with Lavender Seam Binding using Bow-Easy Tool. Add bow to leaves using glue dots. Add button with twine to bow using glue dot.

Saturday, July 5, 2014

Welcome - CottageCutz

Happy Wednesday!

Today I have a “Welcome” card to show you using 3 CottageCutz Dies from The Scrapping Cottage, the Lamp Post w/Sign, Grass Border and Daisy Showers.


I started with a card base made from a caramel color card stock and red brick color mat both from DCWV Cardstock.  The designer paper for the background is from Mirabelle Stack (The Paper Studio).  I also used the designer papers (red) for the die cuts along with White, Soft Suede and caramel.  I used Banana Bliss, Mocha Mama PowderPuff Inks and Red Brick VersaMagic Ink to color and ink the edges of the die cuts.

After gluing all the pieces down, I embellished the flower centers and Lamp Post w/Sign with Bisque Liquid Pearls.  I then added a bow using Tobacco Seam Binding with a button and twine.  On the bottom of the Grass Border I added 3 pieces of Brown Micro Gingham that I tied in a knot, trimmed and added with Scor-tape.

These are the dies I used on my card:


Card Recipe:

Paper: Mirabelle (The Paper Studio), Neutrals Cardstock Stack (DCWV), White (Recollections), Soft Suede (SU)
Ink: Banana Bliss, Mocha Mama (PowderPuffs - Quick Quotes), Red Brick (VersaMagic)
Accessories: Paper Blossoms Mat & Tool Kit, Bisque Liquid Pearls (Ranger), black marker, button, pop dots, Tobacco Seam Binding, Brown Micro Gingham, Bow-Easy (Really Reasonable Ribbon).

I'm submitting this to the following challenges:

Word Art Wednesday #139 - Anything Goes

Thanks for stopping by today!

Blessings!

Kathy


Wednesday, July 2, 2014

Matchbook Post-It Note Holder - Heartfelt Creations


Happy Wednesday!

It's inspiration Wednesday for Heartfelt Creations!  Today I have a cute little post-it note holder I made using the Arianna Blooms Paper Collection and 3 of the Heartfelt Creations Dies.


Here's a side view so you can see the Post-It and how it's put together.


This was really easy to put together and I think it makes for a cute gift!  I used the “Matchbook Post-It Note Holder” Tutorial on Split Coast Stampers found here.  You can find the instructions for how I decorated mine at the end of my post, if you will like to try making one yourself!

Be sure to visit the HC Blog to see all the beautiful projects by the designers this week!

I'm submitting this to the following challenges:

Word Art Wednesday #139 - Anything Goes

Thanks for stopping by today!

Blessings!

Kathy


Matchbook Post-It Note Holder

Heartfelt Creations Products and Products Carried by HC:

HCDP1 244 - Arianna Blooms Paper Collection
HCD 745 - Luggage and Tags Die
HCD 740 - Sweet Juliet Die
HCD 732 - Decorative Flower Pot Die
452255 - Grand Calibur
368770 - Scor-Pal
SMP001 - Stamp Mat Pad
Spring Bling Prills
159723 - Art Institute Glue - Dries Clear

Other Products:
Paper: White heavy card stock
Ink: Hint of Pesto (VersaMagic)
Accessories: Button, white embroidery floss, adhesive pearls, pop dots, Scor-tape, 3" x 3" Post-It Note, 1/4" White Silk Ribbon (May Arts), Bow-Easy (Really Reasonable Ribbon).

Instructions: Using heavy white card stock, make matchbook Post-It note holder using the Split Coast Stampers tutorial found here. Use the adjusted measurements for the 3" x 3" size listed under “Variations”. Die cut the edge of the card stock piece with the Decorative Flower Pot Die by slipping it in the die to cut the scalloped edge only. Mat the front and inside cover with designer papers. Die cut leaves from dark green designer paper using the Sweet Juliet Die. Fussy cut one of the pink blooms from the designer paper, clip between the petals, mist lightly with water and shape with mat and tool kit. Glue leaves and flower as pictured. Cut tag from designer paper and add as pictured using glue and a pop dot in the center. Add adhesive pearls, bow with button and embroidery floss. Add Lemon Chiffon Prills to flower center using Art Institute Glue Dries Clear.