Be Joyful

Rejoice in the Lord always. Again I will say, rejoice! Let your gentleness be known to all men. The Lord is at hand. Be anxious for nothing, but in EVERYTHING by prayer and supplication, with thanksgiving, let your requests be made known to God; and the PEACE OF GOD, which surpasses all understanding, will guard your hearts and minds through Christ Jesus. Philippians 4:4-7

These are verses I memorized years ago and they are written on my heart. There are times when I still need to remember not to be anxious, but I eventually listen to my heart saying these verses. I didn't really understand what the "peace of God" was until I experienced it. It's having peace inside you, even when you're going through heartbreaking situations and trials. It does "surpass ALL understanding" and you know it comes from GOD alone. Praise the Lord for His wonderful promises!


I love, love, love what I do. I am passionate about the things I create and the talents God has placed in me. I SO appreciate the time you take to look at my things and the comments you all leave me!

Blessings to you!

Kathy
Showing posts with label Box. Show all posts

Wednesday, September 3, 2014

Majestic Blooms Box - Heartfelt Creations


Happy Wednesday!

It's time for a little inspiration from Heartfelt Creations!  Today I have a pre-made gift box I bought at Michaels that I decorated with designer papers from the Raindrops on Roses Collection, Majestic Morning flowers and Burst of Spender leaves!


Here's a better view of the top with the beautiful flowers!


Here's a peek at the inside which I also covered with the designer papers.


Be sure to visit the HC Blog to see all the beautiful creations by the designers this week!  There is also a sneak peek of the new Sunflower Collection coming out September 10th!  Heartfelt Creations has also announced the list of Semifinalists for the design team!!!  Congratulations to all the Semifinalists!  Make sure to vote for your favorite top 5 and be eligible to win a gift certificate!

I'm submitting this to the following challenges:

Word Art Wednesday Challenge #148 - Anything Goes

Thanks for visiting today!

Blessings!

Kathy


Majestic Blooms Box

Heartfelt Creations Products and Products Carried by HC:

HCPC 3578 - Majestic Morning Background PreCut Set
HCPC 3546 - Classic Leaf PreCut Set
HCD 742 - Majestic Blooms Die
HCD 736 - Classic Leaf Die
HCD 743 - Raindrops on Roses Die
HCDP1 240 - Raindrops on Roses Paper Collection
452255 - Grand Calibur
459222 - McGill Paper Blossoms Tool Kit
159223 - McGill Paper Blossoms Molding Mat
Other Products:

Paper: Solar White (Neenah)
Ink: Onyx Black (VersaFine), Peeled Paint Distress (Ranger)
Accessories: Sparkle Sheer Shimmer Spritz (Tsukineko), glue gun, splat mat (Darice), Mod Podge, White 1/4" Silk Ribbon (May Arts), Bow-Easy Tool, 1/5" White Netting, String Beads Pearlized (Really Reasonable Ribbon), adhesive pearls, Diamond Stickles (Ranger), 3.75" White Gift Box (Michaels), mineral spirits, Prismacolor Pencils: Clay Rose, Rosy Beige, Black Cherry.

Instructions: Measure your pre-made box and trim the designer papers to fit each side of the box and lid both inside and out. For my box, I used the 12" x 12" sheet with roses in each of the 4 corners. I trimmed each corner, inked the edges with Peeled Paint Ink and glued to the box using Mod Podge. Use coordinating papers for the box inside, lid inside and sides using same process. For the top of the lid, I used the card front in the designer paper that matches the 12" x 12" image in a smaller version (3 5/8" square) and added it using same process. Die cut the Raindrops on Roses Die lattice piece with white card stock and glue to the lid top.

Stamp the Majestic Morning Background on Solar White with Onyx Black and color with pencils and mineral spirits. I used 9 of the 12 flowers for mine (2 of the smallest and 1 each of the next 7 sizes) to create 3 separate flowers in different sizes. Use the mat and tool kit to shape the flowers and glue them together using a glue gun for extra hold. Stamp 2 of the Classic Leaf open stems on Solar White using Onyx Black, die cut with Class Leaf Die and ink with Peeled Paint. Shape and pinch leaves with your fingers. Add stems and flowers to lid as pictured using glue gun. Add string beads, netting piece (tie across middle with string to form a fake bow) and a multi-loop bow using glue gun. Add adhesive pearls, stickles as desired. Spray with Sparkle Shimmer Spritz as desired.

Wednesday, October 16, 2013

Heartfelt Creations - Sweet Juliet Heart Box


Happy Wednesday!  It's time for a little inspiration from Heartfelt Creations!  This week I have a mini paper mache heart box that I decorated using the new Sweet Juliet Collection of papers and dies.


Here's another view...


and another view from the side...


This box was super easy to decorate and makes a really cute gift box!  I fully intended to make a little notecard to go with this, but moving this past month has totally taken away any sense of normalcy in my craft room and I just plain forgot!  The good news is I now have a real craft room!  It has a door and everything!  I've been very busy unpacking everything and putting together storage cubes to organize everything, but it's almost done.  I can't wait to sit down and actually start creating again!

Thank you for stopping by today!  Be sure to visit the Heartfelt Creations Blog to check out all the beautiful creations by the designers this week!  Also, voting for the new designers ends on the 18th.  If you haven't voted yet, here is the link for it.  I would love to be able to continue on the design team the next 6 months, but I can only stay on the team if I have enough votes! 

I'm submitting this to the Word Art Wednesday Challenge #102 - Anything Goes.

Blessings!

Kathy


Sweet Juliet Heart Box

Heartfelt Creations Products & Products Carried by HC:
HCD 740 – Sweet Juliet Die
HCPC1 237 – Antiquity Paper Collection
Product ID: 452255 – Grand Calibur

Other Products Used:
Paper: Green
Ink: Bravo Burgundy (SU)
Accessories: Paper Mache Mini Heart Box (Creative Home Crafts), brad, Cream Seam Binding (Really Reasonable Ribbon), Bow-Easy, velvet ribbon, trim (Jo-Ann’s), sponge, Mod Podge, brush, Scor-tape, Fast-Grab Tacky Glue (Aleene’s)

Instructions:
Trace top of box on designer paper and cut out to fit.  Measure sides of box and cover and trim designer paper to fit.  Glue to box with Mod Podge.  Let dry and trim any excess.  Ink edges, inside and bottom of box with Bravo Burgundy Ink using sponge.  Add velvet ribbon to edge of cover with Scor-tape and add trim over it with Fast-Grab Glue.

Cut designer paper with flower dies and assemble together as shown using brad to secure.  Add flower to bow center.  Cut 2 leaves with green cardstock, shape with fingers and cut into 3 pieces to fit under bow.  Glue all down to top of box.


Wednesday, June 5, 2013

Heartfelt Creations - One Sheet Wonder Cards & Box

Happy Wednesday everyone!

Today I have a fun gift idea using Heartfelt Creations designer papers, stamps and dies!  A while back I created a "one sheet wonder" for a 6" x 6" piece of pattern paper.  I loved how it came out, so I decided to do one with HC's beautiful papers!  Here are the 6 cards I made.


Click on photo for a closer view


I love how these all coordinate together, it makes such a pretty gift!  I also made a gift box to go with these using HC's stamps.


If you're not familiar with "one sheet wonders", basically you use a piece of designer paper (or make your own), cut it into pieces using a pattern and make cards with the pieces.  I made the pattern for these and posted it in February on this post here  if you would like to read more about it or try making one yourself for a gift!

For lots more inspiration, please visit the Heartfelt Creations' Blog to see what all the talented designers have created for you this week!

I'm submitting this to the following challenges:

Allsorts Challenge Week 209 - Here Comes the Girls
Word Art Wednesday #83 - Anything Goes
No Matter Which Challenge #10 - Bingo - Ribbons/Flowers/Bows
Paper Playtime #11 - Two or More Ribbons
Tuesday Throwdown #150 - Embossing

Thank you for visiting today!  I hope I leave you a little inspired!

Blessings!

Kathy


Sun Kissed One Sheet Wonder 6x6 Cards and Box

Heartfelt Creations Products & Products Carried by HC:
HCPC 3533 – Sun Kissed Fleur PreCut Set
HCPC 3535 – Sun Kissed Tags & Basket PreCut Set
HCPC 3536 – Sun Kissed Fleur Background PreCut Set
HCPC 3537 – Sun Kissed Fleur Swirls PreCut Set
HCPC 3538 – Sun Kissed Fleur Border & Corner PreCut Set
HCPC 3520 – Botanical Oval PreCut Set
HCPC 3363 – Inspire Me Sentiments PreCut Set
HCPC 3354 – Classic Message PreCut Set
HCD 734 – Sun Kissed Fleur Die
HCPC1 233 – Sun Kissed Paper Collection
Product ID: 159223 - Paper Blossoms Molding Mat
Product ID: 459222 - Paper Blossoms Tool Kit
Product ID: 159723 – Art Institute Glue – Dries Clear


Other Products Used:
Paper: Natural White (Neenah), Baja Breeze (SU), Capers (Bazzills)
Ink: Onyx Black (VersaFine), Aegean Blue, Spanish Olive (VersaMagic)
Accessories: Copper Microbeads (Recollections), Snow Embossing Powder (Recollections), adhesive pearls, charm, Bow-Easy, Cream Seam Binding (Really Reasonable Ribbon), Always Artichoke, Baja Breeze Seam Bindings (RAK from Jill – SU), distressing tool, embossing folders: Paper Lace II (Cuttlebug), Four Petal Flower (Sizzix), Framed Tulips (SU), Deco Fan Punch (Martha Stewart), make-up applicators, Marine Green Pencil (Prismacolor)

Instructions:
Box: Use A-2 Box Tutorial (http://www.splitcoaststampers.com/resources/tutorials/a2cardbox/) using Baja Breeze for base and Natural White for cover.  Decorate cover before adhering together.  Add mats to sides of box with designer paper and inks edges using the following measurements: cut 2 at 5-15/16” x 7/8” and 2 at 4-3/4” x 7/8”.  Mat top of box with Baja Breeze measuring 4-3/4” x 6” distressing edges.   For image, cut Natural White 4-9/16” x 5-13/16”.  Stamp large corner image (Sun Kissed Fleur Border & Corner) and small swirl (Sun Kissed Fleur Swirl) in opposite corners with Onyx Black Ink.  Color with inks and pencil, emboss with folder and distress edges.

On separate piece of Natural White, stamp flowers, tag image and sentiment on tag and color same way.  Die cut flowers and fussy cut tag.  Add tag with pop dots.  Assemble flower and add flowers as shown.  Add microbeads, bow and adhesive pearls.
Cards: (This is a One Sheet Wonder technique where a piece of designer paper is cut a certain way and used to create a matching set of cards.)  Cut piece of designer paper 6” x 6” and use cutting layout for 6x6 One Sheet Wonder here.   All cards measure 5-1/2” x 4-1/4”.  Mat measurements are 3/16” larger, except for small designer paper pieces for Card #3 & 5 which are 1/8” larger for a thinner mat.

Card #1: Natural White base, mat with designer paper and ink edges.  Stamp sentiment, wrap ribbon around mat and add to base.  Mat designer piece #1 with Capers and Baja Breeze and add to card with pop dots.  Add bow and adhesive pearls.
Card #2: Natural White base embossed with Framed Tulips Embossing Folder and stamp sentiment on bottom.  Mat designer paper piece #2 with Capers and Baja Breeze, wrap Baja Breeze Ribbon around and add to base with pop dots.  Add bow, adhesive pearls and charm.
Card #3: Natural White base.  Cut mat with Baja Breeze, stamp it with Sun Kissed Background image using VersaMark and heat emboss with Snow Embossing Powder.  Wrap lace around mat and glue to base.  Mat the three designer paper pieces #3 with Natural White and Baja Breeze and glue together.  For narrow mats cut as follows: Natural White at 4-5/16” x 2”, Baja Breeze at 4-5/16” x 1-13/16” and glue together.  For top mat, cut Natural White at 4-1/2” x 1-1/16”, punch bottom with Deco Fan Punch and emboss remainder of piece with Paper Lace II folder.  Trim off top of mat so that pieces fit together as shown, glue together and add to base with pop dots.  Add three designer paper pieces as shown.  Add adhesive pearls and bow.

Card #4: Natural White base, mat with Baja Breeze and stamp sentiment on bottom.  Cut Natural White piece at 4” x 3-13/16” and emboss with Four Petal Flower folder.  Glue piece to mat as shown, wrap ribbon around and add to base with pop dots.  Mat the two designer paper pieces #4 with Capers and Baja Breeze and add to base with pop dots.  Add bow and adhesive pearls.
Card #5: Baja Breeze base, mat with Natural White.  Emboss upper portion with Paper Lace II folder, stamp sentiment on bottom, wrap ribbon around and glue to base.  Cut Natural White at 2-1/8” x 3-1/8” and glue four designer paper pieces #4 as shown.  Cut second mat with Baja Breeze at 2-5/16” x 3-5/16” and glue together.  Add to card with pop dots.  Add bow and adhesive pearls.

Card #6: Natural White base, mat with Baja Breeze, then with designer paper.  Stamp sentiment on bottom.  Mat designer paper piece #6 with Capers and Baja Breeze, then add to card with pop dots.  Add bow and adhesive pearls. 


Wednesday, May 22, 2013

Heartfelt Creations - Gift Box & Card


***This is my second post for today...if you are looking for my CottageCutz card, please see post below this!  Thank you!***


Happy Wednesday everyone!

Today I have a gift box and card set to show you!  Here is the card...


(Click on the photo for a closer look)


the box...


the other side of the box...


The flowers were all done by coloring with pencils on black cardstock using white embossing powder for the image.  I was playing around the other day with my pencils and decided to try coloring on black using white pencil as a base.  I love the way this came out with this bright teal color, so striking with the white!


The gift box is made by using the Gift Ensemble Die, cutting 4 pieces and gluing the sides together.  (You can see more about this in the video and the HC Blog.)  I decorated the sides of the box coloring on black as I did with the flowers.

For lots more inspiration, please visit the Heartfelt Creations Blog to see all the designers gorgeous creations this week!

I'm submitting this to the following challenges:

Word Art Wednesday Challenge #81 - Anything Goes
Addicted to Stamps & More #46 - Anything Goes
Allsorts Challenge Week #207 - True Blue
Whimsy Stamps #59 - Anything Goes

Blessings!

Kathy


Gift Box & Card

Heartfelt Creations Products & Products Carried by HC:
HCPC 3537 – Sun Kissed Fleur Swirls PreCut Set
HCPC 3536 – Sun Kissed Fleur Background PreCut Set
HCPC 3533 – Sun Kissed Fleur PreCut Set
HCPC 3474 – Heartfelt Expressions PreCut Set
HCD 734 – Sun Kissed Fleur Die
HCD 735 – Gift Ensemble Die
Product ID: 159223 - Paper BlossomsMolding Mat
Product ID: 459222 - Paper BlossomsTool Kit
Product ID: 159723 – Art InstituteGlue – Dries Clear

Other Products Used:
Paper: Solar White (Neenah), Whisper White (SU), olive, black (Recollections), turquoise
Ink: VersaMark, Onyx Black (VersaFine)
Accessories: White Embossing Powder (SU),  heat tool, adhesive pearls (Recollections), Bow-Easy, Peacock Seam Binding (Really Reasonable Ribbon), Four Petal Embossing Folder (Sizzix), Aleene’s Paper Glaze, Prismacolor Pencils: White, Muted Turquoise, Cobalt Turquoise, Sage Green, Olive Green, Marine Green

Instructions:
Card: Make 4-1/4" x 5-1/2" top fold card from turquoise cardstock.  Cut black mat 4-1/16” x 5-5/16”.  Cut white mat 3-7/8” x 5-1/8”, emboss top portion with embossing folder and stamp sentiment on bottom.  Glue mats together, add ribbon and add to base with pop dots.

On black cardstock, stamp flowers with VersaMark and heat emboss with white embossing powder.  Color flowers and leaves with pencils using White Pencil as a base before adding other colors.  Die Cut with matching die.  Use 4 of the flowers to make a flower using every other size and reserve the other 4 flowers for the box.  Cut 2 leave swirls with olive cardstock and arrange on card with flower and glue down.  Add bow and adhesive pearls.
Box: Cut 4 pieces from Gift Ensemble Die with white for box.  Glue lace edges together on 3 of the sides.  Using black cardstock and VersaMark, stamp smaller swirl (Sun Kissed Fleur Swirls Set) and the Sun Kissed Background Image and heat emboss with White Embossing Powder.  Color in same manner as flowers.  Trim small swirl to 2” x 3-3/16” and cut background into 3 of the same size.  Mat all 4 pieces with turquoise cardstock measuring 2-3/16” x 3-3/8”.  Glue one on each side of the box.  Glue last side of box’s lacy edges together to complete box.  Create flower with leftovers from card and add to one of the top flaps with pop dot.  Cut and add 2 leaf swirls with olive and glue to top.  Add small bow and adhesive pearls to flower centers using Paper Glaze.


Thursday, February 7, 2013

Graphic 45 Baby Gift Set

Hi there!

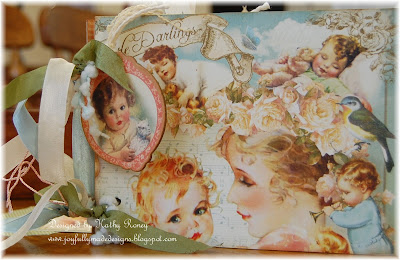
Today I have a baby gift emsemble that I have been working on to give to a dear friend.  There is a tri-shutter card, chipboard mini album, and matching gift box to hold the album.  These are made with the Graphic 45 Little Darlings Papers and Chipboard Tags.  (You can click on the photos for a closer look.)


The card is made using the tri-shutter tutorial on SCS here


The mini album was created based on the Little Darlings Mini Album Project Sheet on the Graphic 45 Website here.  The base for the album is just an inexpensive chipboard album from Michaels that measures 5" x 6 1/2".  Here is the front cover decorated with the papers, chipboard tag, and lots of ribbons and trims:


Here are the inside pages which show the pockets for tags, photos, and/or journalling.  I made die cut pieces in different shapes and added some chipboard tags and cute photos taken from the papers.


The back cover:


This is the gift box I created for the album to be kept in.  I used a basic box making technique, adjusting measurements to fit the album.  This shows the box closed up with the ribbon on it that slides off.


This shows the box without the ribbon on it.


Products used:

Stamps: God's Blessings (Stampin' Up)
Paper: Little Darlings Collection (Graphic 45), Natural White (Neenah), Baja Breeze (SU), Coral (DCWV), Dark Caribbean Coral (Color Mates)
Ink: Vintage Photo Distress Ink (Ranger)
Accessories: Little Darlings Collection Chipboard Tags (Graphic 45), chipboard book (Michaels), extra keyring 1 1/4", various punches & dies, Very Vanilla, Baja Breeze Seam Binding (RAK from Jill), various fibers and trims, button, lace, brad, spacer bead, Crop-a-Dial, hole punch


I'm submitting this to the latest Word Art Wednesday Challenge #66 - Anything Goes
Way to Use It Challenge #WT413 - Use green

Thanks for stopping by!  I hope you are inspired by my projects today!

Blessings!

Kathy

Thursday, April 7, 2011

One Sheet Wonder 8x8 - Box

One Sheet Wonder 8 x 8 Boxes:


The box I used for the One Sheet Wonder 8x8 is the "A2 Card Box" by Beate, located in the Resources/tutorials section on Split Coast Stampers here.

To increase the size of the box to accomodate 9 cards and envelopes, I adjusted it so I could still use 8 1/2 x 11 paper. It could be a little bigger, but I think it works out good. The measurements I used are:

Box base: 8 1/2" x 9 3/4" piece of cardstock
Box lid: 7 1/4" x 8 1/2" piece of cardstock

In step 1 of the tutorial, score at 1 7/8" instead of 1 1/2" for the base.
In step 7 of the tutorial, score at 1 3/16" instead of 1" for the lid.

The remaining instructions would all be the same. Hope this helps!

Kathy