Be Joyful

Rejoice in the Lord always. Again I will say, rejoice! Let your gentleness be known to all men. The Lord is at hand. Be anxious for nothing, but in EVERYTHING by prayer and supplication, with thanksgiving, let your requests be made known to God; and the PEACE OF GOD, which surpasses all understanding, will guard your hearts and minds through Christ Jesus. Philippians 4:4-7

These are verses I memorized years ago and they are written on my heart. There are times when I still need to remember not to be anxious, but I eventually listen to my heart saying these verses. I didn't really understand what the "peace of God" was until I experienced it. It's having peace inside you, even when you're going through heartbreaking situations and trials. It does "surpass ALL understanding" and you know it comes from GOD alone. Praise the Lord for His wonderful promises!


I love, love, love what I do. I am passionate about the things I create and the talents God has placed in me. I SO appreciate the time you take to look at my things and the comments you all leave me!

Blessings to you!

Kathy
Showing posts with label Really Reasonable Ribbon. Show all posts

Wednesday, October 15, 2014

Nuts and Bolts - Heartfelt Creations & Really Reasonable Ribbon


Happy Wednesday!

I'm back again with another card using the new All Geared Up Collection released last week by Heartfelt Creations.  This time I'm using the Nuts and Bolts Set.


I stamped the image with Vintage Photo Distress Ink and colored it with pencils and mineral spirits. (You can click on the photo for a closer view.) The 'frame' was made using one of the card fronts from the designer papers that I trimmed.

Today we are also doing a cross-promotional blog hop with Really Reasonable Ribbon - my favorite place to buy ribbon!!!  I used their gorgeous Copper Forest Silk Ribbon and Bow-Easy Tool to make this beautiful bow!  I love the way their silk ribbon drapes, so pretty and the 2 tones on the ribbon really make an eye-catching bow!

Be sure to visit the Heartfelt Creations Blog and the Really Reasonable Ribbon Blog to see all the beautiful creations by the designers this week!

I'm submitting this to the following challenges:
Word Art Wednesday Challenge #154 - Anything Goes
Addicted to Stamps & More #117 - Make Your Mark

Thanks for stopping by!

Blessings!

Kathy


Nuts and Bolts

Heartfelt Creations Products and Products Carried by HC:

HCPC 3633 - Nuts and Bolts PreCut Set
HCDP1 248 - All Geared Up Paper Collection
452255 - Grand Calibur
368770 - Scor-Pal
SMP001 - Stamp Mat Pad

Other Products:

Paper: Natural White (Neenah), Fudgesicle, French Roast, Aegean (Coredinations)
Ink: Vintage Photo Distress Ink (Ranger)
Accessories: Copper Forest Silk Ribbon, Bow-Easy Tool (Really Reasonable Ribbon), cutting mat, craft knife, button, floss, adhesive pearls, mineral spirits, Prismacolor Pencils: Jade Green, Celadon Green, Muted Turquoise, Ginger Root, Light Umber, Chocolate, Dark Brown, Black.

Instructions: Make top fold card base with French Roast measuring 4" x 5 1/4". Cut mat 3 3/4" x 5" with Aegean and ink edges lightly with Vintage Photo. Cut mat 3 1/2" x 4 3/4" with Fudgesicle and ink edges with Vintage Photo. Glue two mats together and add to base with pop dots.

Stamp image on Natural White with Vintage Photo and color with pencils and mineral spirits. Cut card front (pictured) from designer paper and trim outside and center oval as shown. (I used a craft knife and cutting mat to cut out the oval shape.) Ink edges with Vintage Photo. Add image behind card front as shown with pop dots and add to mats. Make triple loop bow with Bow-Easy tool and add as pictured with glue dots. Add floss to button and add to bow center with glue dots. Add adhesive pearls.


Thursday, November 21, 2013

Spellbinders Platinum Party Blog Hop - Heartfelt Creations


Happy Thursday everyone!

Welcome to the second day of the Spellbinders Platinum Party Blog Hop!!!  I'm so excited to be participating in the Hop today with Spellbinders for Heartfelt Creations!  I hope you are having fun hopping and enjoying all the beautiful creations on your way!

You can find all the rules for the contest at the Spellbinders Blog here and be sure to visit all the participating blogs to be eligible for the Grand Prize.

For your chance to win the Grand Prize for the Platinum Party please enter here

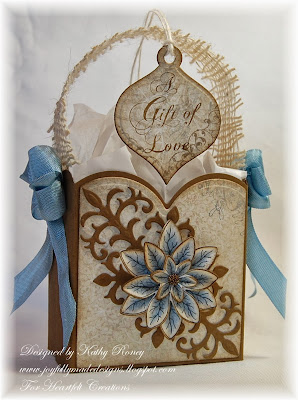
For my project, I will be showing you how I made this special Christmas gift bag using the Grand Labels 23 Die and lots of other Spellbinders and Heartfelt Creations products!


You can make this bag and decorate it for any occasion and it's pretty simple to put together!


I put together a little picture tutorial in a separate post to show you how I did it...sorry I don't have a video camera...yet!

To decorate my bag, I used Spellbinders Dies and  Heartfelt Creations designer papers, stamps, and dies.  I matted the front and back of the bag with light brown designer paper from the Christmas Card Paper Collection by cutting it with the same Labels 23 Grand die, scoring it in the same manner, and trimming the front and back pieces to fit.  I then inked them with Soft Suede Ink and glued them to the bag.

The poinsettia flower was made with the Christmas Poinsettia PreCut Set and the matching Sun Kissed Fleur Die.  The wonderful thing about these is you stamp the one image and cut it with one die and you get 10 different flowers and 2 leaves at once!  It's a huge time saver and I love having extra flowers leftover to use when ever I need them! 


For my flower here, I used Solar White Cardstock and Onyx Black Ink.  I colored 3 of the flowers with Periwinkle and Black Prismacolor Pencils using mineral spirits.  The flower was shaped using the Paper Blossoms Molding Mat and Tool Kit and glued together.  I then added Antique Copper Microbeads to the flower center.  I cut 2 of the flourishes from the Ornamental Add On Die with Soft Suede Cardstock, glued them tip to tip as shown, and popped the poinsettia flower on top.


For the back of the bag, I cut one of the other flourishes from the Ornamental Add On Die with Soft Suede Cardstock and one of each snowflake from the Banner & Tree Die with Natural White Cardstock and glued together as shown adding an adhesive pearl to the center.

I added a bow on each side of the bag made with Danish Blue Seam Binding and an adhesive pearl to the center.  The handle of the bag is a jute ribbon sample I received from Really Reasonable Ribbon that I thought looked kind of cute as a handle!


The gift tag was made with Spellbinders Holiday Tags Dies.  I stamped the sentiment from Heartfelt Creations' Love At Christmas PreCut Set on more of the light brown designer paper with Soft Suede.  This was cut out with the tag die, along with another cut from Soft Suede cardstock.  I glued these together, inked the edges, and added some twine for a tie.


Here is the complete list of participating blogs for the contest both yesterday and today:

  
November 20th

Linda Lucas  www.lovelylindascraftcentral.blogspot.com.au (for Tsukineko)
Angelica Turner  bellisimavida.blogspot.com/ (for Heartfelt Creations)
Mechele Rudd (The Stamp Doctor)http://thestampdoctor.blogspot.com


Allie Gower My Card Partyhttp://wp.me/p2Ys5f-Ai (for Want2Scrap)
Eva Dobilas http://evafromca.blogspot.com/(for JustRite)
Kathy Roneywww.joyfullymadedesigns.blogspot.com (for Heartfelt Creations) (that's me!)
Emily Lanhamhttp://createserendipity.blogspot.com (for Tsukineko)
Steph Ackermanhttp://stephaniescraps.blogspot.com (for The Stamp Doctor)

 
I hope you enjoyed my gift bag tutorial using Spellbinders and Heartfelt Creations beautiful products!

Thank you for stopping by and good luck with the contest!

Supplies:

HCPC 3557 Christmas Poinsettia PreCut Set
HCPC 3554 Love at Christmas PreCut Set
HCD 738 Ornamental Add On Die
HCD 739 Banner & Tree Die
HCD 734 Sun Kissed Fleur Die
HCDP1 236 Christmas Card Paper Collection
Spellbinders Holiday Tags Shapeabilities
Spellbinders Grand Calibur
McGill Paper Blossoms Tool Kit
McGill Paper Blossoms Molding Mat
Art Institute Glue - Dries Clear

Paper: Solar White, Natural White (Neenah), Soft Suede (Stampin' Up)
Inks: Onyx Black (VersaFine), Soft Suede (Stampin' Up)
Accessories: Spellbinders Grand Labels Twenty-Three , Antique Copper Microbeads, Adhesive Pearls (Recollections), Bow-Easy Tool, Danish Blue Seam Binding, 1.5" Jute Ribbon (Really Reasonable Ribbon), mineral spirits, pop dots, Prismacolor Pencils: Periwinkle, Black


I'm submitting this to the following challenges:

Word Art Wednesday Challenge # 107 - Anything Goes.
Addicted to Stamps & More Challenge #72 - Make Your Mark

Blessings!

Kathy

Saturday, June 22, 2013

CottageCutz - Springtime Bluebell Flowers

Happy Saturday!  Hope everyone is having a wonderful weekend!  Today I have a card using CottageCutz's Springtime Bluebell Flowers and Butterfly Mini Dies.


These flowers are so pretty and delicate!  I cut them out with Solar White Cardstock and colored them with chalk inks and makeup applicators.  Very easy to do and looks pretty against the white embossed background.  The butterfly was done the same way.  I love this little die!

Here's a closeup of the flowers and butterfly.


These are the dies I used:


Card recipe:

CottageCutz Dies: Springtime Bluebell Flowers, Butterfly Mini
Stamp: Seeds of Summer (JustRite)
Paper: Solar White (Neenah), Orchard Opulence (SU)
Ink: Onyx Black (VersaFine), Spring Pansy, Aloe Vera (VersaMagic)
Accessories: Lavender Seam Binding (Really Reasonable Ribbon), trim (Jo-Ann's), Scrollwork Embossing Folder (Cuttlebug), Paper Blossoms Tool Kit and Molding Mat (McGill), pearl brad (Recollections), Bow-Easy, adhesive pearls (Want-2-Scrap), Aleene's Paper Glaze, makeup applicators

I'm submitting this to the following challenges:

Word Art Wednesday Challenge #85 - Anything Goes
A Random Thursday Card Challenge #2 - CAS Sketch

Thanks for stopping by today!

Blessings!

Kathy

Sunday, April 21, 2013

Flourishes - Peach Roses

Hi there!

I made this Mother's Day Card for the latest Flourishes Timeless Tuesday Challenge #216 to "Frame It".


I used the Roses Are Red Set and colored them in peach shades with Prismacolor Pencils and mineral spirits.  I had my heart set on making peach colored flowers, but hopefully this doesn't look too pumpkin-y!  I used these beautiful Timeless Rectangles to frame the image and to create a mat frame.  I love the laciness of these dies.

Card recipe:

Stamps: Roses Are Red (Flourishes), Teeny Tiny Wishes (SU)
Paper: Neutrals Cardstock Stack, Mariposa Mat Stack (DCWV), Whisper White, Peach Parfait (SU)
Ink: Onyx Black (VersaFine)
Accessories: Timeless Rectangles (Spellbinders), distressing tool, Paper Lace II Embossing Folder (Cuttlebug), adhesive pearls (Want-2-Scrap), Bow-Easy, Olive Wrinkled Ribbon (Really Reasonable Ribbon), mineral spirits, Prismacolor Pencils: Light Peach, Peach, Mineral Orange, Pumpkin Orange, Pale Vermilion, Black, Kelp Green, Olive Green

I'm submitting this to the following challenges:

Flourishes FTTC216 - Frame It
Really Reasonable Ribbon #70 - Mother's Day & Ribbon/Lace
Addicted to Stamps & More #41 - Anything Goes

Thanks for stopping by today!  Tomorrow I'll have a cute little CottageCutz gift project to show you!

Blessings!

Kathy

Saturday, April 6, 2013

Flourishes - Thank You Tag

Happy Saturday everyone!

Today I have a thank you tag I made for the latest Flourishes' Timeless Tuesday Challenge #FTTC214 - Wrap It With Ribbon - 2 layers ribbon or combine twine together. 

Here is a picture of the tag flat.


Here is a picture of it standing up.


This is my first attempt to make a tag, it's about time I tried one of these!  I colored this flower image with pencils and mineral spirits and cut it with the Timeless Rectangles Die.  I added a little bit of a brown mat behind it.  The tag is made from the same brown paper and a parchment type paper I had in my stash.  I punched the bottom corners and added the sentiment between them.  I added lots of twine, jute, and ribbon for the "tassell" and a couple of bows and a button.

I'm also submitting this to the latest Really Reasonable Ribbon Challenge #RRR69 - Buttons & Bowns Theme.

Tag recipe:

Stamps: With Graditude (Flourishes)
Paper: Natural White (Neenah), Mocha Devine (Bazzills), parchment paper (stash)
Ink: Vintage Sepia (VersaFine)
Accessories: Timeless Rectangles (Spellbinders), Budding Flower Corner Punch (Fiskers), Bow-Easy, twine, ribbon, jute, hole punch, mineral spirits, Prismacolor Pencils: Jasmine, Sand, Yellow Ochre, Goldenrod, Espresso, Chocolate, Kelp Green, Black

Thanks for stopping by!

Blessings!

Kathy
 

Tuesday, March 26, 2013

ODBDSLC148 He is Risen

Happy Tuesday everyone!

It's time for a new Shining the Light Challenge at Our Daily Bread Designs!


This week's challenge is: He is Risen with pastels (a project or card displaying a cross, verse, or sentiment about the true meaning of Easter (not commercialized...bunnies...) This challenge will last 2 weeks!!

To make the challenge even more fun, we will be giving out a prize, a $15 gift certificate to be used toward stamps at the Our Daily Bread Designs store!! Entries for the prize must be submitted by Sunday, April 7 at 8 p.m. EST. One random winner will be chosen and announced next Saturday.

While it is not required to use Our Daily Bread Designs images and sentiments on your creations, we would love to see them if you have them. As a way of recognizing those who do use Our Daily Bread Designs stamps, we will again be choosing three or more of our participants for the Shining the Light Award . In order to qualify for this award or join the challenge, however, you must use Our Daily Bread stamps and have your submission added to Mr. Linky by Sunday, April 7 at 8 p.m. EST. If you upload your creations to Splitcoast Stampers or any other online gallery, please use the keyword is ODBDSLC148. When creating your posts on blogs please include a link to the challenge.

Here is my creation for the challenge this week...


Our Daily Bread Designs - I Am the Way


I used the I Am the Way Stamp Set for this beautiful Verse and cut it with the Floral Ovals Die.  These designer papers are OLD ones from my stash, but I just love the soft colors.  To give them a little texture, I embossed them with an embossing folder.  You can click on the photo for a better view.

Card recipe:

Stamps: I Am the Way (Our Daily Bread Designs)
Paper: Natural White (Neenah), designer papers
Ink: Onyx Black (VersaFine)
Accessories: Paper Lace II Embossing Folder (Cuttlebug), Medium Branch Punch, charm Cream Seam Binding (Really Reasonable Ribbon), resin flower (Michaels), Floral Ovals Die (Spellbinders), adhesive pearls, Bow-Easy, brad

For more inspiration on the challenge this week, please visit my design teammates to see their beautiful creations or the ODBD' Blog to see them all in one place!  We also have a new Guest Designer with us the next 2 months, the very talented  Gloria Stengel!  I can't wait to see what Gloria comes up with for our challenges!
 

 I'm submitting this to the following challenges:

Word Art Wednesday #72 - Anything Goes
Really Reasonable Ribbon #68 - Flowers & Ribbon

Thank you for stopping by!

Blessings!

Kathy

Friday, March 22, 2013

CottageCutz Happy Window

Hi there!

Today I have a center-step card using CottageCutz' Springtime Window and Vintage Lamps Dies!


Here's a closer view of the lamp on the side.


These really are fun to put together!  I used a bunch of different papers, but started with the lavender ones from the Secret Garden Collection from Graphic 45 that I won in January.  These papers are so pretty!  The little birdcage sign on the left side is a sticker from the same collection.  The green papers are from the Preppy Princess Stack which are a little softer than the ones in the Secret Garden Collection.

Here are pictures of the dies I used:


Card recipe:

Stamps: Sentiments Collection (Our Daily Bread Designs)
Paper: Natural White (Neenah), Kraft (Recollections), Wisteria Wonder (SU), Secret Garden Collection (Graphic 45), The Preppy Princess Stack (DCWV)
Ink: Onyx Black (VersaFine), Purple Passion, Green With Envy, Mocha Mama (Powder Puffs)
Accessories: Springtime Window Die, Vintage Lamps Die (CottageCutz), Secret Garden Collection Stickers (Graphic 45), adhesive pearls (Recollections), Lavender Ribbon (Jo-Ann's), button, fibers, Bow-Easy

I'm submitting this to the following challenges:

Word Art Wednesday #72 - Anything Goes
Really Reasonable Ribbon #68 - Flowers & Ribbon
The Shabby Tea Room #158 - Anything Goes

Thank you for stopping by!

Blessings!

Kathy


Monday, March 18, 2013

JustRite Rosey Birthday

Happy Monday!

Today I have a card I made for the latest JustRite Challenge #JRC092, to Make It Pop.  I have lots of "pop" on this one!

(Click on photo for a better view)

I used a new set I recently won, Spring Rose Medallion, for the images, and Violette Vintage Labels for the sentiment "Birthday Wishes".   I stamped the frame image, die cut it with the matching die, and fussy cut the inside to show the sentiment.  I also fussy cut the bird image and added a leftover piece of a die cut from a Memory Box Die.   The "Birthday Wishes" sentiment was also cut with the same labels die in the tiny size.  I added a white mat embossed with Bird & Swirls Folder using pop dots.

Card recipe:

Stamps: Spring Rose Medallion, Violette Vintage Labels (JustRite)
Paper: Solar White (Neenah), Pink Pirouette (SU)
Ink: Onyx Black (VersaFine)
Accessories: Nested Oval Medallion Labels (JustRite), Classic Ovals Large (Spellbinders), Birds & Swirls Embossing Folder (Cuttelbug), leftover die cut pieces, flower (Prima), Baby Pink Seam Binding (Really Reasonable Ribbon), adhesive pearls (Recollections), ribbon (Michaels)

I'm submitting this to the following challenges:

JustRite Challenge #JRC092 - Make it pop
Word Art Wednesday Challenge #71 - Anything Goes
Craft Card Makers Challenge #87 - Friendship
No Matter Which Challenge #7 - Anything Goes
The Shabby Tea Room Challenge #158 - Anything Goes


Thanks for stopping by!

Blessings!

Kathy
 

Tuesday, March 5, 2013

ODBDSLC145 - Sketch

Happy Tuesday everyone!

It's time for a new Shining the Light Challenge at Our Daily Bread Designs!

This week's challenge is:

A Sketch


To make the challenge even more fun, we will be giving out a prize, a $15 gift certificate to be used toward stamps at the Our Daily Bread Designs store!! Entries for the prize must be submitted by Sunday, March 10th at 8 p.m. EST. One random winner will be chosen and announced next Saturday.

While it is not required to use Our Daily Bread Designs images and sentiments on your creations, we would love to see them if you have them. As a way of recognizing those who do use Our Daily Bread Designs stamps, we will again be choosing three or more of our participants for the Shining the Light Award . In order to qualify for this award or join the challenge, however, you must use Our Daily Bread stamps and have your submission added to Mr. Linky by Sunday, March 10th at 8 p.m. EST. If you upload your creations to Splitcoast Stampers or any other online gallery, please use the keyword is ODBDSLC145. When creating your posts on blogs please include a link to the challenge.

Here is my card for the challenge this week.


I used this beautiful "Dahlia" flower image and a sentiment from the Birthday Blessings Set.  The flower is colored with pencils and mineral spirits and fussy cut.  Here are pictures of the stamps I used.

http://www.ourdailybreaddesigns.com/index.php/dahlia.html
 

http://www.ourdailybreaddesigns.com/index.php/birthday-blessings.html


For more inspiration, please visit the other designers to see their beautiful creations for the challenge this week.  You can also see all the creations together on the ODBD Blog.


Card recipe:

Stamps: Dahlia, Birthday Blessings (Our Daily Bread Designs)
Paper: Solar White, Natural White (Neenah), BM Hermit (Core'dinations), Ancestry Designer Paper
Ink: Onyx Black (VersaFine), Vintage Photo Distress Ink
Accessories: Square punch, adhesive pearls, Four Petal Flowers Embossing Folder, mineral spirits, Bow-Easy, Golden Maple Silk Ribbon (Really Reasonable Ribbon), Prismacolor Pencils: Jasmine, Goldenrod, Yellow Ochre, Chocolate, Black

I'm also submitting this to the latest Word Art Wednesday Challenge #69 - Anything Goes

Thank you for stopping by!  Hope to see you in the challenge this week!

Blessings!

Kathy


Saturday, March 2, 2013

CottageCutz Birdie in Blossoms

Hi there!

Today I have a new card to show you using CottageCutz Dies.


For my card, I used the bird from the Bluebird Die, the flowers and branch from the Blossom Branch Die, and the frame from the Oval Doily & Frame Die.

I used a piece of designer paper (Secret Garden - Graphic 45) with a pretty bird and flower image and enhanced it with the dies matching the colors. The bird from the Bluebird Die, was cut with white paper and colored with Aegean Blue Chalk Ink and Vintage Photo Distress Ink. The beak and feet were inked with Red Brick Chalk Ink. The Blossom Branch was cut with peach cardstock for the flowers and green for the branch. The flowers were shaped with a mat and tool kit, inked with Red BrickChalk Ink, and dotted with Buttercup Liquid Pearls in the center. The branch was cut to piece around the lower corner of the image. The frame from the Oval Doily & Frame was cut with Natural White Cardstock.

I added a bow made with Natural Jute String from Really Reasonable Ribbon and the Bow-Maker. I didn't add a sentiment to this, but a small, short sentiment would be cute on the bottom right or as a tag hanging from the bow.

Here are pictures of the dies I used on this.


CottageCutz has a new release for Februrary called "This 'N That" that has lots of fun dies including envelopes, bags, tags and tabs.  You can see them all here at their store!

I'm submitting this to the following challenges:

Word Art Wednesday #69 - Anything Goes

Thank you for stopping by!

Blessings!

Kathy

Tuesday, February 26, 2013

ODBDSLC144 - Black & White

Happy Tuesday!

It's time for a new Shining the Light Challenge at Our Daily Bread Designs!

This week's challenge is:
Black and White with Our Daily Bread Designs stamps only.

To make the challenge even more fun, we will be giving out a prize, a $15 gift certificate to be used toward stamps at the Our Daily Bread Designs store!! Entries for the prize must be submitted by Sunday, March 3rd at 8 p.m. EST. One random winner will be chosen and announced next Saturday.

While it is not required to use Our Daily Bread Designs images and sentiments on your creations, we would love to see them if you have them. As a way of recognizing those who do use Our Daily Bread Designs stamps, we will again be choosing three or more of our participants for the Shining the Light Award . In order to qualify for this award or join the challenge, however, you must use Our Daily Bread stamps and have your submission added to Mr. Linky by Sunday, March 3rd at 8 p.m. EST. If you upload your creations to Splitcoast Stampers or any other online gallery, please use the keyword is ODBDSLC144. When creating your posts on blogs please include a link to the challenge.
 
Here is my sample for the challenge this week:


http://www.ourdailybreaddesigns.com/index.php/ask-seek-knock.html
Click on the photo for a closer view


I used the Ask, Seek, Knock Stamp Set from Our Daily Bread Designs for the focal image of Matthew 7:7.  Here is a picture of this set.


It was die cut with the Floral Oval and Elegant Oval Dies and popped onto the Enchanted Designer Paper.  To fit the die cuts and the lace, I made the card a little taller than normal.  It measures 6 1/2" x 4 1/4".  A very simple card to put together.
 
For more inspiration, please visit the other designers to see their beautiful creations this week for the challenge!  You can also see all the creations in one place on the ODBD Blog here.


I'm submitting this to the following challenges:
 
 
Card recipe:
 
Stamp: Ask, Seek, Knock (Our Daily Bread Designs)
Paper: Black, White, Enchanted Designer Paper (Bo Bunny)
Ink: Onyx Black (VersaFine)
Accessories: Clear Embossing Powder (Stampendous), heat tool, Melon Seam Binding (Really Reasonable Ribbon), trim, rhinestones, button, pearls, Elegant Ovals Die (ODBD/Spellbinders), Floral Oval (Spellbinders)
 
Thanks for stopping by!
 
Blessings!
 
Kathy

Thursday, February 21, 2013

CottageCutz Wedding Chapel

Happy Thursday everyone!

Today I have a center step card I made using two of CottageCutz Dies, Wedding Chapel and Blossom Branch.  I just love these dies, they are so much fun to work with!


I cut out all the pieces with white cardstock and colored them with inks using sponges and make-up applicators.  Some of the pieces were shaped a little with a molding mat and stylus.  Here's a close-up of the die pieces.   I love how the flowers came out with the blue ink and liquid pearls.


These are the CottageCutz Dies that I used.


I'm submitting this to the following challenges:

Word Art Wednesday #66 - Anything Goes
Really Reasonable Ribbon #68 - Spring Colors & Ribbon
Cutie Pie Challenge #38 - Pretty Pastels & Cute


I hope you like my project and it give you a little inspiration!

Blessings!

Kathy

Wednesday, February 20, 2013

Heartfelt Creations - Sunny Day Collection

Happy Wednesday!

It's time for a little inspiration from Heartfelt Creations!

For my project this week, I have a tri-shutter card made with the new Sunny Day Collection.  These papers are so gorgeous, I just love the soft colors on these!


I love making these cards as they look complicated, but are actually pretty easy!  There's lots a little areas to places elements if you want to also!  This card really shows the beautiful designer papers that go with the collection.  Here's a close up picture of the front of the card with the window image.  The image is fussy cut and then I place a piece of the designer paper behind it for a little scene.


Here are some more views of the card.


Please visit the Heartfelt Creations Blog to see all the designer's beautiful creations this week!

I'm submitting this to the following challenges:

Word Art Wednesday #68 - Love/Anything Goes
Really Reasonable Ribbon #66 - Spring Colors & Ribbon
Crafty Card Makers Challenge #85 - Blooming Images
No Matter What - #6 - Ribbons & Bows
All Sorts - #194 - Things with Wings
Whimsy Stamps Inspirations #56 - Add some metal

Thank you for stopping by!

Blessings!

Kathy


You Are One In a Million

Heartfelt Creations Products & Products Carried by HC:
HCPC 3521 – Botanical Window PreCut Set
HCDP1 230 – Sunny Day Paper Collection
HCD 718 – Decorative Chateau Gate Die
Product ID: 159223 - Paper Blossoms Molding Mat
Product ID: 459222 - Paper Blossoms Tool Kit
Product ID: 159723 – Art Institute Glue – Dries Clear
Product ID: SF03598 - Prismacolor Pencil Set 48 pc.

Other Products Used:
Paper: Solar White (Neenah), yellow (DCWV Stack), Baja Breeze (SU), Olive Linen (Recollections)
Ink: Onyx Black (VersaFine), Antique Linen Distress Ink
Accessories: Labels 13 (Spellbinders), pop dots, mineral spirits, sponge, cutting knife & mat, Bow-Easy, adhesive pearls, spacer (Michaels), Olive Wrinkled Ribbon (Really Reasonable Ribbon), Prismacolor Pencils: Light Umber, Dark Brown, Muted Turquoise, Kelp Green

Instructions:
Base: With Olive cardstock, follow Tri-Shutter Card instructions from Split Coast Stampers: http://www.splitcoaststampers.com/resources/tutorials/trishuttercard/   Use the designer papers to make mats for the two large “T” shaped sections as shown leaving a 1/32” edge, ink edges with Antique Linen Ink, and glue to card base.  Cut journal blocks from designer papers as desired in pieces measuring 1 5/16” x 1 13/16”, ink edges, and glue to base.  Cut sentiment block “You are One in a Million”, ink edges.  Add Olive mat (3 3/16” x 1 15/16”) and yellow mat (3 3/8” x 2 1/8”).  Add to center, middle panel of card with pop dots.  With yellow cardstock, cut smaller Decorative Chateau Gate from Die.  Cut mat with Baja Breeze (2 1/4" x 1 1/2") and white (2 1/8” x 1 3/8”).  Glue as shown and add to back “T” section of card with pop dots.

Image: Cut Baja Breeze with Labels 13.  Cut both gates from Decorative Chateau Gate Die with yellow.  Add to Baja Breeze piece as shown.  Stamp window image twice on Solar White with Onyx Black.  Color one with pencils and on the second color only the large flower.  Fussy cut image and add additional flower with pop dots.  Cut journal image block for window image, place behind window, trim to fit, and glue as shown. 
Embellishments:  Fussy cut tiny butterfly from journal block and glue to window.  Add adhesive pearls, bow, and spacer bead as shown.


Tuesday, February 19, 2013

ODBDSLC143 - Easter

Happy Tuesday everyone!

It's time for a new Shining the Light Challenge at Our Daily Bread Designs!

This week's challenge is:
Easter – Make an Easter card or project.

To make the challenge even more fun, we will be giving out a prize, a $15 gift certificate to be used toward stamps at the Our Daily Bread Designs store!! Entries for the prize must be submitted by Sunday, February 24th at 8 p.m. EST. One random winner will be chosen and announced next Saturday.

While it is not required to use Our Daily Bread Designs images and sentiments on your creations, we would love to see them if you have them. As a way of recognizing those who do use Our Daily Bread Designs stamps, we will again be choosing three or more of our participants for the Shining the Light Award . In order to qualify for this award or join the challenge, however, you must use Our Daily Bread stamps and have your submission added to Mr. Linky by Sunday, February 24th at 8 p.m. EST. If you upload your creations to Splitcoast Stampers or any other online gallery, please use the keyword is ODBDSLC143. When creating your posts on blogs please include a link to the challenge.

Here is my card for the challenge this week...


Click on picture for a better view


I used three different sets on my card, The Shepherd for the sentiment, Flower Border for the border, and Scripture Series 2 for the scripture.  I love using this flower border to frame images, especially scripture or quotes.  I thought this Scripture was very fitting for Easter and its' true meaning.

Here are pictures of the stamp sets I used:


Card recipe:

Stamps: The Shepherd, Flower Border, Scripture Series 2 (Our Daily Bread Designs)
Paper: Solar White (Neenah), Concord Grape Linen (Recollections)
Ink: Onyx Black (VersaFine)
Accessories: Moss Seam Binding (Really Reasonable Ribbon), button rhinestone, pearl swirl (Recollections), charm, brad, square punch, Labels 18, Classic Ovals Large (Spellbinders), Scrollwork Embossing Folder, Bow-Easy

Please visit the other designers to see their STUNNING creations this week and leave them some encouragement!


Becky Egecrone - Guest Designer


I'm submitting this to the following challenges:

Word Art Wednesday #67 - Love/Anything Goes
Really Reasonable Ribbon #66 - Spring Colors & Ribbon
Paper Playtime #4 - Use a sentiment
No Matter What - #6 - Ribbons & Bows
Whimsy Stamps Inspirations #56 - Add some metal


Thank you for stopping by!

Blessings!

Kathy