Be Joyful

Rejoice in the Lord always. Again I will say, rejoice! Let your gentleness be known to all men. The Lord is at hand. Be anxious for nothing, but in EVERYTHING by prayer and supplication, with thanksgiving, let your requests be made known to God; and the PEACE OF GOD, which surpasses all understanding, will guard your hearts and minds through Christ Jesus. Philippians 4:4-7

These are verses I memorized years ago and they are written on my heart. There are times when I still need to remember not to be anxious, but I eventually listen to my heart saying these verses. I didn't really understand what the "peace of God" was until I experienced it. It's having peace inside you, even when you're going through heartbreaking situations and trials. It does "surpass ALL understanding" and you know it comes from GOD alone. Praise the Lord for His wonderful promises!


I love, love, love what I do. I am passionate about the things I create and the talents God has placed in me. I SO appreciate the time you take to look at my things and the comments you all leave me!

Blessings to you!

Kathy
Showing posts with label Bag. Show all posts

Wednesday, September 2, 2015

Berry Sweet Raspberries Card and Gift Bag


Happy Wednesday!

I'm back with a cute card and gift bag using Heartfelt Creations' Farmers Market Collection!

I made the card clean and simple using a kraft pre-made card for the base. I stamped the sentiment directly on the base, then added one of the large raspberry swirls colored with pencils and mineral spirits. I love these stamped images with the matching die! So easy to work with! Then I added a bow and pearl to embellish it.


For the gift bag, I used a kraft pre-made bag and added some of the beautiful designer paper to cover the front of it. I then embellished it with some lace, trim, bows and a tag cut from the designer papers. A quick and easy gift presentation with a card to match!


Be sure to visit the HC Blog to see all the wonderful creations by the designers this week!

I'm submitting this to the following challenges:

Word Art Wednesday #199 - Anything Goes/Family Friendly

Thank you for stopping by!

Blessings!

Kathy


Sweet Raspberries

Heartfelt Creations Products and Products Carried by HC:

HCPC 3689 - Berries and Peaches Cling
HCD1-777 - Farmers Market Fruit Die
159723 - Art Institute Glue - Dries Clear
SMP001 - Stamp Mat Pad

Other products: Onyx Black Ink (VersaFine), Solar White cardstock (Neenah), Bow-Easy Tool, Burgundy Jute String (Really Reasonable Ribbon), adhesive pearl, Scotch Mounting Tape, glue dots, Recollection pre-made Kraft card (4" x 5 1/2"), bone folder, paper stumps, mineral spirits, Prismacolor Pencils: Kelp Green, Marine Green, Black, Dark Purple, Black Cherry, Black Raspberry

Instructions: Card measures 4" x 5 1/2". Stamp sentiment on lower right of card base using Onyx Black Ink. Fold pre-made card and use bone folder to sharpen crease. Stamp larger raspberry image on Solar White with Onyx Black Ink. Color with pencils and mineral spirits using paper stumps. Die cut image using matching die from the Farmers Market Fruit Die. Add pieces of Scotch Mounting Tape to back of berries and add glue on back of leaves and stems. Add to card base as pictured. Make multi-loop bow with Burgundy Jute String using Bow-Easy Tool and add using glue dots. Add adhesive pearl to bow center using glue dots.


Berry Sweet Gift Bag

Heartfelt Creations Products and Products Carried by HC:

HCDP1-257 - Farmers Market Paper Collection
HCD 745 - Luggage and Tags Die
159723 - Art Institute Glue - Dries Clear

Other products: Ink: Ranger Peeled Paint Distress, Quick Quotes Razzberry and Brandywine Chalk Inks; lace (my stash), Moss Twill, Burgundy Jute String, Bow-Easy Tool (Really Reasonable Ribbon), Olive Burlap String (May Arts), Celebrate It Small Kraft Bag (Michaels), Scor-Tape, Scotch Mounting Tape, glue dots, green button

Instructions: Bag measures 5 1/4" x 8 1/2" (excluding handles). Cut designer paper pictured to 5" x 8 1/4". Ink green edges with Peeled Paint and purple edges with Razzberry. Adhere to bag front using Scor-Tape. Add lace and Moss Twill as pictured using Scor-Tape. Die cut tag from paper collection using the matching die from Luggage and Tags Die. Ink edges with Razzberry and Brandywine Inks. Add tag using Scotch Mounting Tape and glue dots. Make multi-loop bow with Burgundy Jute String using Bow-Easy Tool and add to top of tag using glue dots. Thread Olive Burlap String into button and tie into a bow on back. Add to Burgundy gown using glue dots.


Wednesday, April 15, 2015

Yellow Daisies Gift Set - Heartfelt Creations


Happy Wednesday!

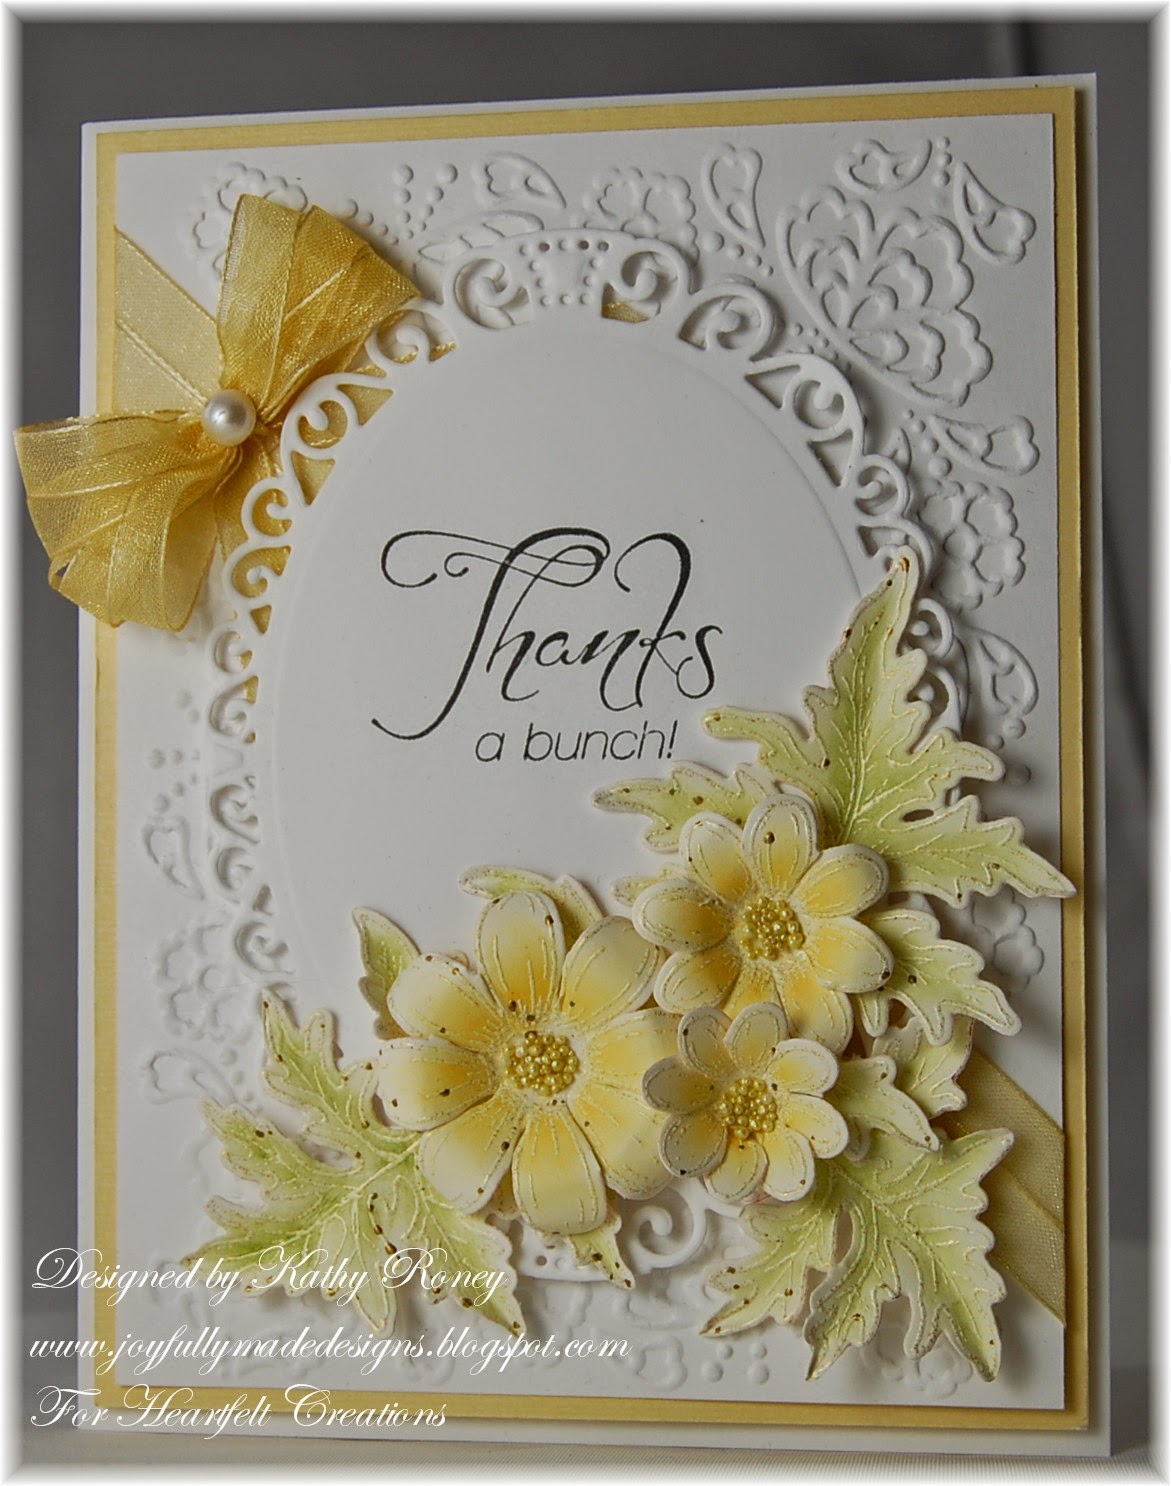
It's time for a little inspiration from Heartfelt Creations! This week I have a card and gift bag set using yellow daisies.


I used the Delightful Daisies Set and matching die for the flowers. They were stamped with VersaMark on Natural White card stock and embossed with Aged Ivory Embossing Enamel. I tried using the regular white card stock, but it was too bright. I like the way it came out on the Natural White much better even though I used white card stock for the rest.

The daisies and leaves were colored with Mango Madness and Tea Leaves chalk inks using make-up applicators. I used the Deluxe Flower Shaping Kit and a pencils to shape the flowers and leaves after spritzing the back with water. Once the flowers are dry, they retain their shape really well.

The sentiment on the card is from the Heartfelt Expressions Set. I used a thank you sentiment, but this would be great for a birthday or Mother's Day too.

Here's a separate picture of the card.


Here's a picture of the mini gift bag. I used a pre-made gift bag and decorated the front of it to match the card.


Here's a little close-up of the flowers on the card.


Be sure to visit the HC Blog to see all the beautiful creations by the designers this week! There are some fun projects there using the Everyday Hero Collection!

I'm submitting this to the following challenges:

Word Art Wednesday Challenge #179 - Anything Goes

Thanks for stopping by to visit! I hope this gives you a little inspiration!

Blessings!

Kathy


Yellow Daisy Thank You

Heartfelt Creations Products and Products Carried by HC:

HCPC 3656 - Delightful Daisies Cling
HCPC 3474 - Heartfelt Expressions Cling
HCD 760 - Delightful Daisy Die
368770 - Scor-Pal
Deluxe Flower Shaping Kit
159723 - Art Institute Glue - Dries Clear


Other Products: Paper: White (Recollections), Natural White (Neenah), yellow (DCWV Stack); Ink: VersaMark, Mango Madness, Tea Leaves (VersaMagic), Onyx Black (VersaFine); Accessories: Elegant Ovals (Spellbinders), Ditsy Dots Embossing Corner Folder (Tattered Lace), Bow-Easy Tool, heat tool, Aged Ivory Embossing Enamel (Stampendous), yellow sheer ribbon, adhesive pearl, water mister, glue dots, Scotch mounting tape, tape, make-up applicators, pencil.

Instructions: Card measures 4 1/4" x 5 1/2" made with white card stock. Cut yellow card stock mat measuring 4 1/16" x 5 5/16". Cut white mat measuring 3 7/8" x 5 1/8". Emboss white mat with Ditsy Dots Corner Embossing Folder on the top left and again on the bottom right. Wrap two pieces of yellow ribbon across mat at an angle between the embossed areas and secure in back with tape. Glue two mats together and add to card base with mounting tape. Stamp sentiment on white card stock with Onxy Black Ink and die cut with second largest Elegant Ovals Die. Add to card as pictured with Mounting Tape.

Stamp Delightful Daisy flowers and leaves (2 small and 1 large) on Natural White with VersaMark and heat emboss with Aged Ivory Embossing Enamel heating from underneath. Color 3 different size small flowers with Mango Madness Ink using make-up applicators, fading color out to petal tips. Die cut flowers with Delightful Daisy Die and clip between petals. Mist back of flowers with water and shape with Deluxe Flower Shaping Kit and use a pencil to roll the petals as pictured. Once dry, add Lemon Chiffon Prills to flower centers using Art Institute Glue (AIG). Color leaves with Tea Leaves Ink using make-up applicators and cut with matching die. Mist back of leaves with water and shape with Deluxe Flower Shaping Kit and fingers. Once leaves and flowers are dry, add to card arranging as pictured using AIG. Make multi-loop bow with yellow ribbon using Bow-Easy Tool and adhere with glue dots. Add adhesive pearl to bow center using glue dots.


Yellow Daisy Mini Gift Bag

Heartfelt Creations Products and Products Carried by HC:


Other Products: Paper: White (Recollections), Natural White (Neenah), yellow (DCWV Stack); Ink: VersaMark, Mango Madness, Tea Leaves (VersaMagic); Accessories: White Mini Craft Bag 4" x 3" (The Paper Studio), Perfect Polka Dots Embossing Folder (Stampin Up), Bow-Easy Tool, heat tool, Aged Ivory Embossing Enamel (Stampendous), yellow sheer ribbon, adhesive pearl, water mister, glue dots, Scotch mounting tape, tape, make-up applicators, pencil.

Instructions: Gift bag measures 4" x 3" plus handle. Cut yellow mat measuring 3 13/16" x 2 13/16". Cut white mat measuring 3 5/8" x 2 5/8" and emboss with Perfect Polka Dots Embossing Folder. Glue mats together and add to bag front with Mounting Tape.

Stamp Delightful Daisy flowers and leaves (2 small and 1 large) on Natural White with VersaMark and heat emboss with Aged Ivory Embossing Enamel heating from underneath. Color 3 different size small flowers with Mango Madness Ink using make-up applicators, fading color out to petal tips. Die cut flowers with Delightful Daisy Die and clip between petals. Mist back of flowers with water and shape with Deluxe Flower Shaping Kit and use a pencil to roll the petals as pictured. Once dry, add Lemon Chiffon Prills to flower centers using Art Institute Glue (AIG). Color leaves with Tea Leaves Ink using make-up applicators and cut with matching die. Mist back of leaves with water and shape with Deluxe Flower Shaping Kit and fingers. Once leaves and flowers are dry, add to card arranging as pictured using AIG. Make multi-loop bow with yellow ribbon using Bow-Easy Tool and adhere as pictured with glue dots. Add adhesive pearl to bow center using glue dots.


Wednesday, April 2, 2014

CottageCutz - Floral Thank You


Happy Wednesday!

Today I have a decorated gift bag with a matching mini notecard and envelope to show you using lots of beautiful CottageCutz Dies!  Here's the complete set!


I found these little White Paper Sacks (1 lb. - 3.5"x 2" x 6.75") at Michaels that I thought would be cute decorated for a gift!  All I did was add the Springtime Floral Die cut in white and colored with chalk inks, a piece of Fancy Floral Lace Border cut in white and a bow with a pearl.  Here's a close up of the die cut on the bag.


I made a little notecard with white card stock that measures 2 3/8" square so it would fit in the Elegant Envelope.  I decorated the notecard with the Spring Label Die cut with white card stock and colored the same way as the bag.  I then added the Thank You Die cut with white card stock to the label.  Here's a close up of the notecard.


For the envelope, I cut the Elegant Envelope Die with white card stock and decorated it with the Flower w/Cutouts (flower) and Plumeria & Leaves (leaves) all colored with chalk inks.  I added some pearls and a little Diamond Stickles around the pearl in the flower center.  On the back flap of the envelope, I add a small piece cut from the Springtime Floral Die that I colored to match the other pieces.  Here's a little close up for you!


I LOVE this little envelope!  It's perfect for little notecards to go with gifts!

These are the dies I used on my project.


Project Recipe:

Paper: White (Recollections)
Ink: Caribbean Blue (PowderPuffs - QuickQuotes), Aloe Vera, Thatched Straw (VersaMagic)
Accessories: White Paper Sacks (Celebrate It - Michaels), White Seam Binding, Bow-Easy (Really Reasonable Ribbon), fatback pearl, Diamond Stickles (Ranger), adhesive pearls.

I'm submitting this to the following challenges:

Word Art Wednesday Challenge #126 - Anything Goes
Really Reasonable Ribbon #92 - Flowers or Buttons & Bows

Thanks for stopping by today!

Blessings!

Kathy


Thursday, November 21, 2013

Spellbinders Platinum Party Blog Hop - Heartfelt Creations


Happy Thursday everyone!

Welcome to the second day of the Spellbinders Platinum Party Blog Hop!!!  I'm so excited to be participating in the Hop today with Spellbinders for Heartfelt Creations!  I hope you are having fun hopping and enjoying all the beautiful creations on your way!

You can find all the rules for the contest at the Spellbinders Blog here and be sure to visit all the participating blogs to be eligible for the Grand Prize.

For your chance to win the Grand Prize for the Platinum Party please enter here

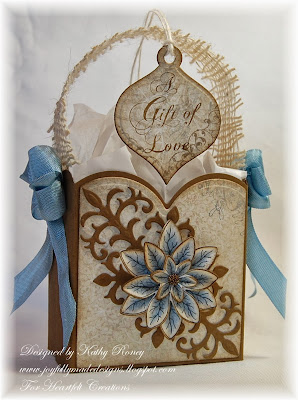
For my project, I will be showing you how I made this special Christmas gift bag using the Grand Labels 23 Die and lots of other Spellbinders and Heartfelt Creations products!


You can make this bag and decorate it for any occasion and it's pretty simple to put together!


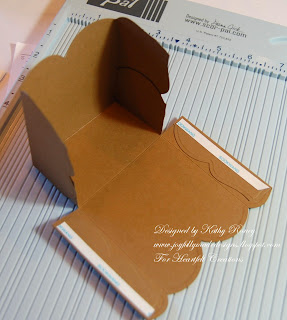
I put together a little picture tutorial in a separate post to show you how I did it...sorry I don't have a video camera...yet!

To decorate my bag, I used Spellbinders Dies and  Heartfelt Creations designer papers, stamps, and dies.  I matted the front and back of the bag with light brown designer paper from the Christmas Card Paper Collection by cutting it with the same Labels 23 Grand die, scoring it in the same manner, and trimming the front and back pieces to fit.  I then inked them with Soft Suede Ink and glued them to the bag.

The poinsettia flower was made with the Christmas Poinsettia PreCut Set and the matching Sun Kissed Fleur Die.  The wonderful thing about these is you stamp the one image and cut it with one die and you get 10 different flowers and 2 leaves at once!  It's a huge time saver and I love having extra flowers leftover to use when ever I need them! 


For my flower here, I used Solar White Cardstock and Onyx Black Ink.  I colored 3 of the flowers with Periwinkle and Black Prismacolor Pencils using mineral spirits.  The flower was shaped using the Paper Blossoms Molding Mat and Tool Kit and glued together.  I then added Antique Copper Microbeads to the flower center.  I cut 2 of the flourishes from the Ornamental Add On Die with Soft Suede Cardstock, glued them tip to tip as shown, and popped the poinsettia flower on top.


For the back of the bag, I cut one of the other flourishes from the Ornamental Add On Die with Soft Suede Cardstock and one of each snowflake from the Banner & Tree Die with Natural White Cardstock and glued together as shown adding an adhesive pearl to the center.

I added a bow on each side of the bag made with Danish Blue Seam Binding and an adhesive pearl to the center.  The handle of the bag is a jute ribbon sample I received from Really Reasonable Ribbon that I thought looked kind of cute as a handle!


The gift tag was made with Spellbinders Holiday Tags Dies.  I stamped the sentiment from Heartfelt Creations' Love At Christmas PreCut Set on more of the light brown designer paper with Soft Suede.  This was cut out with the tag die, along with another cut from Soft Suede cardstock.  I glued these together, inked the edges, and added some twine for a tie.

Here is the complete list of participating blogs for the contest both yesterday and today:

  
November 20th

Linda Lucas  www.lovelylindascraftcentral.blogspot.com.au (for Tsukineko)
Angelica Turner  bellisimavida.blogspot.com/ (for Heartfelt Creations)
Mechele Rudd (The Stamp Doctor)http://thestampdoctor.blogspot.com


Allie Gower My Card Partyhttp://wp.me/p2Ys5f-Ai (for Want2Scrap)
Eva Dobilas http://evafromca.blogspot.com/(for JustRite)
Kathy Roneywww.joyfullymadedesigns.blogspot.com (for Heartfelt Creations) (that's me!)
Emily Lanhamhttp://createserendipity.blogspot.com (for Tsukineko)
Steph Ackermanhttp://stephaniescraps.blogspot.com (for The Stamp Doctor)

 
I hope you enjoyed my gift bag tutorial using Spellbinders and Heartfelt Creations beautiful products!

Thank you for stopping by and good luck with the contest!

Supplies:

HCPC 3557 Christmas Poinsettia PreCut Set
HCPC 3554 Love at Christmas PreCut Set
HCD 738 Ornamental Add On Die
HCD 739 Banner & Tree Die
HCD 734 Sun Kissed Fleur Die
HCDP1 236 Christmas Card Paper Collection
Spellbinders Holiday Tags Shapeabilities
Spellbinders Grand Calibur
McGill Paper Blossoms Tool Kit
McGill Paper Blossoms Molding Mat
Art Institute Glue - Dries Clear

Paper: Solar White, Natural White (Neenah), Soft Suede (Stampin' Up)
Inks: Onyx Black (VersaFine), Soft Suede (Stampin' Up)
Accessories: Spellbinders Grand Labels Twenty-Three , Antique Copper Microbeads, Adhesive Pearls (Recollections), Bow-Easy Tool, Danish Blue Seam Binding, 1.5" Jute Ribbon (Really Reasonable Ribbon), mineral spirits, pop dots, Prismacolor Pencils: Periwinkle, Black


I'm submitting this to the following challenges:

Word Art Wednesday Challenge # 107 - Anything Goes.
Addicted to Stamps & More Challenge #72 - Make Your Mark

Blessings!

Kathy

Gift Bag Tutorial

Hi there!

Here is the tutorial I did showing you how I made the gift bag for the Spellbinders Blog Hop using their Labels 23 Grand Die.


You can make this bag and decorate it for any occasion and it's pretty simple to put together!  I put together a little picture tutorial to show you how I did it...sorry I don't have a video camera...yet!

1. I started with the largest die from Labels 23 Grand Dies and cut it with Soft Suede Cardstock.


2. On the wrong side of the die cut, score edge to edge as follows: on the short side score down the outside scallop on each side, then on the long side score down either side of the center scallop.  Use picture as a guide.


3. On long side of die cut, cut score lines from outside to where the lines meet score lines from short side.


4. Score 2 corner flaps on one of the long sides 7/8" in from outside edge.


5. Turn die cut over and fold score lines, then snip off the outside corners of the 4 flaps (so they don't show when folded up)
.


6. Use Scor-tape to adhere folded flaps together.


7.Turn over to right side and add Scor-tape to the middle flaps.


8. Turn over and adhere to unfolded sides.  Add Scor-Tape to inside of folded sides.


9. Adhere to outside to complete bag.  The finished bag measures 3" x 1 3/4" and is 3" tall.


Here's a view of my project from above:


And a view of the back:


I hope you enjoyed my tutorial and have fun making these!

Blessings!

Kathy