Be Joyful

Rejoice in the Lord always. Again I will say, rejoice! Let your gentleness be known to all men. The Lord is at hand. Be anxious for nothing, but in EVERYTHING by prayer and supplication, with thanksgiving, let your requests be made known to God; and the PEACE OF GOD, which surpasses all understanding, will guard your hearts and minds through Christ Jesus. Philippians 4:4-7

These are verses I memorized years ago and they are written on my heart. There are times when I still need to remember not to be anxious, but I eventually listen to my heart saying these verses. I didn't really understand what the "peace of God" was until I experienced it. It's having peace inside you, even when you're going through heartbreaking situations and trials. It does "surpass ALL understanding" and you know it comes from GOD alone. Praise the Lord for His wonderful promises!


I love, love, love what I do. I am passionate about the things I create and the talents God has placed in me. I SO appreciate the time you take to look at my things and the comments you all leave me!

Blessings to you!

Kathy
Showing posts with label Easter. Show all posts

Wednesday, February 22, 2017

Pink Dogwood Frame Card


Happy Wednesday!

It's time for me to share a little inspiration with Heartfelt Creations! This week I have another card using the beautiful Flowering Dogwood Collection!


I love these flowers and they are so easy to work with! I used the floral frame from the Flowering Dogwood Branches Set and Die and then added additional flowers and leaves using the Flowering Dogwood Set and Die. All the images were colored with pencils and mineral spirits.

Be sure to visit the Heartfelt Creations' Blog to see the beautiful creations by the designers this week! There is also sneak peek of the next collection coming up!

I'm submitting this to the following challenges:

Word Art Wednesday #270-271 - Anything Goes
Really Reasonable Ribbon #158 - Celebrate Theme with ribbon/trim
Crafty Carmakers #182 - Add some texture

Thanks so much for stopping by to visit!

Blessings!

Kathy


Pink Dogwood Frame

Heartfelt Creations Products and Products Carried by HC:

HCPC 3773 - Flowering Dogwood Set
HCPC 3774 - Flowering Dogwood Branches Set
HCPC 3776 - Dogwood Chapel Set
HCD1 7129 - Flowering Dogwood Die
HCD1 7130 - Flowering Dogwood & Doves Die
368770 - Scor-Pal
Deluxe Flower Shaping Kit
159723 - Designer Dries Clear

Other Products: Paper: Neenah Solar White, White (Recollections), burgundy; Inks: VersaFine Onyx Black, Quick Quotes Razzberry; Accessories: Stampin Up Framed Tulips Embossing Folder, Avocado Liquid Pearls, Clear Wink of Stella, ribbon, Bow-Easy Tool, adhesive pearl, glue dots, Scotch Mounting Tape, die cutting machine, mineral spirits, paper stumps, Prismacolor Pencils: Deco Pink, Hot Pink, Processed Red, Black Raspberry, Kelp Green, Marine Green

Instructions: Card Measures 4 1/4" x 5 1/2". Cut burgundy cardstock 5 1/2" x 8 1/2", score at 4 1/4" and fold to make card base. Cut white cardstock 4 1/16" x 5 5/16", emboss with folder, stamp sentiment from Dogwood Chapel Set on lower right and add to card base with SMT.

Stamp on Solar White with Onyx Black Ink the floral frame (Flowering Dogwood Branches Set) and an assortment of flowers and leaves (Flowering Dogwood Set). Color images with pencils and mineral spirits using paper stumps. Lightly spray backs of images with water and shape with Deluxe Flower Shaping Kit. Ink edges of flowers with Razzberry Ink. Add floral frame to card using SMT as pictured. Add Avocado Liquid Pearls to flower centers on frame. Make multi-loop bow using ribbon and Bow-Easy Tool and add to top right of frame using glue dots. Add pearl to center of bow.

Wednesday, February 8, 2017

Flowering Dogwood Collection Release


Happy Wednesday!

Today is the day for the new release of the Flowering Dogwood Collection!  I just LOVE this collection! So beautiful for Easter, but also fitting for many other occasions! Here's a little write-up about it for you.

Heartfelt Creations invites you to usher in the spring season with the new Flowering Dogwood Collection!  Immerse yourself in this newest springtime assembling of designer papers, divinely detailed cling stamps and coordinating dies steeped with beautiful meanings and symbolism perfect for the Easter Season!  The dogwood tree is surrounded by a mesmerizing legend within the Christian faith…once the size of a mighty oak tree it was chosen to be used to construct the cross on which Jesus was to be crucified.  The tree became unhappy with its purpose and would never again grow large enough to ever build another cross.  Its branches would become narrow and crooked and no longer suitable for construction.  The delicate dogwood flower itself is a wonderful symbol of the Easter season…four petals that resemble the shape of a cross, the center laid as a crown of thorns, at the tip of each petal an indent resembling nail punctures, and a reddish hue around those indents resembling the blood of Jesus.  Soft and pastel in coloring, this newest paper collection reveals beautiful springtime shades of pinks, peaches, and greens which set stunning backdrops for scripted lettering and graceful swirls, while darker hints of blues and blacks bring out the gorgeous detail and coloring of the showy dogwood florals.  Bountiful blossom filled branches, peaceful white doves and hillside chapels are just a few of the beautiful illustrations found within the cling stamp sets!  Assemble the perfect dimensional dogwood flower using the varying sized petals within the Flowering Dogwood Cling Stamps Set and die cut using the coordinating dies.  The ideal collection to send out springtime and Easter wishes to friends and family!


Here is my card for this week!


The front of the card has a shorter width so that the right side of the inside of the card shows with the front.  Here's a view of the inside of the card.


The images were all colored with pencils and mineral spirits and cut with their matching dies. I love this dogwood branch and can see it being used lots of different ways for simple cards or more complex cards.

Be sure to visit the Heartfelt Creations' Blog to see all the beautiful creations by the designers this week! Emma Lou also has a new video for you showing you different ways to shape the dogwood flower!

I'm submitting this to the following challenge:

Word Art Wednesday #268-269 - Anything Goes

Thanks so much for stopping by to visit!

Blessings!

Kathy


He Lives!

Heartfelt Creations Products and Products Carried by HC:

HCPC 3773 - Flowering Dogwood Set
HCPC 3774 - Flowering Dogwood Branches Set
HCPC 3775 - Flowering Dogwood & Doves Set
HCPC 3776 - Dogwood Chapel Set
HCD1 7129 - Flowering Dogwood Die
HCD1 7130 - Flowering Dogwood & Doves Die
HCD1 7131 - Flowering Dogwood & Doves Die
HCDP1 275 - Flowering Dogwood Paper Collection
368770 - Scor-Pal
Deluxe Flower Shaping Kit
159723 - Designer Dries Clear
Lettuce Entertain You Prills

Other Products: Paper: Neenah Solar White, White (Recollections); Inks: VersaFine Onyx Black, VersaMagic Perfect Plumeria, Quick Quotes Razzberry; Accessories: Rosa Embossing Folder and Border (Cuttlebug), Stampin Up Punches: Large Oval and Scallop Oval, piercing tool and mat, make-up applicators, Scotch Mounting Tape, mineral spirits, paper stumps, Prismacolor Pencils: Deco Pink, Hot Pink, Processed Red, Black Raspberry, Sage Green, Olive Green, Kelp Green, Marine Green, Cool Greys 20%, 50%, Espresso, Yellow Ochre, Clear Wink of Stella, White Opal Liquid Pearls, Scotch Mounting Tape

Instructions: Card measures 4 1/4" x 6". Cut white cardstock 7 1/4" x 6", score at 4 1/4" and fold to make base. Cut pink designer paper 4 1/16" x 5 13/16", ink edges with Perfect Plum and glue inside card. Cut white 1" x 5 11/16", emboss with border folder and glue in place on right side as shown. Cut pink designer paper 2 13/16" x 5 13/16", ink edges with Perfect Plum and add to front with Scotch Mounting Tape. Cut white 2 11/16" x 5 11/16", emboss with Rosa folder and glue to pink designer paper mat on front. Cut pink designer paper 2 3/8" x 5 1/8", ink edges with Perfect Plumeria and add as pictured with Scotch Mounting Tape. Cut white cardstock 2 3/16" x 4 15/16", pierce around outside edges and adhere to pink mat.

Stamp dogwood branch (Flowering Dogwood Branches Set), dove (Flowering Dogwood & Doves Set), flowers and leaves for one small flower and one small leaf (Flowering Dogwood Set) on Solar White with Onyx Black Ink. Color images with pencils and mineral spirits and cut with matching dies. Glue dogwood branch to front on white mat. Glue small flower and leaves on lower right inside of card. Punch Large Oval with pink designer paper, ink edges with Perfect Plumeria and glue down as pictured. Stamp "He Lives!" sentiment (Dogwood Chapel Set) on white with Onyx Black Ink, punch out with Scallop Oval Punch and add to pink oval with Scotch Mounting Tape. Add dove as pictured with Scotch Mounting Tape. Add Lettuce Entertain You Prills to flower centers using Designer Dries Clear Glue. Apply Clear Wink of Stella to flower tips and dove as desired. Add White Opal Liquid Pearls to embossed flower centers and as desired around images.

Monday, April 14, 2014

Easter Gift Card Holder

Happy Monday!

I'm back with another Easter project for The Scrapping Cottage, this time a gift card holder which can also be used as a small note card envelope.


I used the Fancy Envelope and Spring Embellishment CottageCutz Dies.  Here's a picture of it open.


All the die pieces were cut with white card stock and colored with chalk inks.  I used Thatched Straw, Aloe Vera, Spring Pansy (VersaMagic), and Pink Cheeks (PowderPuffs - Quick Quotes) Inks.

These are the dies I used:


Card recipe:

Stamps: Well Scripted (SU)
Paper: White (Recollections)
Ink: Onyx Black (VersaFine), Thatched Straw, Aloe Vera, Spring Pansy (VersaMagic), Pink Cheeks (PowderPuffs - Quick Quotes)
Accessories: Diamond Stickles (Ranger), McGill Paper Shaping Tools and Mat

I'm submitting this to the Word Art Wednesday Challenge # 127 - Anything Goes.

Thanks for stopping by!

Blessings!

Kathy

Saturday, April 12, 2014

Lil' Spring Chicks

Happy Saturday!

Today I have cute Easter card for you using CottageCutz's Lil' Spring Chicks and Oval Doily & Frame.


Aren't these little guys too cute?  I love the yellow, white and black color combination.  So bright and cheery looking!

Here's a little closeup of the chicks.


I cut the dies out with white card stock and colored them with Thatched Straw (VersaMagic), Banana Bliss, Rusty Nail and Orange Slice (PowderPuffs) chalk inks using makeup applicators.  I then added them to the center piece of the Oval Doily & Frame using pop dots.

These are the dies I used:


Card recipe:

Stamps: Teeny Tiny Wishes (SU)
Paper: Black, White (Recollections), Travel Light (We R Memory Keepers)
Ink: Onyx Black (VersaFine), Thatched Straw (VersaMagic), Banana Bliss, Rusty Nail, Orange Slice (PowderPuffs - Quick Quotes)
Accessories: Lace, trim (Jo-Ann's), Bow-Easy, Gingham Black 3/8" Ribbon (Really Reasonable Ribbon), adhesive pearls (Recollections), floss, button.

I'm submitting this to the following challenges:

Word Art Wednesday Challenge #127 - Anything Goes
Really Reasonable Ribbon #92 - Flowers or Buttons and Bows

Thanks for stopping by today!

Blessings!

Kathy

Wednesday, March 12, 2014

Happy Easter - CottageCutz


Happy Wednesday!

Hope everyone is having a wonderful day!  Today I have an Easter card for you using 3 of the new Garden Delight Dies from The Scrapping Cottage!


I've used the Garden Floral Frame, Garden Delight Butterflies, and the Garden Butterfly Vine.  All the pieces were die cut with white card stock and colored with chalk inks (Aloe Vera & Pink Grapefruit VersaMagic) and make up applicators.  This is a quick technique I like to use sometimes on the more "lacy" type dies.  It doesn't need to be perfect, just add some color wherever you like!

Here is a close up of the beautiful dies:


I glued the die pieces to a white mat that was stamped with a sentiment and embossed with a folder.  I then added a mat using Lime Granita (Coredinations) and popped it on a white card base.   The butterfly was slightly shaped with my fingers, glued down by the body only so the wings came up and decorated with a little bit of Diamond Stickles on the edges.  White Opal Pearls were also added to the butterfly body and flower centers.  To finish the card, I added a small bow and adhesive pearl.

These are the dies I used:


Card recipe:

Stamps: Well Scripted (SU)
Paper: White (Recollections), Lime Granita (Coredinations)
Ink: Onyx Black (VersaFine), Aloe Vera, Pink Grapefruit (VersaMagic)
Accessories: Doily Lace Embossing Folder (Darice), adhesive pearl, White Seam Binding (Really Reasonable Ribbon), Bow-Easy Tool, White Opal Liquid Pearls, Diamond Stickles (Ranger)

I'm submitting this to the Word Art Wednesday Challenge #123 - Anything Goes.

Thanks for stopping by today!

Blessings!

Kathy

Saturday, April 7, 2012

Our Daily Bread Designs Shining the Light Challenge - New Life

Good Morning & Happy Saturday!

It's time for a new ODBD Shining the Light Challenge! 

 
This week's challenge:
Since spring is now here and signs of new life are happening all around us we want to see creations symbolizing new life…this can be Easter, new baby, budding trees, flowers…..etc.

To make the challenge even more fun, we will be giving out a prize, a $15 gift certificate to be used toward stamps at the Our Daily Bread Designs store!! Entries for the prize must be submitted by Friday, April 13th at 8 a.m. EST. One random winner will be chosen and announced next Saturday.


While it is not required to use Our Daily Bread Designs images and sentiments on your creations, we would love to see them if you have them. As a way of recognizing those who do use Our Daily Bread Designs stamps, we will again be choosing three or more of our participants for the Shining the Light Award. In order to qualify for this award or join the challenge, however, you must use Our Daily Bread stamps and have your submission added to Mr. Linky by Friday, April 13 at 8 a.m. EST. If you upload your creations to Splitcoast Stampers or any other online gallery, please use the keyword is ODBDSLC103. When creating your posts on blogs please include a link to the challenge.

Here is my take on the challenge...


Here's the inside...very simple...


This is my interpretation of "New Life",  a new creation in Christ!  I can't think of a better verse than this one to represent new life!  I am in Christ and I'm a new creation, and thankfully the "old" has gone!

This beautiful verse is from ODBD's Scripture Series 2 Stamp Set.  I decided on white and yellow, which I love this time of the year.

I'm also entering this in a new challenge for me, Word Art Wednesday. You can use a verse or quote that they post on their blog for you on Wednesdays, or use one of your own.

For the ingredients I used:

Stamps: Scripture Series 2
Paper: Solar White (Neenah), "yellow" (DCWV Cardstock), Meadow Lark Collection (Prima)
Ink: Onyx Black (VersaFine), Banana Bliss (Powder Puffs)
Accessories: Labels 8, Large Labels Nestibilities (Spellbinders), sponge, adhesive pearls (Want2Scrap), Branches s/Leaves & Flowers Embossing Folder (Sizzix), Ribbon (my stash), silk flower (wedding spray - Michaels), stamems (Michaels), stick pin, crystals, and beads (Michaels & Pretties Kit - SU)

For more inspiration, please visit the other Design Team Members blogs for their gorgeous creations for the challenge:


That's it for now, I hope to see you join in on the challenge this week!

Have a wonderful, blessed Easter!

Blessings!

Kathy

Wednesday, March 28, 2012

Treat Holders - You Bless Me!

Hi there!

After doing the tutorial yesterday, I had the urge to make some for some special people in my life!  These are people that "Bless Me!".  I found the perfect stamp that I just received from Our Daily Bread Designs for the March Release, "Sentiments Collection".  I have a feeling I'll be using this set a LOT!

For some reason, I just don't like doing the same thing over and over, so each one of these is different.  I can never decide which one I like the best, so I just do a bunch of different ones!


I used the basic tutorial I did yesterday, but didn't do the "base" part.  I also used Spellbinder's Dies instead of a punch.

For the ingredients I used:

Stamps:  Sentiments Collection (Our Daily Bread Designs)
Paper:  The Watercolor Bouquet Collection (K & Co), Tea Party Designer Series Paper, Certainly Celery Pattern Paper (Stampin' Up), White (Georgia Pacific), Solar White (Neenah)
Ink: Onyx Black (VersaFine)
Accessories: Ribbons (Michael's & Really Reasonable Ribbon), 3 x 4 Treat Bags (Wilton), Crop-a Dile, Scor-tape, Modern Lable Punch (SU), Doily Lace Edge Punch (Martha Stewart), Classic Scallop Ovals Large Dies, Labels 20 Dies (Spellbinders), Arrow Border Edge Punch (E K Success).

That's it for now!  I hope you have a chance to try these treat holders out, they are super easy and make a cute gift!

Blessings!

Kathy

Tuesday, March 27, 2012

Easter Treat Holder Tutorial - My First Tutorial!

Hi there!

For a long time, I've been wanting to try writing up a tutorial.  Before I was a Mom,  a loooong time ago, I use to write training manuals and create new procedures at an insurance company.  So I figured I should be able to do tutorials!!!  Yesterday, someone asked me about the Easter Treat Holders I did a couple of years ago, so I thought the time was right and I would give a tutorial a try!  Here's what I came up with!

There's lots of different treat holder tutorials out there, but this is how I did mine a couple of years ago.   I used one from "The Ultimate Paper Crafts Collection's" "Valentine Treat Bags" by Linda Beeson for the bag base.  These are cute for any type of treat bag you need.  These are the Easter Treat Bags that I originally did and posted a couple of years ago.


Supplies:

One 2 3/4" x 9 1/2" piece cardstock
One  2 3/4" x 3" piece cardstock or coordinating paper (optional for bottom of bag)
One 2 3/4" x 2" piece cardstock or coordinating paper (optional for topper on bag)
Scor-Pal or scoring tool
Punches for border and window
Stamps
Ink
Ribbon
Crop-a-dile or other hole punch (optional)
Treat bags 3" x 4" (I used Wilton's)
Chocolate eggs or other treats


Step-by-Step

Step 1
Score the 2 3/4" x 9 1/2" piece cardstock at 3 1/2",  4 1/4",  5",  8 1/2".


Step 2
Fold cardstock in half at 4 1/4" score line.


Step 3
Fold the 3 1/2" and 5" score lines in opposite direction to form the bottom of the bag.


Step 4
Fold the cardstock at the 8 1/2" score line for the top flap.


At this point, you can decorate however you want.


For my Easter Treat Bags, I did the following:

Step 5
Score the 2 3/4" x 3" cardstock/designer paper at 3/4",  1 1/2", and 2 1/4".  (Note: If you use an edge punch, the length can be anywhere between 3" - 3 1/4" depending on the "waste" the punch creates.)


Step 6
Fold score lines as shown to fit bottom of the bag as it was done with the bag in steps 2 & 3.


Step 7
Punch border on one edge for the front of the bag.


Step 8
Adhere bottom mat to bottom of bag using scor-tape or strong adhesive.  Make sure pieces stay together well when folded.


Step 9
Punch window opening on front center with wide oval punch or other punch.


Step 10
For topper, score 2" x 2 3/4" piece cardstock at 1" and fold.  (Note: Picture shows piece 2 1/4" x 2 3/4" piece adding 1/4" for punch waste that I ended up cutting off.)


Step 11
Punch border on one end.


Step 12
Adhere to top of bag with scor-tape or other strong adhesive.


Step 13
Fill treat bags with treats, but not too full.  Add score-tape as shown.


Step 14
Fold in sides of treat bag to fit without sticking out on sides and adhere to score-tape on flap.


Step 15
Then adhere to front of bag to completely close.


Decorate as desired! 

On this one, I did 2 holes on top with a Crop-a-Dile and put ribbon through it.  There's tons of different things you can do with this basic bag!


Well, that's it, my first tutorial for my Blog!  I did this the same way the Split Coast Stamper Tutorials are usually written up to give myself something to go by.  I hope you find this useful and have lots of fun with it!  Lots of pictures and steps, I am a little detailed...hope I included everything though!

If you wanted to make a bunch of these, you could get 3 bags from one sheet of 8 1/2" x 11" cardstock.  I would probably try scoring first and then cutting the main piece for the bags the next time I did a bunch of these.

Let me know how I did, if it goes well, maybe I'll do some more!


Blessings!

Kathy


Sunday, March 25, 2012

Almost Easter - Flourishes & Cheery Lynn Challenges

Hi there!

This is a very quick card I put together for Easter using one of my most favorite dies, Fanciful Flourish by Cheery Lynn Designs.  The colors on this look blue in the photo, but are actually more lavender.  I'd like to sponge some Almost Amethyst around the sentiment with the die in place, but a little late now!


I'm submitting this to the Flourishes' FTTC161 Sketch Challenge and the Cheery Lynn Designs' Challenge #20 for Easter.

For ingredients used:

Stamps: Well Scripted (Stampin' Up)
Paper: Natural White (Neenah), Almost Amethyst, Pear Pizzazz (SU)
Ink: Onyx Black (VersaFine)
Accessories: Fanciful Flourish (Cheery Lynn), Floral Oval (Spellbinders), Ornate Flower Embossing Folder (Sizzix), Rose Leaf Punch (Martha Stewart), adhesive pearls, rick rack (Recollections), flower & satin trim (RAK from Sabrina), pearl string (? old, old old).

That's it for now!  Hope everyone is having a wonderful weekend! 

Blessings!

Kathy

Thursday, March 25, 2010

More Boutique Items!

Here are some more of the things I'm making for the Boutique on Saturday!

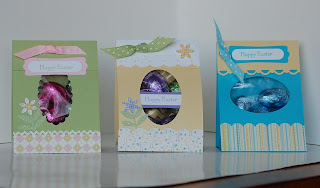
Easter Treat Bags


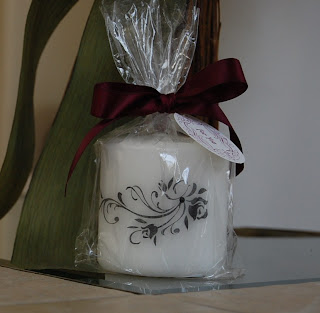
Something new! ~ Stamped Candles


I hope people like my things and are able to come!  :-)