Be Joyful

Rejoice in the Lord always. Again I will say, rejoice! Let your gentleness be known to all men. The Lord is at hand. Be anxious for nothing, but in EVERYTHING by prayer and supplication, with thanksgiving, let your requests be made known to God; and the PEACE OF GOD, which surpasses all understanding, will guard your hearts and minds through Christ Jesus. Philippians 4:4-7

These are verses I memorized years ago and they are written on my heart. There are times when I still need to remember not to be anxious, but I eventually listen to my heart saying these verses. I didn't really understand what the "peace of God" was until I experienced it. It's having peace inside you, even when you're going through heartbreaking situations and trials. It does "surpass ALL understanding" and you know it comes from GOD alone. Praise the Lord for His wonderful promises!


I love, love, love what I do. I am passionate about the things I create and the talents God has placed in me. I SO appreciate the time you take to look at my things and the comments you all leave me!

Blessings to you!

Kathy
Showing posts with label Bookmarks. Show all posts

Wednesday, November 30, 2016

Violet Rose Fold Over Bookmark


Happy Wednesday!

***The winner of last week's Black Friday Blog Hop is Diana Joy from Angelica's Blog. Diana will need to email info@heartfeltcreations.us with her details to claim her awesome prize!

It's time for a little inspiration for you from Heartfelt Creations! This week I have a quick and easy fold over bookmark that makes a cute gift!


I left the front fairly simple, but you can easily add a sentiment or quote on the bottom to personalize it. The flower and leaves are from the Classic Rose Stamp Set and matching Classic Rose Die. They were colored with pencils and mineral spirits and shaped with the Deluxe Flower Shaping Kit.

I made the bookmark from cardstock and the Classic Rose Paper Collection. The front of the bookmark is a pre-made tag from the collection. The back of the bookmark has paper from the collection and an adhesive pearl.


Be sure to visit the Heartfelt Creations' Blog to see all the beautiful creations by the designer this week!

I'm submitting this to the following Challenge:

Word Art Wednesday #258-259 - Anything Goes
Craft Carmakers #178 - Anything But a Card

Thanks so much for stopping by to visit!

Blessings!

Kathy


Violet Rose Fold Over Bookmark

Heartfelt Creations Products and Products Carried by HC:

HCPC 3752 - Classic Rose Cling
HCD1-7110 - Classic Rose Die
HCD1-7108 - Snow Kissed Flakes & Tag Die
HCD 745 - Luggage & Tags Die
HCPC1-270 - Classic Rose Paper Collection
368770 - Scor-Pal
Deluxe Flower Shaping Kit
159723 - Designer Dries Clear
Other Products: Paper: Neenah Solar White, The Paper Studio Green Jewel; Inks: VersaFine Onyx Black, Quick Quotes Purple Passion; Accessories: mineral spirits, paper stumps, Prismacolor Pencils: Prussian Green, Dark Green, Black, Imperial Violet, Dioxazine Purple Hue, adhesive pearls, hot glue gun, 1/4" scor-tape, Clear Wink of Stella

Watch this video https://youtu.be/Z8P070kC3oo to learn how to create dimensional roses with the Classic Rose Collection.

Instructions: Bookmark measures approximately 3" x 4 1/4". You can find instructions for fold over bookmarks here. (http://www.splitcoaststampers.com/forums/try-new-technique-f44/tlc392-%7E-fold-over-bookmark-%7E-8-27-12-a-t559984.html) For my bookmark, I used the Festive Tag Die from the Snow Kissed Flakes & Tag Die for the base. Die cut once with Green Jewel and again with designer paper from the collection. Ink edges of designer paper tag with Purple Passion Ink. Adhere top 3/4" of tag pieces together using Scor-Tape. Using the Luggage and Tags Die, cut pre-made tag from the paper collection. Ink edges of tag with Purple Passion Ink and glue down to Green Jewel tag.

Stamp small rose petals (2 small, 1 medium) and foliage from Classic Rose Cling on Solar White with Onyx Black Ink. Color with pencils and mineral spirits using paper stumps. Die cut with matching dies from the Classic Rose Die Set. Shape petals using Deluxe Flower Shaping Kit into one flower. Add foliage and flower as pictured. Accent with adhesive pearls. Brush lightly with Clear Wink of Stella on flowers and die cut leaves.


Wednesday, May 6, 2015

Teal Rose Fold Over Bookmark


Happy Wednesday!

I'm back today with a quick and easy gift you can create using Heartfelt Creations designer papers!


This is a Fold Over Bookmark that I found a tutorial for on Split Coast Stampers here. I made a bunch of these a couple of years ago for ladies in a Bible Study class I was in and they loved them! Very simple to make and you can decorate them any way you want! Perfect way to use up leftover pieces of designer papers too!

Make sure to visit the HC Blog to see the designers beautiful creations this week!

Next week is the release of the Cascading Fuchsia Collection! What a gorgeous collection it is! You can see a preview of it here.

I'm submitting this to the following challenge:

Word Art Wednesday Challenge #182 - Anything Goes

Thanks for stopping by to visit!

Blessings!

Kathy


Teal Rose Fold Over Bookmark

Heartfelt Creations Products and Products Carried by HC:

HCDP1-253 - Everyday Heroes Paper Collection
368770 - Scor-Pal
Art Institute Glue Clear

Other Products: Paper: Black (Recollections); Ink: Midnight Confession (Quick Quotes); Crop-A-Dile, Platinum Liquid Pearls (Ranger), Black and Soapstone Seam Binding, Black Burlap String (Really Reasonable Ribbon), Baja Breeze Seam Binding (Stampin Up), fibers (my stash), Scor-Tape 1/4", metal charm, pop dot, Aleenes Fast Grab Tacky Glue.

Instructions: Bookmark measures 2" x 5 1/2". Follow "Fold Over Bookmark" instructions here. Cut black card stock 2" x 11", score at 5 1/2" and fold crease. Adhere top 1/2" of bookmark by adding 2 pieces of Scor-Tape to inside top. Using the 12" x 12" piece of designer paper with the teal roses in each corner, cut 1 7/8" x 5 3/8" from one of the corners. Ink edges with black ink and glue to bookmark. Make hole in top of bookmark with Crop-A-Dile and add various ribbons and fibers tying in a knot. Add charm using Black Burlap String and tie into a bow. Add this to top of ribbon knots using Aleenes Fast Grab Tacky Glue. Add pop dot under charm to keep in place.

Sunday, January 6, 2013

Rose Corner Bookmark

Hi there!
 
Today I have a corner bookmark I made using Flourishes' A Year in Flowers Stamp Set...


I made this using the Split Coast Stampers Corner Bookmark Tutorial by Beate Johns which you can find here.  This is super easy to make and comes out really pretty for a gift.  I colored this beautiful rose image with pencils and mineral spirits and cut it out with the Fleur de Lis Squares Die.
 
I'm submitting this to the Word Art Wednesday Challenge #61 - Trust/Anything Goes
 
Also, for the Flourishes Timeless Tuesday Challenge #201 - use your favorite 2012 challenge project and case the card/project.  I cased the FTTC157 - Corner Bookmark Challenge.
 
Recipe:
 
Stamp: A Year in Flowers 2 (Flourishes)
Paper: Solar White (Neenah), Burgandy (Recollections)
Ink: Onyx Black (VersaFine)
Accessories: Olive Wrinkled Ribbon, White Seam Binding (Really Reasonable Ribbon), Fleur de Lis Squares, Classic Petals & Classic Decorative Inserts Four Edgeabilities (Spellbinders), adhesive pearls, spacer bead, Bow-Easy, butterfly punch (Marvy), mineral spirits, Prismacolor Pencils: Black Raspberry, Kelp Green
 
Thank you for stopping by!
 
Blessings!
 
Kathy


Tuesday, December 11, 2012

ODBDSLC134 - NOEL

Happy Tuesday!

It's time for a new Shining the Light Challenge at Our Daily Bread Designs!

This week's challenge: 
Noel word challenge- Use the letters in Noel to create a card.


To make the challenge even more fun, we will be giving out a prize, a $15 gift certificate to be used toward stamps at the Our Daily Bread Designs store!! Entries for the prize must be submitted by Sunday, December 23rd at 8 p.m. EST. One random winner will be chosen and announced next Saturday.

While it is not required to use Our Daily Bread Designs images and sentiments on your creations, we would love to see them if you have them. As a way of recognizing those who do use Our Daily Bread Designs stamps, we will again be choosing three or more of our participants for the Shining the Light Award . In order to qualify for this award or join the challenge, however, you must use Our Daily Breadstamps and have your submission added to Mr. Linky by Sunday, December 23rd at 8 p.m. EST. If you upload your creations to Splitcoast Stampers or any other online gallery, please use the keyword is ODBDSLC134. When creating your posts on blogs please include a link to the challenge.

For my card this week I used Flourished Verses and 2 of the new release this month, Snowflake Background and Snowy Blessings  Here is a picture with the bookmark slipped in behind the sentiment.


Here is is with it detached.


Here are pictures of the stamps sets I used:


For my NOEL recipe, I used: N=Nestabiling, O=Organdy Silver Ribbon, E=Embossing, L=Layers

Complete Card Recipe:

Stamps: Snowflake Background, Snowy Blessings, Flourished Verses (Our Daily Bread Designs)
Paper: Solar White (Neenah), Baja Breeze (SU)
Ink: VersaMark
Accessories: Winter Wonderland Embossing Powder (Stampendous), Metalic Silver Embossing Powder (Recollections), Bookmark Die (Our Daily Bread Designs Custom Die),  Snowpeople Glitter Rub-ons (Royal Brush), adhesive heart pearls (Want2Scrap), White Seam Binding (Really Reasonable Ribbon), Organdy Silver Ribbon (Wrights), metal thread, button snowflake (Michaels), Parisian Accents Die (Spellbinders)
For more inspiration, please visit the other DT ladies and see their beautiful creations!

  •  
    Hope you can join in the challenge this week!

    Blessings!

    Kathy

    Sunday, February 26, 2012

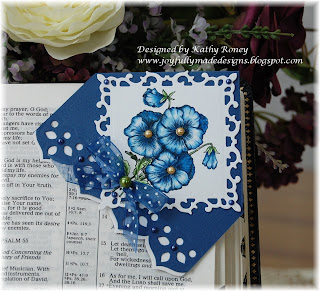
    Corner Bookmark - Flourishes FTTC157

    Happy Sunday!

    I decided to join in on the latest challenge at Flourishes - FTTC157 - make a corner bookmark.  I've seen this, but hadn't tried it out yet.  I'm glad I did, very easy to make and would make a nice gift!

    I would LIKE to make a bunch of these for the ladies at my Bible study, but there are a LOT of ladies!  We'll have to see how that goes!

    The blue paper is actually darker and more of a navy than the royal blue as it looks here.  It looks a lot nicer in real life!


    I couldn't decide which picture to show you, so I'm showing you all 3!

    I used the tutorial on Split Coast Stampers in the Resource section done by Beate Johns, you can find it here

    I colored the image with Prismacolor Pencils and tried something a little different.  I did a base of white pencil on the flower before adding the blue.  I'm not sure I like it, it changes the color too much from what I wanted.    I checked out pictures of real pansies online and found gorgeous one that was mostly white with dark blue highlights on the base and tip of the petals.  This definitely isn't how it came out, but I'll try it again in the future.  I also noticed in the real pictures that the "fifth" petal underneath was usually a solid darker color, which I tried to do here.  I'm just a little detailed, LOL!

    The ingredients used:

    Stamps: A Year in Flowers 1 (Flourishes)
    Paper: White (PTI), Typhon (Bazzills), Watercolor Bouquet (K&Co).
    Ink: Black Onyx (Versafine)
    Accessories: Fleur de Lis Squares, Classic Petal Edgeabilities (Spellbinders), ribbon (Micheals), adhesive pearls (Michaels & Want2Scrap), Prismacolor pencils, mineral spirits.

    Hope you are all having a wonderful weekend!

    Blessings!

    Kathy

    Tuesday, December 6, 2011

    Lighthouse Bookmark - ODBDSLC87

    Hi there!

    Here is my newest creation...a bookmark! I made this for the latest Shining the Light Challenge on Our Daily Bread Designs which you can find here. The challenge was to make any type of bookmark, using one of their stamps.

    I bought this Christmas paper, Naughty or Nice by Recollections, but really liked it for some of the papers it had that I could use year round. I loved this brown and teal flourish paper.

    Here is the front of the bookmark.


    Here is a close up of the image. I used the Light of the World stamp set by ODBD. I stamped the lighthouse first in sage shadow (SU), then the verse in soft suede (SU), then die cut it with Labels Four from Spellbinders, then sponged the edges with the die still in place with VersaMark. I like the effect it gave.


    For the back of the bookmark, I stamped the lighthouse image in Vintage Sepia (VersaFine) and colored it with my Prismacolor Pencils and mineral spirits...one of my favorite things to do! Here's the back.


    Here's a close up of the colored image.


    I then die cut the image and all the mats using Labels Four again. I glued 3 different ribbons together (not sure I'll do this again...little stiff)for the ribbon portion, then I used Lables 13 (Spellbinders) for the top of the bookmark. I added some adhesive pearls and a flower.

    That's about it for now! I think this will be a nice Christmas gift for someone.

    Bessings to you all, and I'll be back next week!

    Kathy

    Wednesday, October 5, 2011

    Daisy's Sweet Treats

    Hi there!

    I hope everyone is doing well! I have a little project to share with you using the stamp "Daisy Hugging Dolly" from Elphine House Australia. I love Elisabeth Bell's images, especially any with Daisy, she's so adorable!

    This is a treat box I made with a detachable bookmark on the front of it. I made this for Elphine House's challenge to use sweet treats on your card/project. The box is from K&Co's Paper Boxes. I've had these for a long time, but hadn't used them yet. They're really pretty for gifts and have a bunch of die cuts to go with them.

    I took lots of pictures of this so you could see everything. (I will list all the details on my Split Coast Gallery if you would like them.) This is the front of the box with the bookmark in place. I used the fancy tag diecut to hold the bookmark in place.


    This is the back of the box with the bookmark in place.


    This is the back without the bookmark.


    This is the front without the bookmark.


    This is the bookmark by itself. (Make sure to read all the way down, I have a really funny story about this picture.)


    This is the label close up. I wrapped the sides of the label around the box and used a brad to secure it in place. Sorry, the picture is a little blurry.


    This is the box opened up. It's really pretty with the 2-sided paper showing.

    If you would like to join in the fun for the "Tasty Treats" challenge at Elphine House Australia, we would love you to join us. The challenge starts today and ends in 2 weeks. You can use ANY Elisabeth Bell image for this. The winner receives 2 EHA's stamps of their choice! Here's a link for the challenge where you can see more about it and the awesome Design Team's samples.

    I am also entering this in the Split Coast Stamper's challenge WT342 to have a bookmark that's detachable. I really like the way the bookmark came out, and I may make more of these for gifts and maybe one for ME!

    Now for the funny story. You may or may not have noticed, but the coloring I did on the bookmark in the first photo had a white space on Daisy's shoulder. I didn't notice it until after I had taken all the pictures. I had erased the color a little to get rid of a mark, but I got interrupted and never fixed it. So, being a perfectionist, I had to fix it for the bookmark only picture at least. Well, I took picture after picture and my camera just wouldn't focus...every single picture was completely blurry. I was getting so frustrated and couldn't figure out what I was doing wrong. So, about 30 pictures later, taken in 5 different places, I realized the pictures weren't blurry at all, I just didn't have my glasses on. LOL!!!

    I would just like to say, I LOVE what I do, I'm so excited to use the talents God has given me. I hope I can somehow use them to glorify Him to others! Anyone out there who doesn't know God as their Savior, you are missing SO much. I use to try to do IT on my own, wow, now I wouldn't think of doing anything without Him! I hope you all have God with you in your heart.

    Blessings to you!

    Kathy