Be Joyful

Rejoice in the Lord always. Again I will say, rejoice! Let your gentleness be known to all men. The Lord is at hand. Be anxious for nothing, but in EVERYTHING by prayer and supplication, with thanksgiving, let your requests be made known to God; and the PEACE OF GOD, which surpasses all understanding, will guard your hearts and minds through Christ Jesus. Philippians 4:4-7

These are verses I memorized years ago and they are written on my heart. There are times when I still need to remember not to be anxious, but I eventually listen to my heart saying these verses. I didn't really understand what the "peace of God" was until I experienced it. It's having peace inside you, even when you're going through heartbreaking situations and trials. It does "surpass ALL understanding" and you know it comes from GOD alone. Praise the Lord for His wonderful promises!


I love, love, love what I do. I am passionate about the things I create and the talents God has placed in me. I SO appreciate the time you take to look at my things and the comments you all leave me!

Blessings to you!

Kathy
Showing posts with label Treat Bags/Boxes. Show all posts

Sunday, February 10, 2013

Violet Roses - Flourishes - FTTC206

Hi there!

I made this card for the latest Flourishes Timeless Tuesday Challenge #206 which is a sketch.


Click on photo for a closer view.


The rose image is from the Roses Are Red Set that I recently won...I love this set and this small rose image!  I colored this with my Prismacolor Pencils and mineral spirits and made a frame for it using the Labels 20 Spellbinders Dies.  Here's a closer view of the image.


The sentiment is from the With Graditude Set which I punched out with the Modern Label Punch and them created a mat for it with the Labels 20 Dies.  Here's a closer look at the sentiment.


The green pattern paper is from the brand new Graphic 45 Papers Secret Garden that I won and just received this weekend...wow, these papers are beautiful!  I can't wait to use more of it!

Card recipe:

Stamps: Roses Are Red, With Graditude (Flourishes)
Paper: Solar White (Neenah), Secret Garden (Graphic 45), Concord Crush (Stampin Up)
Ink: Onyx Black (VersaFine)
Accessories: Labels 20 (Spellbinders), lace, Modern Label Punch, square punch, Perfect Polka Dot Embossing Folder (SU), Four Petal Flower Embossing Folder (Sizzix) , adhesive pearls, mineral spirits, Prismacolor Pencils: Olive Green, Marine Green, Imperial Violet, Dioxazine Purple Hue, Black

Thanks for stopping by!  I hope I leave you with a little inspiration today!

Blessings!

Kathy
 

Wednesday, March 28, 2012

Treat Holders - You Bless Me!

Hi there!

After doing the tutorial yesterday, I had the urge to make some for some special people in my life!  These are people that "Bless Me!".  I found the perfect stamp that I just received from Our Daily Bread Designs for the March Release, "Sentiments Collection".  I have a feeling I'll be using this set a LOT!

For some reason, I just don't like doing the same thing over and over, so each one of these is different.  I can never decide which one I like the best, so I just do a bunch of different ones!


I used the basic tutorial I did yesterday, but didn't do the "base" part.  I also used Spellbinder's Dies instead of a punch.

For the ingredients I used:

Stamps:  Sentiments Collection (Our Daily Bread Designs)
Paper:  The Watercolor Bouquet Collection (K & Co), Tea Party Designer Series Paper, Certainly Celery Pattern Paper (Stampin' Up), White (Georgia Pacific), Solar White (Neenah)
Ink: Onyx Black (VersaFine)
Accessories: Ribbons (Michael's & Really Reasonable Ribbon), 3 x 4 Treat Bags (Wilton), Crop-a Dile, Scor-tape, Modern Lable Punch (SU), Doily Lace Edge Punch (Martha Stewart), Classic Scallop Ovals Large Dies, Labels 20 Dies (Spellbinders), Arrow Border Edge Punch (E K Success).

That's it for now!  I hope you have a chance to try these treat holders out, they are super easy and make a cute gift!

Blessings!

Kathy

Tuesday, March 27, 2012

Easter Treat Holder Tutorial - My First Tutorial!

Hi there!

For a long time, I've been wanting to try writing up a tutorial.  Before I was a Mom,  a loooong time ago, I use to write training manuals and create new procedures at an insurance company.  So I figured I should be able to do tutorials!!!  Yesterday, someone asked me about the Easter Treat Holders I did a couple of years ago, so I thought the time was right and I would give a tutorial a try!  Here's what I came up with!

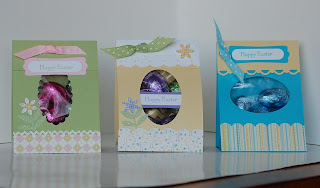
There's lots of different treat holder tutorials out there, but this is how I did mine a couple of years ago.   I used one from "The Ultimate Paper Crafts Collection's" "Valentine Treat Bags" by Linda Beeson for the bag base.  These are cute for any type of treat bag you need.  These are the Easter Treat Bags that I originally did and posted a couple of years ago.


Supplies:

One 2 3/4" x 9 1/2" piece cardstock
One  2 3/4" x 3" piece cardstock or coordinating paper (optional for bottom of bag)
One 2 3/4" x 2" piece cardstock or coordinating paper (optional for topper on bag)
Scor-Pal or scoring tool
Punches for border and window
Stamps
Ink
Ribbon
Crop-a-dile or other hole punch (optional)
Treat bags 3" x 4" (I used Wilton's)
Chocolate eggs or other treats


Step-by-Step

Step 1
Score the 2 3/4" x 9 1/2" piece cardstock at 3 1/2",  4 1/4",  5",  8 1/2".


Step 2
Fold cardstock in half at 4 1/4" score line.


Step 3
Fold the 3 1/2" and 5" score lines in opposite direction to form the bottom of the bag.


Step 4
Fold the cardstock at the 8 1/2" score line for the top flap.


At this point, you can decorate however you want.


For my Easter Treat Bags, I did the following:

Step 5
Score the 2 3/4" x 3" cardstock/designer paper at 3/4",  1 1/2", and 2 1/4".  (Note: If you use an edge punch, the length can be anywhere between 3" - 3 1/4" depending on the "waste" the punch creates.)


Step 6
Fold score lines as shown to fit bottom of the bag as it was done with the bag in steps 2 & 3.


Step 7
Punch border on one edge for the front of the bag.


Step 8
Adhere bottom mat to bottom of bag using scor-tape or strong adhesive.  Make sure pieces stay together well when folded.


Step 9
Punch window opening on front center with wide oval punch or other punch.


Step 10
For topper, score 2" x 2 3/4" piece cardstock at 1" and fold.  (Note: Picture shows piece 2 1/4" x 2 3/4" piece adding 1/4" for punch waste that I ended up cutting off.)


Step 11
Punch border on one end.


Step 12
Adhere to top of bag with scor-tape or other strong adhesive.


Step 13
Fill treat bags with treats, but not too full.  Add score-tape as shown.


Step 14
Fold in sides of treat bag to fit without sticking out on sides and adhere to score-tape on flap.


Step 15
Then adhere to front of bag to completely close.


Decorate as desired! 

On this one, I did 2 holes on top with a Crop-a-Dile and put ribbon through it.  There's tons of different things you can do with this basic bag!


Well, that's it, my first tutorial for my Blog!  I did this the same way the Split Coast Stamper Tutorials are usually written up to give myself something to go by.  I hope you find this useful and have lots of fun with it!  Lots of pictures and steps, I am a little detailed...hope I included everything though!

If you wanted to make a bunch of these, you could get 3 bags from one sheet of 8 1/2" x 11" cardstock.  I would probably try scoring first and then cutting the main piece for the bags the next time I did a bunch of these.

Let me know how I did, if it goes well, maybe I'll do some more!


Blessings!

Kathy


Wednesday, October 5, 2011

Daisy's Sweet Treats

Hi there!

I hope everyone is doing well! I have a little project to share with you using the stamp "Daisy Hugging Dolly" from Elphine House Australia. I love Elisabeth Bell's images, especially any with Daisy, she's so adorable!

This is a treat box I made with a detachable bookmark on the front of it. I made this for Elphine House's challenge to use sweet treats on your card/project. The box is from K&Co's Paper Boxes. I've had these for a long time, but hadn't used them yet. They're really pretty for gifts and have a bunch of die cuts to go with them.

I took lots of pictures of this so you could see everything. (I will list all the details on my Split Coast Gallery if you would like them.) This is the front of the box with the bookmark in place. I used the fancy tag diecut to hold the bookmark in place.


This is the back of the box with the bookmark in place.


This is the back without the bookmark.


This is the front without the bookmark.


This is the bookmark by itself. (Make sure to read all the way down, I have a really funny story about this picture.)


This is the label close up. I wrapped the sides of the label around the box and used a brad to secure it in place. Sorry, the picture is a little blurry.


This is the box opened up. It's really pretty with the 2-sided paper showing.

If you would like to join in the fun for the "Tasty Treats" challenge at Elphine House Australia, we would love you to join us. The challenge starts today and ends in 2 weeks. You can use ANY Elisabeth Bell image for this. The winner receives 2 EHA's stamps of their choice! Here's a link for the challenge where you can see more about it and the awesome Design Team's samples.

I am also entering this in the Split Coast Stamper's challenge WT342 to have a bookmark that's detachable. I really like the way the bookmark came out, and I may make more of these for gifts and maybe one for ME!

Now for the funny story. You may or may not have noticed, but the coloring I did on the bookmark in the first photo had a white space on Daisy's shoulder. I didn't notice it until after I had taken all the pictures. I had erased the color a little to get rid of a mark, but I got interrupted and never fixed it. So, being a perfectionist, I had to fix it for the bookmark only picture at least. Well, I took picture after picture and my camera just wouldn't focus...every single picture was completely blurry. I was getting so frustrated and couldn't figure out what I was doing wrong. So, about 30 pictures later, taken in 5 different places, I realized the pictures weren't blurry at all, I just didn't have my glasses on. LOL!!!

I would just like to say, I LOVE what I do, I'm so excited to use the talents God has given me. I hope I can somehow use them to glorify Him to others! Anyone out there who doesn't know God as their Savior, you are missing SO much. I use to try to do IT on my own, wow, now I wouldn't think of doing anything without Him! I hope you all have God with you in your heart.

Blessings to you!

Kathy