Be Joyful

Rejoice in the Lord always. Again I will say, rejoice! Let your gentleness be known to all men. The Lord is at hand. Be anxious for nothing, but in EVERYTHING by prayer and supplication, with thanksgiving, let your requests be made known to God; and the PEACE OF GOD, which surpasses all understanding, will guard your hearts and minds through Christ Jesus. Philippians 4:4-7

These are verses I memorized years ago and they are written on my heart. There are times when I still need to remember not to be anxious, but I eventually listen to my heart saying these verses. I didn't really understand what the "peace of God" was until I experienced it. It's having peace inside you, even when you're going through heartbreaking situations and trials. It does "surpass ALL understanding" and you know it comes from GOD alone. Praise the Lord for His wonderful promises!


I love, love, love what I do. I am passionate about the things I create and the talents God has placed in me. I SO appreciate the time you take to look at my things and the comments you all leave me!

Blessings to you!

Kathy
Showing posts with label Tutorials. Show all posts

Friday, July 24, 2015

Sparkling Poinsettia Step by Step Coloring and Shaping Tutorial


Happy Friday!

I'm so excited today to have a tutorial I've written featured on the  Heartfelt Creations Blog.

This is the project I created for the tutorial.


I've been using this coloring technique for a while now and love the soft look it gives and how easy it is to do!

For my tutorial I'm using the Sparkling Poinsettia, but you can use almost any flower for this technique. Here's a little close-up of the beautiful poinsettia flower.


Now, for the tutorial!

Sparkling Poinsettia Step by Step Coloring and Shaping Tutorial


Step 1) Stamp flowers and leaves on Natural White Cardstock with VersaMark Ink and heat emboss with Aged Ivory Embossing Enamel. Apply heat from underneath so that the little gold specks don’t blow away.

Note: Click on the photos to see a closer view.


Step 2) Using make-up applicators and chalk inks, color the flowers. Start with a light application of color from the center of the flower petal and fading to the outside of the petal. Depending on how “juicy” my ink pad is, I usually dab off a lot of the color on paper towel first so I can get a light application. You can always add more color, but you can't take it away. I'll then go back and add a little more color to create more of a shadow. You can see here how one petal is a little darker than the others.


Step 3) For the leaves, I apply the color down the center and fade to the outside. For the berry clusters, I apply a little bit of both colors.


Step 4) Die cut the flowers and leaves with the matching dies.


Step 5) Clip between the flower petals with scissors.


Step 6) Spritz lightly on backs of flowers, leaves and center clusters with water before shaping. (Note: do this process of spritzing and shaping one piece at a time.)


Step 7) Shape flower petals with curler tool by pressing the tool down the center of each petal on the embossing mat.


Step 8) Shape leaves down the center using your fingernail. (Or a stylus tool if you don’t have any!)


Step 9) Shape flower center cluster by cupping each on the back with a stylus tool, then turn over and press stylus tool in the center so the cluster pops up.


Step 10) This is how your flowers, leaves and clusters should look when done.


Step 11) Using Art Institute Glue Dries Clear, glue flower together offsetting petals. Glue leaves to back of flower.


Step 12) Cut Natural White cardstock 4 1/2” x 6”. Stamp sentiment on lower right using VersaMark Ink and heat embossing with Brown Sugar Embossing Powder.


Step 13) Die cut Decorative Lace Border with Natural White and glue to mat. It’s best to used the Metal Glue Tip with the glue although it’s not in the picture here.


Step 14) Add Jute Ribbon over die cut using Scor-Tape. Make a multi-loop bow with fibers using a bow making tool and add to mat using Aleenes Tacky Glue. Add mat to a 4 3/4” x 6 1/4” blue card base using Scotch Mounting tape.

(You can find a basic tutorial here on using the Bow-Easy Tool like did here if you need it. My bow was made wrapping it 9 times...I usually always make it an odd number. The thinner the ribbon/fiber is, the more times I will wrap it.)


Step 15) Add flower to card using Aleene's Tacky Glue.


Step 16) To decorate the inside of the card, cut a 4 1/2” x 6” mat with Natural White. Stamp the sentiment with VersaMark and heat emboss with Brown Sugar Embossing Powder. Using the Sparkling Poinsettia Swirl Set, stamp the poinsettia swirl on the top left with VersaMark Ink and heat emboss from underneath with Aged Ivory Embossing Enamel. Color image with chalk inks using same method as you did with the flowers, leaves and clusters. Add mat to inside of card.

I'm submitting this to the Word Art Wednesday Challenge #193 - Anything Goes/Family Friendly

I hope you enjoyed my tutorial! I love coloring with pencils, but it's a lot of work sometimes. This technique to so easy to do and I love how it comes out! Hope you like it too!

Blessings!

Kathy


Heartfelt Creation Products:

HCPC 3679 - Large Sparkling Poinsettia Cling
HCPC 3680 - Sparkling Poinsettia Cling
HCPC 3681 - Sparkling Poinsettia Candle Cling
HCPC 3682 - Sparkling Poinsettia Swirl Cling
HCD1 765 - Large Sparkling Poinsettia Die
HCD1 766 - Sparkling Poinsettia Die
HCD 713 - Decorative Lace Border Die
368770 - Scor-Pal
Deluxe Flower Shaping Kit
159723 - Art Institute Glue - Dries Clear

Other Products: Neenah Natural White cardstock, Coredinations Waterspout cardstock, VersaMark Watermark Pad, VersaMagic Aegean Blue and Tea Leaves, Spanish Olive Inks, Bow-Easy Tool, Ivory Jute 1.5” ribbon, ivory cotton fibers, Brown Sugar Zing Embossing Powder, Stampendous Aged Ivory Embossing Enamel, heat gun tool, scor-tape, Aleene’s Fast Grab Tacky Glue, Scotch Mounting Tape, make-up applicators, Embossing Buddy, water spritzer.

Thursday, November 21, 2013

Spellbinders Platinum Party Blog Hop - Heartfelt Creations


Happy Thursday everyone!

Welcome to the second day of the Spellbinders Platinum Party Blog Hop!!!  I'm so excited to be participating in the Hop today with Spellbinders for Heartfelt Creations!  I hope you are having fun hopping and enjoying all the beautiful creations on your way!

You can find all the rules for the contest at the Spellbinders Blog here and be sure to visit all the participating blogs to be eligible for the Grand Prize.

For your chance to win the Grand Prize for the Platinum Party please enter here

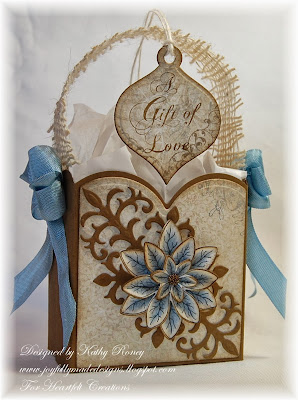
For my project, I will be showing you how I made this special Christmas gift bag using the Grand Labels 23 Die and lots of other Spellbinders and Heartfelt Creations products!


You can make this bag and decorate it for any occasion and it's pretty simple to put together!


I put together a little picture tutorial in a separate post to show you how I did it...sorry I don't have a video camera...yet!

To decorate my bag, I used Spellbinders Dies and  Heartfelt Creations designer papers, stamps, and dies.  I matted the front and back of the bag with light brown designer paper from the Christmas Card Paper Collection by cutting it with the same Labels 23 Grand die, scoring it in the same manner, and trimming the front and back pieces to fit.  I then inked them with Soft Suede Ink and glued them to the bag.

The poinsettia flower was made with the Christmas Poinsettia PreCut Set and the matching Sun Kissed Fleur Die.  The wonderful thing about these is you stamp the one image and cut it with one die and you get 10 different flowers and 2 leaves at once!  It's a huge time saver and I love having extra flowers leftover to use when ever I need them! 


For my flower here, I used Solar White Cardstock and Onyx Black Ink.  I colored 3 of the flowers with Periwinkle and Black Prismacolor Pencils using mineral spirits.  The flower was shaped using the Paper Blossoms Molding Mat and Tool Kit and glued together.  I then added Antique Copper Microbeads to the flower center.  I cut 2 of the flourishes from the Ornamental Add On Die with Soft Suede Cardstock, glued them tip to tip as shown, and popped the poinsettia flower on top.


For the back of the bag, I cut one of the other flourishes from the Ornamental Add On Die with Soft Suede Cardstock and one of each snowflake from the Banner & Tree Die with Natural White Cardstock and glued together as shown adding an adhesive pearl to the center.

I added a bow on each side of the bag made with Danish Blue Seam Binding and an adhesive pearl to the center.  The handle of the bag is a jute ribbon sample I received from Really Reasonable Ribbon that I thought looked kind of cute as a handle!


The gift tag was made with Spellbinders Holiday Tags Dies.  I stamped the sentiment from Heartfelt Creations' Love At Christmas PreCut Set on more of the light brown designer paper with Soft Suede.  This was cut out with the tag die, along with another cut from Soft Suede cardstock.  I glued these together, inked the edges, and added some twine for a tie.


Here is the complete list of participating blogs for the contest both yesterday and today:

  
November 20th

Linda Lucas  www.lovelylindascraftcentral.blogspot.com.au (for Tsukineko)
Angelica Turner  bellisimavida.blogspot.com/ (for Heartfelt Creations)
Mechele Rudd (The Stamp Doctor)http://thestampdoctor.blogspot.com


Allie Gower My Card Partyhttp://wp.me/p2Ys5f-Ai (for Want2Scrap)
Eva Dobilas http://evafromca.blogspot.com/(for JustRite)
Kathy Roneywww.joyfullymadedesigns.blogspot.com (for Heartfelt Creations) (that's me!)
Emily Lanhamhttp://createserendipity.blogspot.com (for Tsukineko)
Steph Ackermanhttp://stephaniescraps.blogspot.com (for The Stamp Doctor)

 
I hope you enjoyed my gift bag tutorial using Spellbinders and Heartfelt Creations beautiful products!

Thank you for stopping by and good luck with the contest!

Supplies:

HCPC 3557 Christmas Poinsettia PreCut Set
HCPC 3554 Love at Christmas PreCut Set
HCD 738 Ornamental Add On Die
HCD 739 Banner & Tree Die
HCD 734 Sun Kissed Fleur Die
HCDP1 236 Christmas Card Paper Collection
Spellbinders Holiday Tags Shapeabilities
Spellbinders Grand Calibur
McGill Paper Blossoms Tool Kit
McGill Paper Blossoms Molding Mat
Art Institute Glue - Dries Clear

Paper: Solar White, Natural White (Neenah), Soft Suede (Stampin' Up)
Inks: Onyx Black (VersaFine), Soft Suede (Stampin' Up)
Accessories: Spellbinders Grand Labels Twenty-Three , Antique Copper Microbeads, Adhesive Pearls (Recollections), Bow-Easy Tool, Danish Blue Seam Binding, 1.5" Jute Ribbon (Really Reasonable Ribbon), mineral spirits, pop dots, Prismacolor Pencils: Periwinkle, Black


I'm submitting this to the following challenges:

Word Art Wednesday Challenge # 107 - Anything Goes.
Addicted to Stamps & More Challenge #72 - Make Your Mark

Blessings!

Kathy

Gift Bag Tutorial

Hi there!

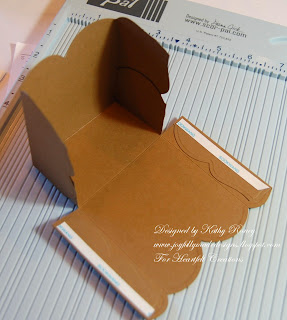
Here is the tutorial I did showing you how I made the gift bag for the Spellbinders Blog Hop using their Labels 23 Grand Die.


You can make this bag and decorate it for any occasion and it's pretty simple to put together!  I put together a little picture tutorial to show you how I did it...sorry I don't have a video camera...yet!

1. I started with the largest die from Labels 23 Grand Dies and cut it with Soft Suede Cardstock.


2. On the wrong side of the die cut, score edge to edge as follows: on the short side score down the outside scallop on each side, then on the long side score down either side of the center scallop.  Use picture as a guide.


3. On long side of die cut, cut score lines from outside to where the lines meet score lines from short side.


4. Score 2 corner flaps on one of the long sides 7/8" in from outside edge.


5. Turn die cut over and fold score lines, then snip off the outside corners of the 4 flaps (so they don't show when folded up)
.


6. Use Scor-tape to adhere folded flaps together.


7.Turn over to right side and add Scor-tape to the middle flaps.


8. Turn over and adhere to unfolded sides.  Add Scor-Tape to inside of folded sides.


9. Adhere to outside to complete bag.  The finished bag measures 3" x 1 3/4" and is 3" tall.


Here's a view of my project from above:


And a view of the back:


I hope you enjoyed my tutorial and have fun making these!

Blessings!

Kathy

Thursday, December 27, 2012

Time With...ODBD Heart Wall Hanging

Happy Thursday everyone!

Today is a special day for me at Our Daily Bread Designs' Blog!  It's my turn to do a project tutorial on their Blog

For my project, I have a wall hanging to show you.  Very simple to make and I think these make pretty gifts!  This is a picture of my Heart Wall Hanging...


You can read all about it and see my tutorial on their Blog here!

I'm submitting this to the following:

Word Art Wednesday Challenge #60 - Faith/Anything Goes
Really Reasonable Ribbon Challenge #62 - Anything Goes + Ribbon
Spellbinders Explore Beyond Challenge

I hope you like my project and tutorial and it gives you a little inspiration for gift giving.  I think this would be a nice Valentine's Day or Wedding Gift.  Please visit the ODBD Blog and check it out!

Blessings!

Kathy


Wednesday, March 28, 2012

Treat Holders - You Bless Me!

Hi there!

After doing the tutorial yesterday, I had the urge to make some for some special people in my life!  These are people that "Bless Me!".  I found the perfect stamp that I just received from Our Daily Bread Designs for the March Release, "Sentiments Collection".  I have a feeling I'll be using this set a LOT!

For some reason, I just don't like doing the same thing over and over, so each one of these is different.  I can never decide which one I like the best, so I just do a bunch of different ones!


I used the basic tutorial I did yesterday, but didn't do the "base" part.  I also used Spellbinder's Dies instead of a punch.

For the ingredients I used:

Stamps:  Sentiments Collection (Our Daily Bread Designs)
Paper:  The Watercolor Bouquet Collection (K & Co), Tea Party Designer Series Paper, Certainly Celery Pattern Paper (Stampin' Up), White (Georgia Pacific), Solar White (Neenah)
Ink: Onyx Black (VersaFine)
Accessories: Ribbons (Michael's & Really Reasonable Ribbon), 3 x 4 Treat Bags (Wilton), Crop-a Dile, Scor-tape, Modern Lable Punch (SU), Doily Lace Edge Punch (Martha Stewart), Classic Scallop Ovals Large Dies, Labels 20 Dies (Spellbinders), Arrow Border Edge Punch (E K Success).

That's it for now!  I hope you have a chance to try these treat holders out, they are super easy and make a cute gift!

Blessings!

Kathy

Tuesday, March 27, 2012

Easter Treat Holder Tutorial - My First Tutorial!

Hi there!

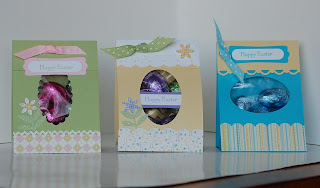
For a long time, I've been wanting to try writing up a tutorial.  Before I was a Mom,  a loooong time ago, I use to write training manuals and create new procedures at an insurance company.  So I figured I should be able to do tutorials!!!  Yesterday, someone asked me about the Easter Treat Holders I did a couple of years ago, so I thought the time was right and I would give a tutorial a try!  Here's what I came up with!

There's lots of different treat holder tutorials out there, but this is how I did mine a couple of years ago.   I used one from "The Ultimate Paper Crafts Collection's" "Valentine Treat Bags" by Linda Beeson for the bag base.  These are cute for any type of treat bag you need.  These are the Easter Treat Bags that I originally did and posted a couple of years ago.


Supplies:

One 2 3/4" x 9 1/2" piece cardstock
One  2 3/4" x 3" piece cardstock or coordinating paper (optional for bottom of bag)
One 2 3/4" x 2" piece cardstock or coordinating paper (optional for topper on bag)
Scor-Pal or scoring tool
Punches for border and window
Stamps
Ink
Ribbon
Crop-a-dile or other hole punch (optional)
Treat bags 3" x 4" (I used Wilton's)
Chocolate eggs or other treats


Step-by-Step

Step 1
Score the 2 3/4" x 9 1/2" piece cardstock at 3 1/2",  4 1/4",  5",  8 1/2".


Step 2
Fold cardstock in half at 4 1/4" score line.


Step 3
Fold the 3 1/2" and 5" score lines in opposite direction to form the bottom of the bag.


Step 4
Fold the cardstock at the 8 1/2" score line for the top flap.


At this point, you can decorate however you want.


For my Easter Treat Bags, I did the following:

Step 5
Score the 2 3/4" x 3" cardstock/designer paper at 3/4",  1 1/2", and 2 1/4".  (Note: If you use an edge punch, the length can be anywhere between 3" - 3 1/4" depending on the "waste" the punch creates.)


Step 6
Fold score lines as shown to fit bottom of the bag as it was done with the bag in steps 2 & 3.


Step 7
Punch border on one edge for the front of the bag.


Step 8
Adhere bottom mat to bottom of bag using scor-tape or strong adhesive.  Make sure pieces stay together well when folded.


Step 9
Punch window opening on front center with wide oval punch or other punch.


Step 10
For topper, score 2" x 2 3/4" piece cardstock at 1" and fold.  (Note: Picture shows piece 2 1/4" x 2 3/4" piece adding 1/4" for punch waste that I ended up cutting off.)


Step 11
Punch border on one end.


Step 12
Adhere to top of bag with scor-tape or other strong adhesive.


Step 13
Fill treat bags with treats, but not too full.  Add score-tape as shown.


Step 14
Fold in sides of treat bag to fit without sticking out on sides and adhere to score-tape on flap.


Step 15
Then adhere to front of bag to completely close.


Decorate as desired! 

On this one, I did 2 holes on top with a Crop-a-Dile and put ribbon through it.  There's tons of different things you can do with this basic bag!


Well, that's it, my first tutorial for my Blog!  I did this the same way the Split Coast Stamper Tutorials are usually written up to give myself something to go by.  I hope you find this useful and have lots of fun with it!  Lots of pictures and steps, I am a little detailed...hope I included everything though!

If you wanted to make a bunch of these, you could get 3 bags from one sheet of 8 1/2" x 11" cardstock.  I would probably try scoring first and then cutting the main piece for the bags the next time I did a bunch of these.

Let me know how I did, if it goes well, maybe I'll do some more!


Blessings!

Kathy