


Hi there!
For a long time, I've been wanting to try writing up a tutorial. Before I was a Mom, a loooong time ago, I use to write training manuals and create new procedures at an insurance company. So I figured I should be able to do tutorials!!! Yesterday, someone asked me about the Easter Treat Holders I did a couple of years ago, so I thought the time was right and I would give a tutorial a try! Here's what I came up with!
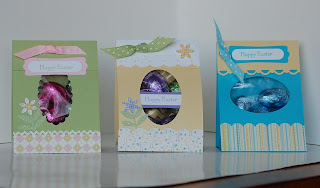
There's lots of different treat holder tutorials out there, but this is how I did mine a couple of years ago. I used one from "The Ultimate Paper Crafts Collection's" "Valentine Treat Bags" by Linda Beeson for the bag base. These are cute for any type of treat bag you need. These are the Easter Treat Bags that I originally did and posted a couple of years ago.


Supplies:
One 2 3/4" x 9 1/2" piece cardstock
One 2 3/4" x 3" piece cardstock or coordinating paper (optional for bottom of bag)
One 2 3/4" x 2" piece cardstock or coordinating paper (optional for topper on bag)
Scor-Pal or scoring tool
Punches for border and window
Stamps
Ink
Ribbon
Crop-a-dile or other hole punch (optional)
Treat bags 3" x 4" (I used Wilton's)
Chocolate eggs or other treats
Step-by-Step
Step 1
Score the 2 3/4" x 9 1/2" piece cardstock at 3 1/2", 4 1/4", 5", 8 1/2".

Step 2
Fold cardstock in half at 4 1/4" score line.

Step 3
Fold the 3 1/2" and 5" score lines in opposite direction to form the bottom of the bag.

Step 4
Fold the cardstock at the 8 1/2" score line for the top flap.

At this point, you can decorate however you want.
For my Easter Treat Bags, I did the following:
Step 5
Score the 2 3/4" x 3" cardstock/designer paper at 3/4", 1 1/2", and 2 1/4". (Note: If you use an edge punch, the length can be anywhere between 3" - 3 1/4" depending on the "waste" the punch creates.)

Step 6
Fold score lines as shown to fit bottom of the bag as it was done with the bag in steps 2 & 3.

Step 7
Punch border on one edge for the front of the bag.

Step 8
Adhere bottom mat to bottom of bag using scor-tape or strong adhesive. Make sure pieces stay together well when folded.


Step 9
Punch window opening on front center with wide oval punch or other punch.

Step 10
For topper, score 2" x 2 3/4" piece cardstock at 1" and fold. (Note: Picture shows piece 2 1/4" x 2 3/4" piece adding 1/4" for punch waste that I ended up cutting off.)

Step 11
Punch border on one end.

Step 12
Adhere to top of bag with scor-tape or other strong adhesive.


Step 13
Fill treat bags with treats, but not too full. Add score-tape as shown.

Step 14
Fold in sides of treat bag to fit without sticking out on sides and adhere to score-tape on flap.

Step 15
Then adhere to front of bag to completely close.

Decorate as desired!
On this one, I did 2 holes on top with a Crop-a-Dile and put ribbon through it. There's tons of different things you can do with this basic bag!

Well, that's it, my first tutorial for my Blog! I did this the same way the Split Coast Stamper Tutorials are usually written up to give myself something to go by. I hope you find this useful and have lots of fun with it! Lots of pictures and steps, I am a little detailed...hope I included everything though!
If you wanted to make a bunch of these, you could get 3 bags from one sheet of 8 1/2" x 11" cardstock. I would probably try scoring first and then cutting the main piece for the bags the next time I did a bunch of these.
Let me know how I did, if it goes well, maybe I'll do some more!
Blessings!
Kathy
For a long time, I've been wanting to try writing up a tutorial. Before I was a Mom, a loooong time ago, I use to write training manuals and create new procedures at an insurance company. So I figured I should be able to do tutorials!!! Yesterday, someone asked me about the Easter Treat Holders I did a couple of years ago, so I thought the time was right and I would give a tutorial a try! Here's what I came up with!
There's lots of different treat holder tutorials out there, but this is how I did mine a couple of years ago. I used one from "The Ultimate Paper Crafts Collection's" "Valentine Treat Bags" by Linda Beeson for the bag base. These are cute for any type of treat bag you need. These are the Easter Treat Bags that I originally did and posted a couple of years ago.


Supplies:
One 2 3/4" x 9 1/2" piece cardstock
One 2 3/4" x 3" piece cardstock or coordinating paper (optional for bottom of bag)
One 2 3/4" x 2" piece cardstock or coordinating paper (optional for topper on bag)
Scor-Pal or scoring tool
Punches for border and window
Stamps
Ink
Ribbon
Crop-a-dile or other hole punch (optional)
Treat bags 3" x 4" (I used Wilton's)
Chocolate eggs or other treats
Step-by-Step
Step 1
Score the 2 3/4" x 9 1/2" piece cardstock at 3 1/2", 4 1/4", 5", 8 1/2".

Step 2
Fold cardstock in half at 4 1/4" score line.

Step 3
Fold the 3 1/2" and 5" score lines in opposite direction to form the bottom of the bag.

Step 4
Fold the cardstock at the 8 1/2" score line for the top flap.

At this point, you can decorate however you want.
For my Easter Treat Bags, I did the following:
Step 5
Score the 2 3/4" x 3" cardstock/designer paper at 3/4", 1 1/2", and 2 1/4". (Note: If you use an edge punch, the length can be anywhere between 3" - 3 1/4" depending on the "waste" the punch creates.)

Step 6
Fold score lines as shown to fit bottom of the bag as it was done with the bag in steps 2 & 3.

Step 7
Punch border on one edge for the front of the bag.

Step 8
Adhere bottom mat to bottom of bag using scor-tape or strong adhesive. Make sure pieces stay together well when folded.


Step 9
Punch window opening on front center with wide oval punch or other punch.

Step 10
For topper, score 2" x 2 3/4" piece cardstock at 1" and fold. (Note: Picture shows piece 2 1/4" x 2 3/4" piece adding 1/4" for punch waste that I ended up cutting off.)

Step 11
Punch border on one end.

Step 12
Adhere to top of bag with scor-tape or other strong adhesive.


Step 13
Fill treat bags with treats, but not too full. Add score-tape as shown.

Step 14
Fold in sides of treat bag to fit without sticking out on sides and adhere to score-tape on flap.

Step 15
Then adhere to front of bag to completely close.

Decorate as desired!
On this one, I did 2 holes on top with a Crop-a-Dile and put ribbon through it. There's tons of different things you can do with this basic bag!

Well, that's it, my first tutorial for my Blog! I did this the same way the Split Coast Stamper Tutorials are usually written up to give myself something to go by. I hope you find this useful and have lots of fun with it! Lots of pictures and steps, I am a little detailed...hope I included everything though!
If you wanted to make a bunch of these, you could get 3 bags from one sheet of 8 1/2" x 11" cardstock. I would probably try scoring first and then cutting the main piece for the bags the next time I did a bunch of these.
Let me know how I did, if it goes well, maybe I'll do some more!
Blessings!
Kathy


These are so cute, and you did a great job with the tutorial! I haven't tried it yet, but I plan to, I'll let you know how I make out.
ReplyDeleteEsto es excelente,me encanto thank you very much
ReplyDeleteawesome tutorial...thank you for sharing
ReplyDeleteThese are the cutest treat bags!! The tutorial is great also! I have to try to make them, great idea!
ReplyDeleteKathy, girl, too cute!! I love treat holders of any kind and this one is perfect for just a little something! Thanks so much for sharing and putting the tutorial together! Sending you hugs and blessings, Sabrina
ReplyDeleteYou did great! I'm impressed with your detail. I am going to make these for my grandkids for an Easter treat. Can't wait to get started.
ReplyDeleteThanks for sharing!